rsrmoto_monster-titanium

Evo fork oil

Rrawlings

UKMOC Member
Joined
May 9, 2019
Messages
175
Location
Bradford
Bike
M1100evo
Hi all. Has anyone done a fork oil change on an evo? I want to get my bike setup after putting and Öhlins spring on the shock as per Luddite’s recommendation but thought it might be worth doing fork oil first. I’ve had a search but can’t find any specs on oil or quantity and anything on how to do it. I have the kit that I used for my daytona 675 so hope this will suit.
Thanks again in advance
 
Last edited:
Hi Ryan

The workshop manual recommends 7.5w oil with a level of 104mm (measured without springs and preload tube). Note that the manual says to use a special tool (88713.3203) to pump the oil into the various orifices. (Whether it's strictly necessary, I don't know.)


I'll post the relevant instructions from the workshop manual below but note that I can't show the pictures. If you like, I can send you the manual on CD and you can print off the parts you need.
 
Overhauling the front forks
Note
It is advisable to loosen the top cap (7) when the fork leg is still fitted to the motorcycle.
Note
The specific tools for the revision of the fork, are described in Sect.*3 -*4, Specific tools for the frame.
*
Loosen the spring preload adjuster before unscrewing the plug (7).
Unscrew the top cap (7) complete with the rebound damping adjuster.

Disassembly of the front fork
Restrain the counter nut (13) with a hex wrench.
Using another hex wrench, unscrew the plug (7), with its seal, from the cartridge (8).

Unscrew the counter nut (13) up to the final threads on the damper (8).

While restraining the spring (9) with one hand, withdraw the bush (20) sideways and then slowly release spring (9).

Slide off the spring (9).

Slide the preload tube (12).

Drain the oil from inside the leg by pumping with the outer tube (18) and the damper cartridge (8).

Warning
This movement generates pressure so that the oil will be rapidly expelled from the fork leg.
Aim the jet of oil into a previously prepared container and avoid contact with fork oil.
*
Block the fork tube/calliper unit (6) with a vice provided with protection jaws.

Unscrew the compression damping adjuster (3).
Remove the adjuster screw (3) and recover the seal (4).

Withdraw the damper assembly (8).

Slip the dust seal (15) off the outer tube (18), prising it off with a screwdriver.

Remove the circlip (17).

Important
Take care not to damage the fork tube - calliper unit (6) and the seat of snap ring (17) in the outer tube (18).
*
Remove the outer tube (18) from the fork tube - calliper unit (6), pull sharply outwards repeatedly to gradually displace the bottom bush (26).
Insert the tip of a screwdriver in the slit in the bush (11) and open it up sufficiently to slide the bush off the fork tube - calliper unit.
Remove the following parts from the inner fork tube:
-
bottom bush (26);
-
collar (27);
-
Sealing ring (21);
-
circlip (17);
-
dust seal (15).

Inspection of the front fork
Place the spring on a flat surface and measure the free length (L).
Service limit:
270*mm.

Replace the spring if the length is not within the specified limit.
Inspect the outer surfaces of both fork inner tubes and the internal surfaces of both outer tubes. They must be free from scoring, steps, or dents.
Check that the outer tubes are straight:
maximum allowed error 0.10*mm.
Whenever the inner tube is removed from the sleeve it is good practice to replace the bottom bushes (20) and (26).

Check the collar (27) for distortion in the area indicated. Replace if distorted.
 
Reassembly of the front fork
Lock the fork tube - calliper unit.
Protect the end of the unit with tape.
Important
Before installation, smear the sliding edges of sealing ring (21) with fork oil or oil seal grease.
Install the sealing ring (21) with the marked surface facing the dust seal (15).
*
Install the following components in the fork tube - calliper unit (6):
-
dust seal (15);
-
circlip (17);
-
sealing ring (21);
-
collar (27);
-
bottom bush (26);
-
bottom bush (11).


Note
Before assembling the fork tube - calliper unit with the outer tube, lubricate the bush sliding surfaces with fork oil.
*
Push the bottom bush (26) and the cap (27) into the external sleeve (18) using the sealing ring tool (F,*part no.*88713.3204).
Drive the oil sealing ring (21) into the outer tube using the same tool.
Fit the circlip (17) and the dust seal (15).

*
Important
The outer tube must freely slide on the fork tube - calliper unit. Only support the sliders and the outer sleeve with your hands to avoid damaging the sealing rings and the bottom bushes.
*
Insert the cartridge assembly (8) in the fork tube - calliper unit (6), screwing the tool 88713.3203 onto the cartridge.

Install the gasket (4) and the compression set screw (3) and tighten to the torque (Sect.*3 - 3, Frame torque settings).

Insert half of the prescribed quantity of oil in each fork leg (Sect.*3 - 2, Fuel, lubricants and other fluids).
Pump with tool 88713.3203 to force the oil to fill internal volume completely.
Slide both the damper and outer tube fully down the inner tube.
Pour the remaining oil into the fork leg and measure the oil level.
Important
Keep the fork leg vertical when measuring the oil level. Make sure the oil level is the same in both fork legs.
*
Recommended oil:
SHELL ADVANCE FORK 7.5 or DONAX TA
Standard capacity:
0.480*dm3 for each fork leg.
Standard oil level:
104*mm.
*
The quantity of oil affects fork response during the final part of the compression stroke.
High oil level increases compression loading, low oil level will decrease it.
Clean off any oil from the spring (9) and the counter nut (13) before refitting.
*
Install the preload tube (12).
Insert the spring (9), bush (15) and counter nut (13), with the conical side facing counter nut (26).


Screw the counter nut (13) onto the damper (8) with a wrench.

Using the same wrench, restrain the counter nut and screw the top cap (7) complete with the O-ring onto the damper (8).
Tighten the upper plug (7) to the specified torque (Sect.*3 - 3, Frame torque settings).
 
which is doubtless correct for maxton setup but bears little relation to factory spec
 
Thanks for the details Vince. How would you get the disk to me just by post? On searching for that special tool it showed up a description and some photos for a Diavel for rebuild and to be fair looked straightforward. Knowing the air gap is a bonus now as part of me was going to take them in bits and just put in the same amount that they had in oil wise.

My main concern is that the guy I’ve used for fork and shock services over the years and bike setup won’t touch Marzocchi forks he said things can go wrong in the process and require machining parts to put them back together. I really trust what John says so wondering what to do for the best. Brooks suspension is a 15 minute drive from me and their website quotes about £150 for the evo forks. Might be easiest and safest option
 
Thanks for the details Vince. How would you get the disk to me just by post?

Yes - I'm happy to post it to you. Just send it back when you're done. PM me your address if you want it.

If you're thinking of taking the forks to a specialist, you might also consider replacing the progressive springs with some linear rate ones tailored to your weight/riding style. I think Brook Suspension are K-tech agents aren't they? You could have K-tech springs fitted. I did think the springs just dropped in but I've since learned from Crawsue that they have to remove some material from the fork caps to make the springs fit. I'm sure Brook Suspension can give you more details. The lightest suitable K-tech spring is 8.5N/mm. If you want to go softer, then Maxton can accommodate you but they'll also have to make you a longer preload spacer as their springs are shorter than standard or K-tech versions.

I went with 7.5N/mm from Maxton and that's perfect for me.

http://www.ukmonster.co.uk/monster/showpost.php?p=559811&postcount=29
 
Hmm interesting I may have to have a chat with the people at Brook’s when they reopen in January. Thanks guys
 
An update and some photos from the rebuild.

I stripped the forks last week and changed the oil following the instructions in the workshop manual kindly sent to me by Luddite. Along the way some details were different inside my forks compared to the manual. The oil quantity of 480ml per leg gave me an air gap of only 70mm so I compared the amount of oil with what came out and to achieve the 104mm air gap had to remove roughly 65ml of oil using a depth gauge with some pipe attached to it and a syringe. The manual also mentioned a bush (item 20 in photo below) which did not exist in my forks. They appear to have never been apart as each part had paint dots from the factory from I presume when they were torqued up. I also made a tool to pump the cartridge, this was a piece of tubing with an M12 nut tacked on the end to allow me to do this and saved me the £50 I was quoted by Ducati for the tool.

Overall not a difficult job. If anyone wants any more info on how it is done I'm happy to help


Nicely done, Ryan! And I like the home made special tool - very ingenious.

Regarding the discrepancy in the air gap, did you measure it with or without springs, etc.? (The quoted figure is without springs.) Just for comparison, when my forks came back from K-tech with 8.5 N/mm springs, the air gap was given as 115mm. Since then, I've had 7.5 N/mm springs fitted by Maxton, but I don't know what air gap they used.
 
Spring out and preload tube out. I’ve never reread anything as much as the workshop manual in my life when the level was out.

Should I be worried about the missing bush from the instructions?
 
I shouldn't worry too much about the 'bush' mentioned in the manual, Ryan. It's a Ducati manual don't forget and we know that they're not always accurate!

I have a copy of the Marzocchi service guide for these forks and this type of fork comes in Ø43mm and Ø50mm versions. (The Evo runs the Ø43mm ones.) Only the Ø50mm ones appear to have the bush.


Disassembly instructions (note that the bush is only mentioned for the 50mm forks


Exploded view of Ø50mm forks (with bush)


Exploded view of Ø43mm forks (no bush)

So I think the guidance in the Ducati manual is probably just one of those idiosyncrasies we've come to know and love about Ducati!

I'd forgotten I had the Marzocchi service guide (sorry!) until I read your post, otherwise I'd have let you see it before you started work. If you'd still like it for future reference, PM me your email address and I'll send you a copy.
 
Vince as always you have put my mind at ease! I hardly slept last night mulling over the issue. I had a trip to Brooks suspension this morning and they said the same as you have. Can get the Evo back together now. Just got the brakes to bleed using a Mityvac and torque everything back to spec. Although I'm tempted to swap the PR4's whilst I'm at it for some Metzeler's
 
I've also noticed in the technical data on the workshop manual it states 445ml per fork leg so more discrepancies!
 
Glad to help, Ryan.

If you're thinking of switching to Metzelers, I can thoroughly recommend these, which I've been running for the last 12 months or so.


They seem to warm up much quicker than the Pirellis and feel a lot more confidence-inspiring in less than ideal conditions, such as on cold roads. Very neutral feeling with more than enough grip for my purposes.

Of, course, Metzeler and Pirelli are both part of the same group and I believe the rubber compounds used in both tyres are the same. It's just the construction and tread pattern that differ.

And, for what it's worth, the Marzocchi service manual recommends 425cc of 7.5w oil with an air gap of 110mm.
 
I'm going to try the M9RR that have recently replaced the M7RR that I have used on my Daytona previously and where the best tyres I've used. Although my dad is putting Roadtec 01's on the 2013 Speed Triple he has on Friday so may have to have a go on that and see what they perform like. I just need to replace the PR4's as I'm really not a fan of the lack of feel on what is going on they give
 
Vince do the roadtec 01's give any feeling as to what the front is doing? That is my complaint with the PR4's that are on there now they are just a round black thing with no hint of any guidance as to what is going on and the turn in is sluggish.

Chris your front end mods do seem intriguing I am considering the Andreani Cartridge set if the oil change has done little to change things. It would work out a little cheaper to do than the k-tech setup but as we all know cheaper is not always best but would give me more scope towards a shock change financially. Does anyone have any experience with the Andreani stuff? I know they are owned by the same group as Ohlins and reviews are good on things like MT-09's
 
Vince do the roadtec 01's give any feeling as to what the front is doing?

I had the exact same problem with the Pirellis as you, Ryan. I didn't get much feedback from the front. I'm sure the grip was there but it was sometimes a bit of a leap of faith tipping it into a corner, especially if conditions were less than ideal. I ran the Pirellis at 33 and 36 rather than the 36/42 in the handbook. That improved matters a little but they were still far from perfect. That's why I decided to try something different and, with universally good reviews, I went for the Metzelers.

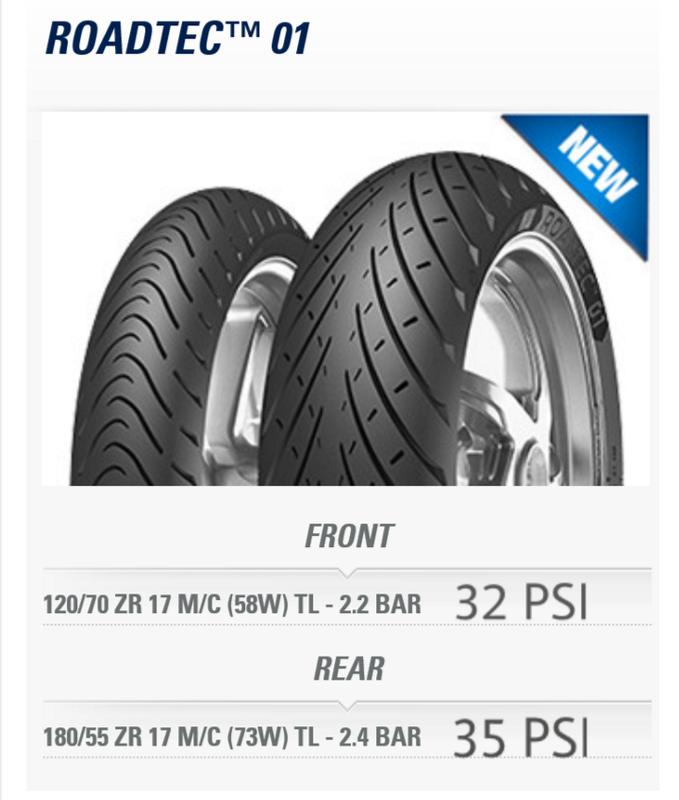
I fitted them last year and straight away they inspired more confidence than the Pirellis. I think the Metzelers have a less stiff construction than the Pirellis and I'm sure the ride is also slightly smoother as a result (I'm running these at 32/35).

I actually ventured out today for the first time since late October. It was less than 10° today and tarmac temperature probably half that and this was the first time I'd ridden on the Metzelers in cold conditions. Despite not having ridden the Monster for four months, the front end felt perfect - really planted and neutral tipping in to corners.

In similar cool conditions, I never really trusted the front Pirelli, which never seemed to warm up fully and always felt somewhat 'wooden'.

So, I'm really happy with the Metzelers and would certainly fit them again. I think they're going to last longer than the Pirellis too, so I shouldn't actually have to worry about that for some time!

Try your dad's Speed Triple and see how they feel to you. (By the way, what tyres were on your dad's bike before the Metzelers?)
 
Back
Top