Bikesure_adrianflux

Ducati 1000 DS custom build

buzzer

Registered
Joined
Jun 1, 2018
Messages
427
Location
Wolverhampton
Bike
M900
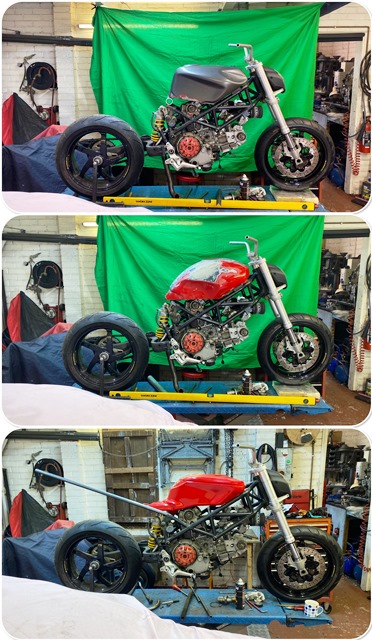
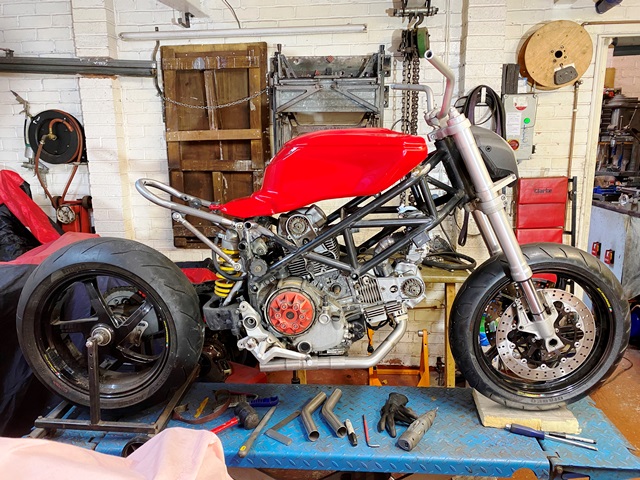
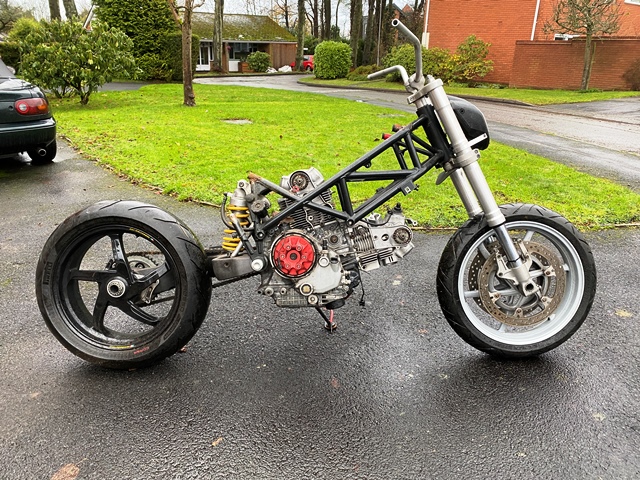
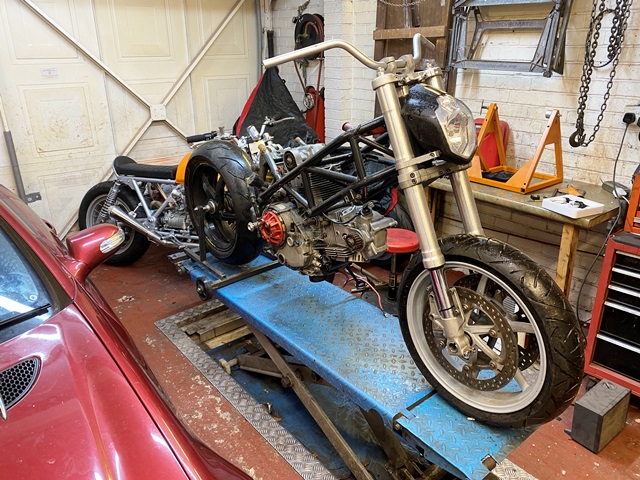
December 2022 and my Guzzi build is finished, So onto the next project, a Ducati Multistrada 1000 DS. *I bought this as an unfinished project and it has some nice parts with it... *light wheels, 4 pad brakes, and many more nice parts.

I wanted to make this build a bit different. I have in my head what it will look like, and some criteria for the build. It must be light, single seat, less old school, *Carbs (I like carbs!) underslung exhaust... no tail piece, and above all minimal... *I will ask myself do I need to fit this! *Here is where it all starts!
52573574618_0c88cd1366_o-copy.jpg


52573494245_3c690a27e9_o-copy.jpg


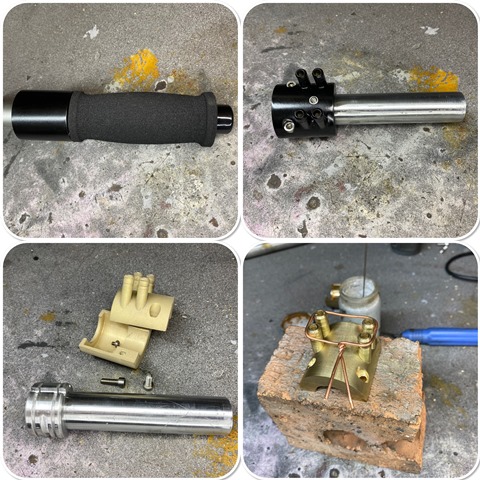
I have ordered a load of stuff, but due to strikes and the time of year nothing will be here till the new year… It was also very cold in the main workshop, and with the cost of heating I don’t want to put the central heating on in there so the first job on this build was to make the throttle of all things. I can do this in the side workshop which is small and cheap to heat! As I am using flat slides I want some positive means of closing them, which means a pull to open, pull to close set up. I tried splitters in the past to do this but disliked the action, so decided on a 4 cable throttle. I made similar for the Guzzi build and it worked well, so this is an enhanced version of that with a slightly smaller cable wheel as the Guzzi throttle is a little too quick… I refined my silver soldering technique after watching the repair shop, and I have to say it worked rather well!


52587722923_7cb4de3077_o-copy.jpg


52586835707_d0083057ab_o-copy.jpg


throttle-3-copy.jpg
 
Some winter reading….

Excellent news, will look forward to the build. :spin:
 
I wondered when the next one would come along! Crack on Tony :thumbsup:
 
As I wanted this to be different to the other builds, I tried several other tanks… I had an ST4 tank and a Monster tank that had too many holes to repair, so I cut these down… while I liked the ST tank, I couldn’t get the seat to tie in… I didn’t like the monster tank… So off to the bike breakers… he gave me the key to his storage unit... and said "say hi to the ghost!"


I walked around looking at the hundreds of tanks in there, discounting the plastic ones, of which there were many… the slope of the frame makes the choices limited... Nothing took my eye. Its a VERY old building though, and I have to say it spooked me somewhat being in there on my own, lots of creaking noises, and scuttling sounds which were probably rats... I didn't stay longer than I needed!

In the end I went back to the 999 tank I have used before. Another with some holes in the bottom where its rusted out.

52604526524_1f09c75a72_o-copy.jpg
 
Great stuff Tony,always love your build threads!!

Kimbo

Thanks!

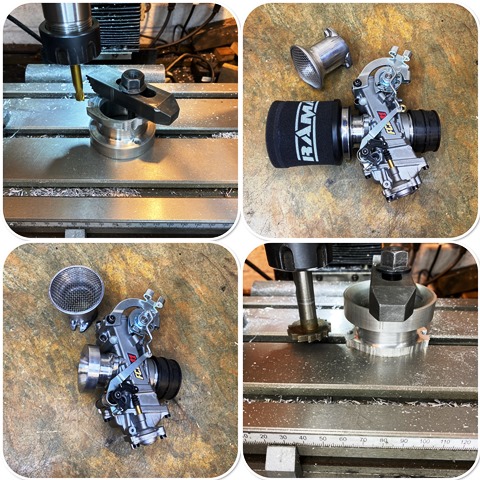
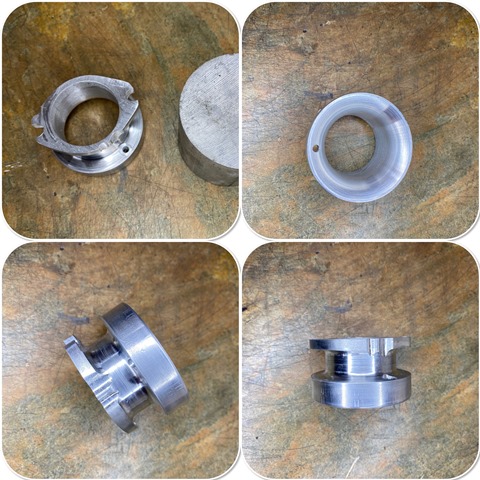
While I love the look of a nice velocity stack they are not really practical for the road, hence while I make them for the photos I take, I like to use foam filters on the road. this of course means I need some suitable adaptors, which although you can buy them are REALLY expensive. these took a while to machine out of billet! I sometimes get asked where I get my material from for the lathe and miller. I am really lucky that there is a scrap yard locally that lets me hunt through the bins! They take scrap in from some of the aerospace companies so there are sometimes some nice bar ends in the skips. What is great about that is the bar ends are often etched with the material specification!

I don’t usually pay as I take my scrap in there and he writes the value in the back of his desk diary, and then as I take stuff, he takes the value off! he has done this for me for over 30 years! A few years ago I went in early in the year… he was no longer there as he had retired and I learned that his grandson had taken the company over. We chatted and I mentioned about the diary as I had a few pounds credit… The lad said he knew all about it and it was in the back of the book!

bells1-copy.jpg


bells-2-copy.jpg
 
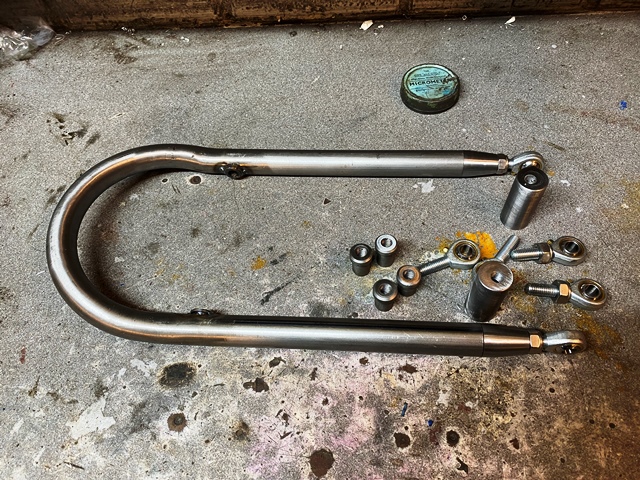
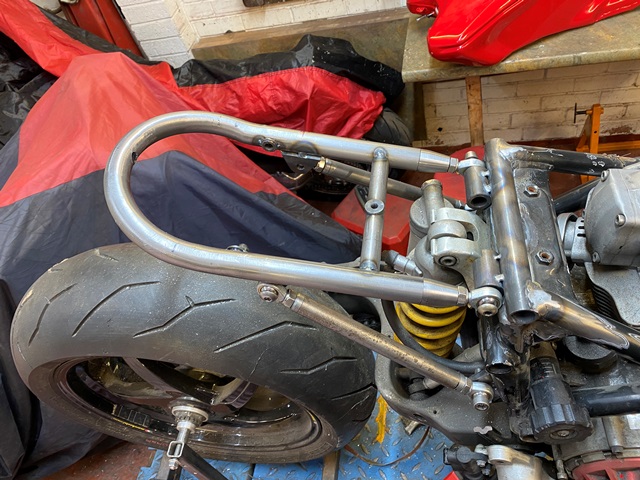
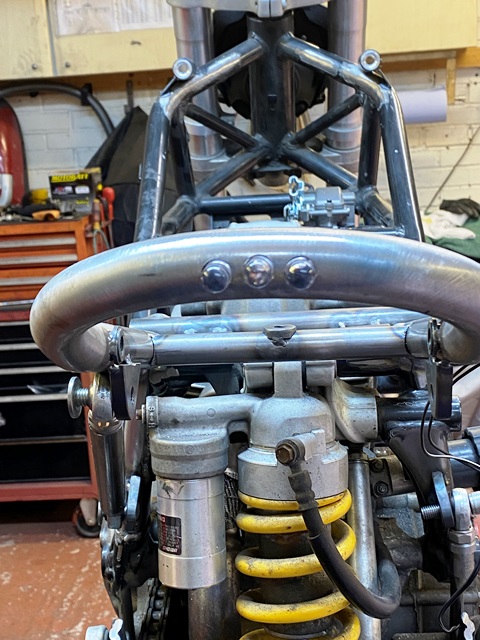
Time to start the fabrication of the back end. I decided to use some rose joints as I like the look they bring to a build. Experience has taught me to tack everything up first before welding fully! its going to be a very stubby back end, I have also used three 10mm LED as a stop and tail light. they are amazingly bright

rear-end-fab-7-copy.jpg


rear-end-fab-2-copy.jpg


rear-end-fab-3-copy.jpg


rear-end-fab-9-copy.jpg
 
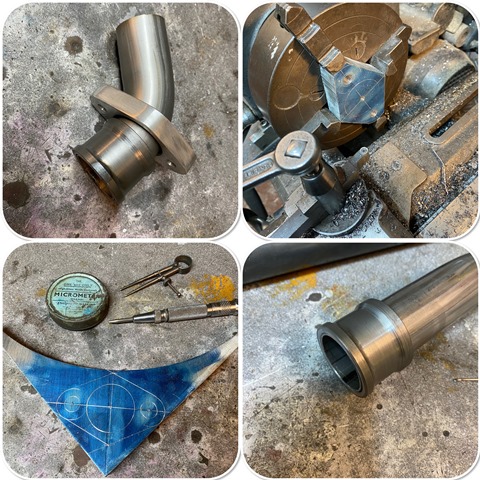
Making the exhaust retaining flange out of 15mm alloy plate was quick and easy…

As an aside, that tin of marking blue is 50 years old, given to me by my Dad, along with one of my treasured possessions, a 0 – 1″ micrometre when I was 15 years old. Not much left in the tin now, but its still usable.

The stainless steel collar however took an absolute age to make! I should have really used some stainless pipe, but its an odd size and I couldn’t get any that would fit, so I ended up machining it out of a solid piece of bar stock. I hate working with stainless… everything you do with it makes your life hard, just like the material!

exhaust-1-copy.jpg
 
I tried for a while to make a seat out of alloy sheet, and failed. the shape is just to complicated! in the end I decided on an alloy and glass fibre approach. I lifted the tank slightly so the finished seat will have some clearance, and then covered it with duct tape, followed by some tin foil to act a a release. This actually worked quite well! Cutting the foam to shape took a while and is a dusty job, but with the fan blowing on me and out the door it wasn't too bad. The key to using resin is the mix ratio... I used 2.5% as it was a cold day, in the summer that would have gone off in 5 mins! I will send it to the trimmer to do his magic... this is one of the few jobs I send out.


seat.jpg
 
To get the tank low, and get rid of the large pump mounting hole I had to cut the bottom out of the tank. easy enough with one of those 1mm cutting disks which I seem to use a lot of these days! I needed to make the infill patch and contour this to fit the hole. to make this easier I profiled it to the right shape by cutting some wood and pressing it to shape in the vice, then a bit of planishing to get it to the final shape.

The aim is to get the gap as small as possible to facilitate a nice weld. I used some 1mm mild steel plate which matches the thickness of the tank, so TIG welding is no problem on a low amp setting. I used a couple of magnets to position it before adding a few tacks all round. At this point I ran out of Argon... The last refill I bought was £65.. now its £104!

The outlet is made, but I need the filter fitting on the bike first so I can position it to get the pipe runs neat. Once this is welded on I can leak test.

tank-copy.jpg
 
I picked up the headlight and fuel filter brackets today... What a fantastic process waterjet cutting is! They were profile cutting a 150mm thick block of alloy while I was there! The jury is out on the brackets at the moment, but I am struggling to think of a better design

52637413883_cd4466a09d_o-copy.jpg
 
Sounds like you've had a great relationship with your scrap man & his grandson is a chip off the old block - happy days

Maybe swarf off the old billet would be more appropiate?

Those old multi stradas make great donor bikes and its not like you could make one less ugly.
 
Sounds like you've had a great relationship with your scrap man & his grandson is a chip off the old block - happy days

Maybe swarf off the old billet would be more appropiate?

Those old multi stradas make great donor bikes and its not like you could make one more ugly.
 
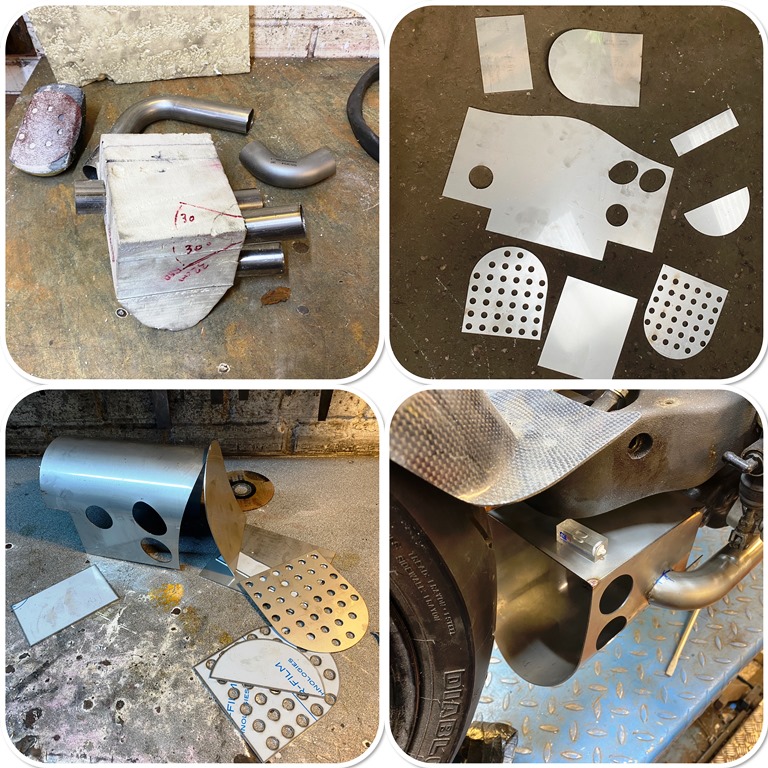
When i bought the bike it had a QD system on it… while I liked the concept, it was too big and heavy so I sold it on and decided to make an underslung exhaust of my own design. I wanted smaller and much lighter. I started with a mock-up of builders foam to get the shape and angles, and then moddled this in 3D. I did do a basic model on my iPad, but then found I had to pay to output it to a file! really frustrating! so I got my mate to do it and then had all the individual parts laser cut.

The baffle plates have staggered holes, which should quieten it down somewhat, but if not, I have a backup plan! Who knows if this will kill any performance? if I lose a few BHP so be it… but you never know!

here is a 1 min video of the process

https://www.youtube.com/watch?v=RgssU93IbPM

silencer-2.jpg


silencer-3.jpg
 
Shorter exhaust tend to rob torque esp. from a v twin. Which is why Termi full systems have all those spaghetti manifolds to maintain and improve gas flow using negative pressure created by the other cylinder. And it works 10% more torque/power on an S4 with nothing more than the exhaust. You can feel the torque come onto the pipe in a similar way to 2 stroke expansion chambers.
 
Shorter exhaust tend to rob torque esp. from a v twin. Which is why Termi full systems have all those spaghetti manifolds to maintain and improve gas flow using negative pressure created by the other cylinder. And it works 10% more torque/power on an S4 with nothing more than the exhaust. You can feel the torque come onto the pipe in a similar way to 2 stroke expansion chambers.

spot on... Lets see how it goes... i do expect to lose some performance... but these days its faster anyway than i can think!


Apart from a polish the exhaust is welded up and finished. I didn’t want to have distortion and burn through when attaching the baffles, so for these I used TIG braze which worked quite well.

The slip joints are held together with springs and to hold these I needed to make some spring hoops. These are actual quite difficult to make to get the bend just right and to a consistent shape. I made a little jig to make these.

silencer-4.jpg
 
While I admire all of your work and I do appreciate that the exhaust is not being built with performance efficiency at the top of the list, I must say that I've never been a fan of this type of exhaust.
On top of Darren's comments about long systems working better on these engines, the flow characteristics from having a short header leading to a weird shaped box containing weird shaped baffles and an exit through stubby tailpipes, none of which align with the natural flow direction must be awful.
However as usual, it is all being built faultlessly and I'll repeat .. I do understand that performance is not the major requirement here.
It still makes me whince a bit though.
 
It's a neat piece of work for sure. I've had a few goes at designing one of those Q-D Style boxes myself, but it's hard to get the length in the box without it becoming very bulky and defeating the object of minimalizing the visual impact of silencers. They are loud and inefficient too, so I've just gone down the route of doing away with exhausts altogether.
 
Back
Top