Bikesure_adrianflux

Fuel cap surround

Webbo

Registered
Joined
Apr 12, 2026
Messages
30
Location
Scotland
Bike
Other Not a Ducati
Hi
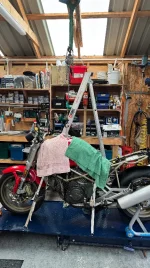
I am having trouble getting the fuel cap off the tank.
Taken the grub screws out, sprayed wd40 , used a wooden hammer handle, but still no joy.
Would appreciate any tips on how the remove it without damaging the tank.
.
 
So I’ve tried leaving overnight after a soak with wd40.
Tried pulling and levering with a wooden hammer handle but it won’t budge. Worried about denting the tank. Any ideas anyone?
 
Have you checked that you have released all the grub screws? Try tapping the surround to try and break the seal. I generally use a claw hammer passed into the tank and then pull up on it. Don't use it a lever, that will dent the tank!
 
Well that was a right ol’ job.
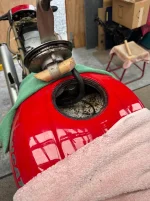
Finally got it out using a piece of wood inside the tank, a strop around it then hooked up to a 250kg chain lever hoist. It eventually came out but has rust all around the rim and internally.
Was going to strip out tank and try and clean the rust.
Any tips on what to use cleaning it out?
 

Attachments

  • IMG_8549.webp
    IMG_8549.webp
    106.3 KB · Views: 3
  • IMG_3214.webp
    IMG_3214.webp
    90.6 KB · Views: 3
Well done. I've never had one that stubborn!
Put some rubber grease round the O-ring when you put it back together.

I have used Deox-C with great success on one or two tanks and other parts. https://bilthamber.com/product/deox-c/
It comes as a powder to mix with water. Hot water is better and you can even put a heater in the tank to keep it warm if you have one, I've never bothered with that.
Remember to seal off the breather and drain pipes, and the two bigger fuel ones, before you fill the tank with solution.
If you've got something to keep the solution in when you empty it out of the tank, it will still be useful, especially if you can warm it up again.

Run a little clutch and brake cleaner round the tank and tip it out after you drain the solution, it will absorb any remaining water.

You're going to need to take the fuel pump and filter out. There's an in line canister filter high in the tank which should be renewed and a "teabag" at the bottom of the pump, that should go again unless it's holed or really badly choked.

Check the internal metal tubes that the cap breather and drain connect to. Make sure they are clear right through.
A thick wire wound guitar string is good for rodding those out if they are blocked. Sometimes they take some unblocking, but persistence prevails.
Deox-C can help. I use a syringe to get a bit of solution into the pipes. You can keep the rubber tubes on the top end, it helps get the solution in.

Come back when you're ready to put the cap back in and we'll tell you how to get the rubber top seal in place.. ;)
 
Ok, thanks for the tips.
I think I’ll get a new pump for it.Should I go genuine or aftermarket?
I have a filter and a length of submersible pipe.
Will replace the I ring and top seal as well.
Will get some Deox C and let you know when done👍
Thanks.
 
Got a little question.
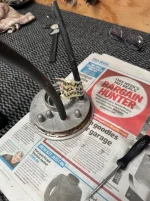
One of the breather pipes from the bottom of the rand mark “2” in pic goes under the seat and has a siliconed bolt stuck in the end.
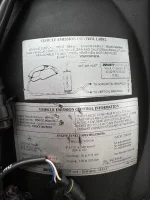
This is a US import and I think has part of the emission stuff removed.
Would it not make send that this pipe should be unblocked and join the other thinner breather down the back of the swinging arm?
 

Attachments

  • IMG_3222.webp
    IMG_3222.webp
    111.4 KB · Views: 4
That looks like the drain.
It is supposed to take any rain water or over-filled petrol away and the little hole for it beneath the cap should be on the left side when you re-fit the cap assy as that will be the lower side when on the side stand.
Definitely unblock that or water could fill the cavity below the cap and enter the fuel when you flip it open.
The breather and drain normally connect to a "y" piece quite close to the tank and run down the back of the crankcase with a little wire guide attached to the RH , rear of the crankcase with a Rawlbolt type fixing in the vacant hole just above the rear foot rest hanger bolt.
Maybe you already have the wire guide in place?
 
Wire guide is there. I think the other pipe went to this canister??
Anyway, I’ve chucked the tank surround into the ultrasonic cleaner, will blow through after.
No Y piece so will just run 2 separate pipes down the swing arm.
Thanks for your help.
 

Attachments

  • IMG_3232.webp
    IMG_3232.webp
    127.2 KB · Views: 2
The canister was a US emissions thing so that fuel vapour/fumes were filtered out/recirculated back into the engine.

Best to just vent both to atmosphere as breather and overflow, it's not like there are any fumes exiting it anyway but you do need to let air in or you'll starve the carbs/implode the tank.

I once took the kids out into the sea in my Dad's tender/dinghy which had a small outboard motor and I didn't open the fuel vent, got about 1/4 mile out and it stopped, took me ages to figure out why. ;)
 
😂 Did the same on our tender engine.

Will run 2 vents. Looking forward to starting it up.
Just received the Deox c so will attempt the tank at the weekend.
 
Did you have any problems with flash rusting after the Deox c treatment?
 
I used DEOX on mine. Cleaned it up a treat.

Gave it a good slosh around with petrol afterwards, didn't have any problems with rust. If you're not going to use it for a while swill some oil around in it to coat it.
 
Mine have kept clean with no visible re-rusting, but do soak up any residual water with clutch and brake cleaner which absorbs it almost instantly, but evaporates quickly too, so tip it out straight away.
Petrol, as mentioned by Crust, will absorb it too, especially E10, but you could leave that in for a while to check for leaks, as it absorbs and evaporates much slower than the C+B cleaner.
A bit of two stoke oil in the petrol would leave the oil on the surface of the tank after you swilled it round and tipped it out.
 
Back
Top