UK Monster Owners Club Forum » .: Technical :. » Mods & How To's » Another build thread - Ducati 1000

Reply
 
Thread Tools Display Modes
Old 30-10-2021, 10:21 AM   #181
Luddite
Registered User
 
Luddite's Avatar
 
Join Date: Aug 2011
Location: Southampton
Bike: M1100evo
Posts: 2,465
Here's a sentence I never thought I'd utter: "That numberplate hanger is a thing of beauty!"

Nice job.
Luddite is offline   Reply With Quote
Old 31-10-2021, 01:56 PM   #182
buzzer
Registered User
 
buzzer's Avatar
 
Join Date: Jun 2018
Location: Wolverhampton
Bike: M900
Posts: 392
Quote:
Originally Posted by Luddite View Post
Here's a sentence I never thought I'd utter: "That numberplate hanger is a thing of beauty!"

Nice job.
Thanks! I was rather pleased with it!

Funny how you think some jobs are going to be easy… I needed to bend some stainless steel rod into some hoops for the exhausts springs… easy enough I though, and tried to bend it over an 8mm bolt. After about the 5th attempt and failing to get a nice radius I ran out of rod.. I needed to think again! so I made this little jig and managed to finally get some nice even bends!

buzzer is offline   Reply With Quote
Old 01-11-2021, 10:12 AM   #183
buzzer
Registered User
 
buzzer's Avatar
 
Join Date: Jun 2018
Location: Wolverhampton
Bike: M900
Posts: 392
Started work on the wiring diagram… I always do one of these for a build, and invest some time in it as (1) its easier to design in stages, and ( 2) I think of the poor next owner trying to fault find in years to come! and (3) I can do it while she watches stuff like Strictly come dancing

Its not finished yet, but its getting there.

I did start to do it on my iPad on an App… which was a actually very good... but I got conned! after a few days it came up “your trial period is over – please pay” I wish I had spotted that in the small print before I started! so it was back to good old Microsoft Visio

buzzer is offline   Reply With Quote
Old 01-11-2021, 10:42 AM   #184
PPuxley
Registered User
 
Join Date: Apr 2021
Location: Reading
Bike: M900
Posts: 600
With you on item 3! In the room but not "In the room" Also I d add 4: I enjoy it, as the rare type who doesnt mind the leccy stuff
__________________
Golf-My favourite game. While my wife plays I'm in the workshop.
PPuxley is offline   Reply With Quote
Old 02-11-2021, 03:18 PM   #185
buzzer
Registered User
 
buzzer's Avatar
 
Join Date: Jun 2018
Location: Wolverhampton
Bike: M900
Posts: 392
Quote:
Originally Posted by PPuxley View Post
With you on item 3! In the room but not "In the room" Also I d add 4: I enjoy it, as the rare type who doesnt mind the leccy stuff
I really like the electrical side of a build... its quite satisfying...


First time in the sunlight for a while… the exhaust is now finished and I have added a heat shield to protect the underside of the seat, and some protectors for the stanchions.


buzzer is offline   Reply With Quote
Old 02-11-2021, 05:34 PM   #186
Jam911
Registered User
 
Join Date: Jun 2021
Location: Stratford Upon Avon
Bike: Multiple Monsters
Posts: 288
The pipework under the seat looks great
Jam911 is offline   Reply With Quote
Old 06-11-2021, 04:24 PM   #187
buzzer
Registered User
 
buzzer's Avatar
 
Join Date: Jun 2018
Location: Wolverhampton
Bike: M900
Posts: 392
Quote:
Originally Posted by Jam911 View Post
The pipework under the seat looks great
thanks! some hours went into the exhaust!

A little break today to do something I love doing… making things from scratch…. I have always liked the window in the cover on some of the bevel bikes, so I decided to make a window for the desmo valve gear…


buzzer is offline   Reply With Quote
Old 06-11-2021, 04:38 PM   #188
Luddite
Registered User
 
Luddite's Avatar
 
Join Date: Aug 2011
Location: Southampton
Bike: M1100evo
Posts: 2,465
How weird, I was just looking at some on the TRO Designs channel that I linked to in my earlier post...

Luddite is offline   Reply With Quote
Old 07-11-2021, 08:35 AM   #189
buzzer
Registered User
 
buzzer's Avatar
 
Join Date: Jun 2018
Location: Wolverhampton
Bike: M900
Posts: 392
Quote:
Originally Posted by Luddite View Post
How weird, I was just looking at some on the TRO Designs channel that I linked to in my earlier post...
that's where I stole the idea from
buzzer is offline   Reply With Quote
Old 07-11-2021, 08:38 AM   #190
Darkness
.
 
Darkness's Avatar
 
Join Date: May 2007
Location: Stockbridge
Bike: M900
Posts: 1,984
It shows clearly that the engine oil is getting up there in decent amounts, though takes a few seconds to get there on start-up!
__________________
Original and Best since 1993
Darkness is offline   Reply With Quote
Old 07-11-2021, 10:34 AM   #191
Luddite
Registered User
 
Luddite's Avatar
 
Join Date: Aug 2011
Location: Southampton
Bike: M1100evo
Posts: 2,465
Quote:
Originally Posted by buzzer View Post
that's where I stole the idea from
Well, you've done a fantastic job as usual and saved a load of cash in the process! (If the price of those TRO ones is anything to go by.)
Luddite is offline   Reply With Quote
Old 07-11-2021, 12:50 PM   #192
Mr Gazza
Lord of the Rings
 
Mr Gazza's Avatar
 
Join Date: May 2013
Location: Norwich
Bike: M900sie
Posts: 5,827
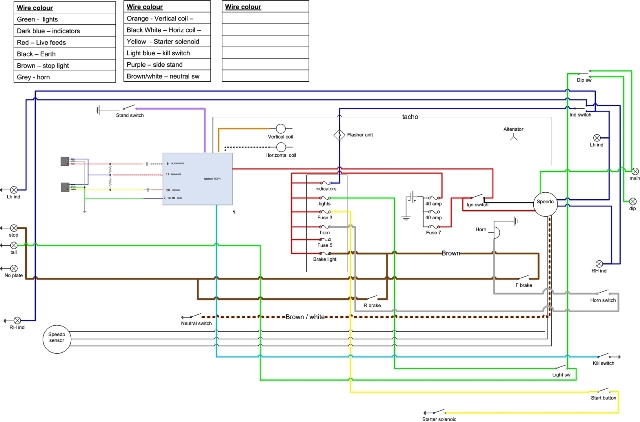
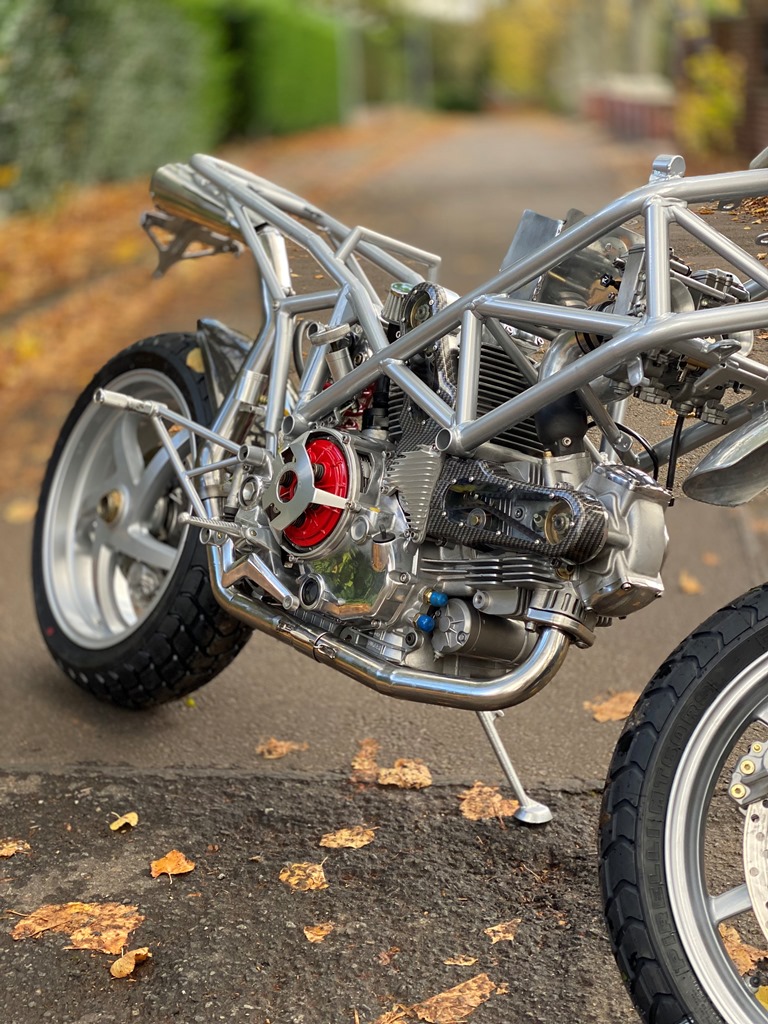
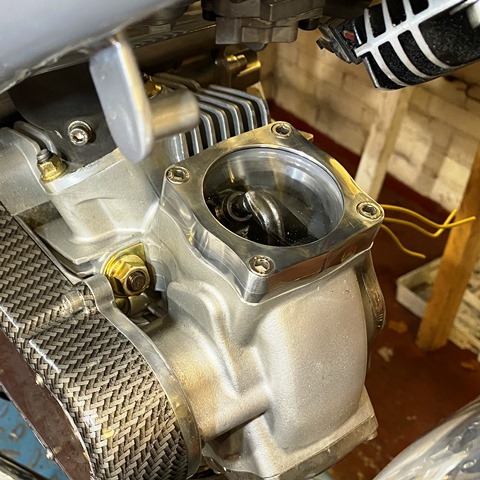
Interesting little mod. The window on the bevels was on the vertical bevel box to check that oil was arriving, as it takes about 30 seconds to reach the top apparently. Unnecessary on the horizontal one, as that gets it's oil first and besides the rev-counter drive is taken from there anyway.
Difficult to see the vertical covers on a belter I guess, but fun to have it on the horizontal I suppose.
Good to see from the video that it only takes about 4 seconds for the oil to reach the top valves.

Did you use a bit of float glass or is it something more exotic?
I remember a circle cutting demo when I worked at a place with resident glazers. Both cutting a disc like yours and also cutting a circular hole in a pane for an extractor or whatever.. If you can do that you know you can cut glass!..
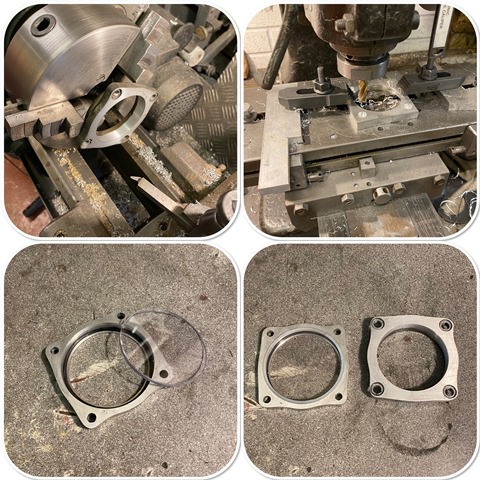
__________________
Mr Gazza is offline   Reply With Quote
Old 07-11-2021, 03:26 PM   #193
slob
.
 
slob's Avatar
 
Join Date: Jul 2003
Location: East London
Bike: Multiple Monsters
Posts: 9,713
indeed, from the second time you remove the horizontal exhaust rocker cover, you always have a drain tray underneath ;-)
slob is offline   Reply With Quote
Old 07-11-2021, 07:32 PM   #194
Ron1000
Registered User
 
Ron1000's Avatar
 
Join Date: Jun 2015
Location: Livingston
Bike: M1100evo
Posts: 863
Quote:
Originally Posted by buzzer View Post
Started work on the wiring diagram… I always do one of these for a build, and invest some time in it as (1) its easier to design in stages, and ( 2) I think of the poor next owner trying to fault find in years to come! and (3) I can do it while she watches stuff like Strictly come dancing

Its not finished yet, but its getting there.

I did start to do it on my iPad on an App… which was a actually very good... but I got conned! after a few days it came up “your trial period is over – please pay” I wish I had spotted that in the small print before I started! so it was back to good old Microsoft Visio

Autocad electrical, E3 or EPlan are your friend for doing electrical design work.
Ron1000 is offline   Reply With Quote
Old 10-11-2021, 02:02 PM   #195
buzzer
Registered User
 
buzzer's Avatar
 
Join Date: Jun 2018
Location: Wolverhampton
Bike: M900
Posts: 392
Ron 1000, thanks, I will take a look... I am using Visio 2003, so its getting on a bit now!

One of the things I like to do on any build is to rubber mount any electrical components, it gives them a much easier life. The coils and the rear number plate holder are therefore supported by rubber bushes with collars in them to isolate the components from vibration. The coil rubbers are a standard size, but I needed to have a custom pair for the rear number plate as it was a none standard size. Rubber is almost impossible to turn… I read people put it in the freezer and use a very sharp tool, but in my experience that simply does not work… What does work is grinding it. Here is a 30 second video of widening the groove in a rubber bush in the lathe with a cutting disc in a Dremel.

https://www.youtube.com/watch?v=6-vn8Qtouss

buzzer is offline   Reply With Quote
Reply


Posting Rules
You may not post new threads
You may not post replies
You may not post attachments
You may not edit your posts

BB code is On
Smilies are On
[IMG] code is On
HTML code is Off

Forum Jump


All times are GMT. The time now is 04:17 PM.

vBulletin Skins by vBmode.com. Powered by vBulletin® Version 3.8.3
Copyright ©2000 - 2024, Jelsoft Enterprises Ltd.