UK Monster Owners Club Forum » .: Technical :. » Engines, Clutch, Gears » Guide: Valve Clearances, Shims and Seals. (Pic Heavy)

Reply
 
Thread Tools Display Modes
Old 03-09-2018, 12:41 AM   #1
Macflurry
Registered User
 
Macflurry's Avatar
 
Join Date: Mar 2018
Location: Blakeney
Bike: M900
Posts: 134
Guide: Valve Clearances, Shims and Seals. (Pic Heavy)

Hi guys, thought I'd try and give a little back to the community as a new member. I've had problems with oil ending up on my spark plugs so before going to the extent of stripping out the heads and swapping out o-rings and piston rings I thought that I would start by ruling out the easy options first. So while going in to change the valve stem oil seals it gave me a chance to go through checking the valve clearances and also to measure up the shims for replacements if needed. Now, in reading up online I found an abundance of information with a million different ways to achieve the same end results but what I did notice was that everything I was after was scattered across several places or didn't quite answer my questions. So I've tried to put together all the info that I found useful as I went through the work. I've tried to keep it as comprehensive as possible and aimed it at someone like myself who was going in from scratch knowing nothing, but anything that I've missed or anything that you guys find wrong then please let me know and I'll happily get it changed to make it accurate for members to use in future.

Before I get started I want to point out that this isn't only my first Ducati, it's my first bike too. I've only had it a couple of months and I'm going in at the deep end. I've had it out on the road three times and already stripped, re-jetted and rebuilt the carbs, then swapped the seals and looked at the clearances, and from here I'm going onto removing the heads... so if this post goes well then that one may follow. As I am new to working on bikes then some of the seasoned pro's on here may cringe at how I go about some of this but, again, it's a learning curve. Tell me what I've done wrong and I'll happily get it changed out to improve the thread.

This thread will be pretty big so I've reserved the first few posts to break it up and I'll build it up over the next few days. This will be a work in progress for a while but bear with me and hopefully it'll be a worthwhile guide.

The thread will be broken down as follows:

1. Desmo’, how it works.
2. Checking valve clearances.
3. Removing/refitting shims
4. Measuring shims.
5. Swapping out valve seals.
6. Additional Info
7. Remarks

*** Usual disclaimer: The info contained in this thread is what I have pieced together to use on my own bike. I am very definitely not a mechanic. Use this information at your own risk as it worked for me but may not gO so well for you. I am not responsible for the work you carry out on your own bike. Do your own research, find your own sources, put together your own plan that you're happy with and if in any doubt ASK A PROFESSIONAL!! ***

Cheers guys, enjoy the thread.
Macflurry is offline   Reply With Quote
Old 03-09-2018, 12:42 AM   #2
Macflurry
Registered User
 
Macflurry's Avatar
 
Join Date: Mar 2018
Location: Blakeney
Bike: M900
Posts: 134
1. Desmo’, how it works.

Understanding how the demo’ system works and what it does helps to understand what you are checking and why with your valve clearances and then also what you are trying to achieve by adjusting them.

I said earlier I would try to cater for everyone from the ground up, so...

Engine basics - The four stoke engine works using the phases shown in the picture below.


Image from http://web.mit.edu

1. The intake stroke opens the inlet valve and draws in the air/fuel mixture on the pistons down stroke.
2. The compression stroke closes the valves and seals the chamber to build up pressure on the pistons up stroke.
3. Spark ignites the air/fuel mixture and the combustion forces the piston down.
4. The pistons down stroke is called the power stroke as the downward force from the combustion creates the power that turns the engine over.
5. At the end of the power stroke the exhaust valve opens for the exhaust stroke allowing the piston to force the exhaust gas out past the valve. At the end of the exhaust stroke the exhaust valve closes and the cycle starts again.

This is a very loose description of its operation but you get the idea.

Traditionally most bike engines work by using the camshafts in the cylinder head to push open the inlet and exhaust valves, when required throughout the phases of the cycle, using rockers. Then, as the cams rotate past the rockers, springs are used to force the valves closed. But, the springs take time to kick in and force the valves closed. Enter the desmodromic system...

Over the years Ducati have developed the desmo’ system which uses cams and rockers to open the inlet valves, as above, but also uses a second set of cams and rockers to mechanically close the valve when required instead of relying on the springs.


Image from http://www.ducati.com

The image above is taken from Ducatis website and shows the components of the desmo’ system. The blue camshaft at the top centre runs through the heads and has a cam for each of the rockers. The two red rockers at the top left and top right control the openers. As the arm in the centre is pushed up by the cam the arm at the opposite end pushes down on the opener shim on the top of the valve, in yellow, and forces the valve open. As the cams turn further the opener is released and the closer cams press on the rocker arms, at the bottom centre, causing the opposite end to push against the closer shim and force the valve closed. This process then repeats throughout the combustion cycle.

Ducatidesmo.com have produced an animation that clearly shows the operation of the desmo’ system using cams to force the valve open and closed.


Image from http://ducatidesmo.com

When the system is set up properly the cam should hold the rocker arm as flush to the closer shim as possible as it passes so that the cam seals the valve to its seat as best it can but not so tight that it causes binding. A gap is left between the opener arm and the opener shim to ensure that the valve isn't inadvertently keep the valve forced open when it isn't required to be. Over time, as the valve repeatedly hits the seat as it closes it will bed itself further into the head causing the gap to increase between the rocker arm and the closer shim and also the gap to decrease between the rocker arm and the opener shim. On Ducatis picture above you will notice a spring, again in yellow, attached to each of the closing rockers. This is to take up the last of the slack on starting and idle to ensure that the valve fully closes at low speeds if the closer gap gets bigger.

Last edited by Macflurry; 03-09-2018 at 02:02 AM..
Macflurry is offline   Reply With Quote
Old 03-09-2018, 12:43 AM   #3
Macflurry
Registered User
 
Macflurry's Avatar
 
Join Date: Mar 2018
Location: Blakeney
Bike: M900
Posts: 134
2. Checking valve clearances.

The factory spec's for the valve clearances, taken from Ducati Monster 900 Workshop Manual, are as follows:

2v engines.

Opening Rocker

Inlet, mm/in. 0.10-0.12/0.0039-0.0047
Exhaust, mm/in. 0.12-0.15/0.0047-0.0059

Closing Rocker

Inlet and exhaust, mm/in. 0.03-0.05/0.0012-0.0019

4v engines have different recommended clearances.

Before measuring any of your own clearances ensure that the engine is as cold as possible, ideally left overnight!!

When you read around there are various alternative measurements that are offered up, each for their own reasons to the person who uses them. The following table has been put together to show the various settings from sources ranging from manufacturer, professional engineers, enthusiasts and magazine articles. From here you need to read around and decide whose methods suit you best for your application. There’s no right or wrong answer just different opinions on how to approach the adjustments. But from what I’ve read across them all a sensible approach is to not aim for the smallest reading possible.

Closers: Ideally under 0.001” but not so tight that it binds although anything up to 0.002” is good.

Openers: Ideally aim to adjust for 0.004” or very slightly over.
If in doubt call a Ducati specialist for advice.

Online recommended Settings


Carrying out the valve checks.

1. Before you start put the bike into its highest gear so you can turn the engine over using the rear wheel and put it up on a stand. Tools are available to turn the engine over by hand but they can be pricey from Ducati.

2. If you are working on the vertical cylinder then you need to remove the seat, the tank, the battery and battery tray to make as much space as possible around the cylinder head.

If you are working on the horizontal cylinder head then the bolts securing the oil cooler need to be removed along with the bolt for the oil feed to the carb’s so that the cooler can be lowered out of the way. I also had to remove the mud guard to get the cooler fully out of the way.

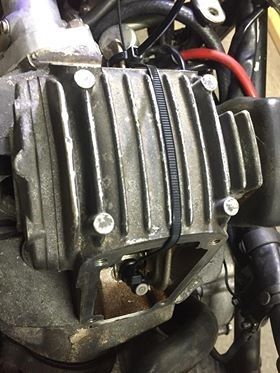
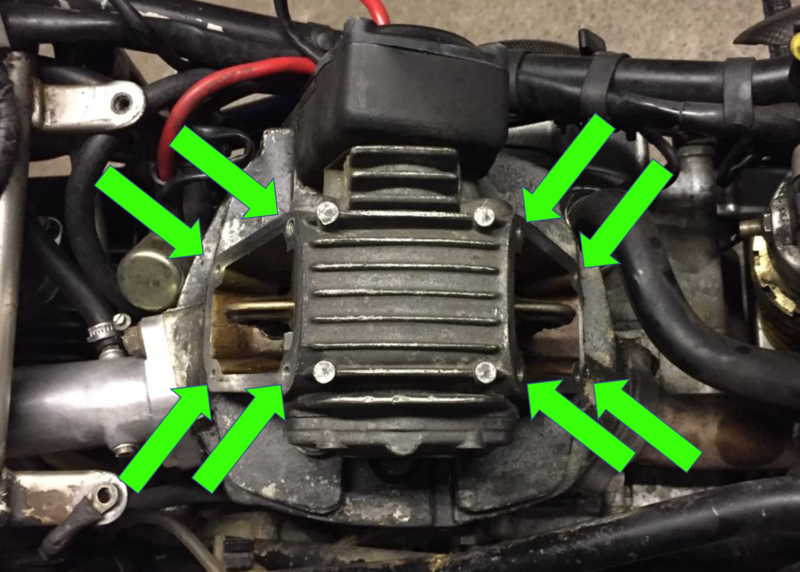
3. Once you have sufficient access to the cylinder head remove the four bolts on each of the inspection covers to expose the valves, rockers and shims. This also allows you to view the rockers and see the valve states as the engine is rotated.


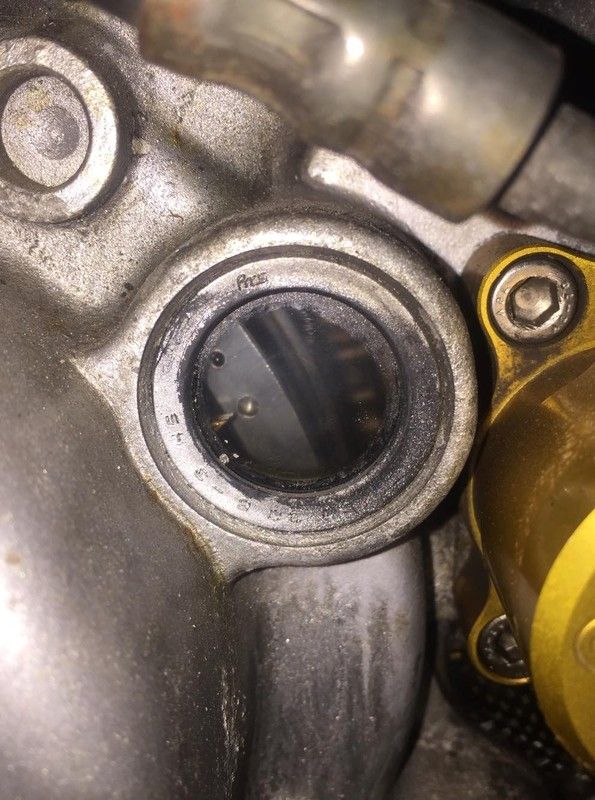
4. Remove the spark plugs and then using the rear wheel, turn the engine over by hand until you line up the arrow marker in the bottom left with these lower of the two marks on the side of the flywheel through the inspection window.


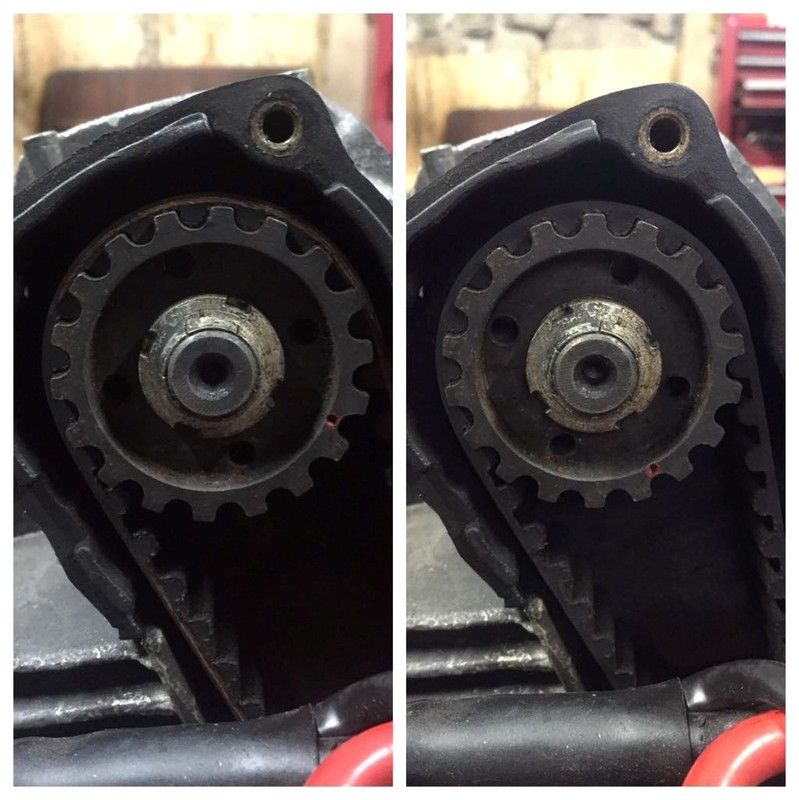
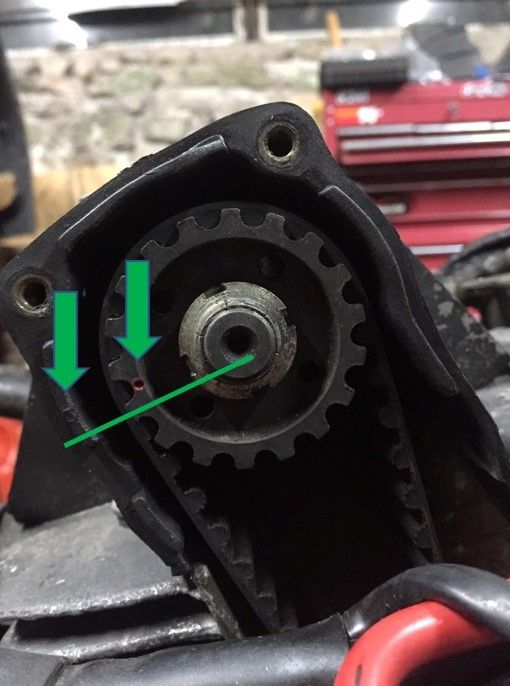
5. Now that you’ve found top dead centre (TDC) the question is which one? The horizontal and vertical cylinders both reach TDC at different times. Every time the flywheel passes through this marker one of the cylinders reaches the top of its cycle. The easy way to tell which has reached the top is by sliding a screw driver into the spark plug hole and checking which one hits a piston. Another way is to remove the top belt cover on the back of the vertical cylinder and check where the pulley marker is. If the indentation on the pulley is lined up with the plastic mark on the casing to the left then the horizontal cylinder is at TDC. If the pulley marker is at the 4 o’clock position then the vertical cylinder has reached TDC.
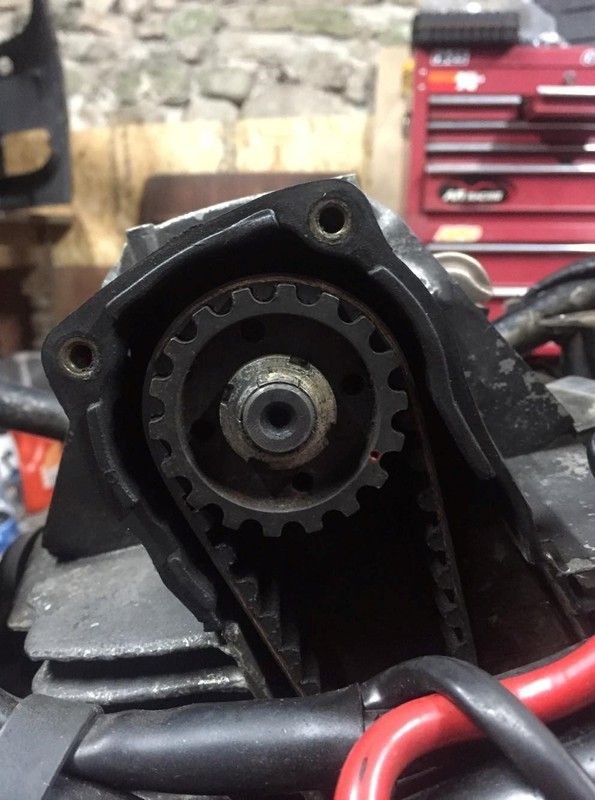
Last edited by Macflurry; 03-09-2018 at 08:44 AM..
Macflurry is offline   Reply With Quote
Old 03-09-2018, 12:43 AM   #4
Macflurry
Registered User
 
Macflurry's Avatar
 
Join Date: Mar 2018
Location: Blakeney
Bike: M900
Posts: 134
6. Working on the cylinder at TDC you will next check the opener and closer clearances. At TDC both valves should be closed meaning that there should be no pressure on the opening rocker, and so there should be a gap between the rocker and the shim, as well as the cam having pressed the closer rocker shut which should leave virtually no gap between the rocker and the shim. There is more than one way to check clearances but here we will check them using the unloaded and loaded gap.

The unloaded gap is when measurements are taken with no pressure on the closer rocker and the loaded gap is where measurements are taken with pressure is applied to the closer rocker as follows.

7. Unloaded gap.

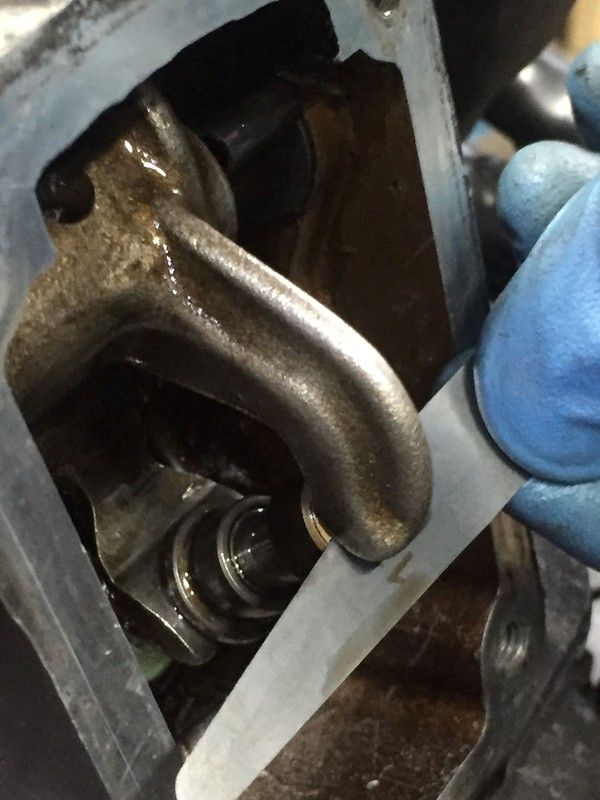
With the valve in the closed position, at TDC, leaves no pressure on the opening rocker, the unloaded gap between the opener shim and the rocker is measured as the opener clearance and the values noted and compared to the clearance requirements.

The right feeler gauge should slide all the way through the gap without force and has been likened to sliding the feeler gauge through a thick book. If the feeler is too big then there is too much pressure required, the gauge will snag and will need to be forced through.


8. Loaded gap.

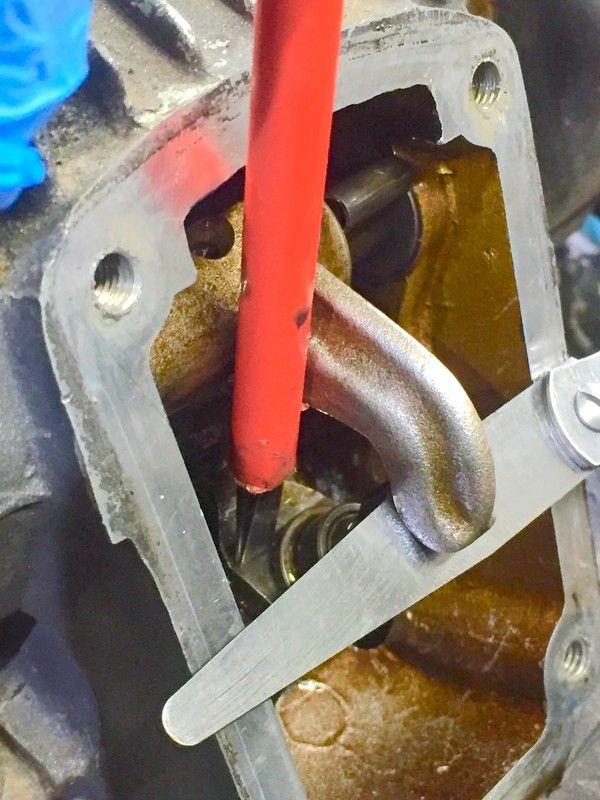
Still with the valves in the closed position, at TDC, the gap between the cam and the closer rocker, and then the rocker and the closer shim, should be at a minimum. As wear and tear increases these gaps the slack is taken up by the closer spring to fully seal the valve. If the closer rocker is pressed down with a screwdriver you can feel the rocker move through the gap that has grown. To measure the closer clearance, remeasure the opener gap, as in the previous step, but with a screwdriver pressing down on the closer rocker and note the value. This gap will now be bigger than before. To find the closer clearance simply subtract the value previously found for the opener clearance from the loaded gap measurement. The figure that’s left is your closer clearance.


9. Note down all measurements, opener and closer clearances for the inlet and exhaust valves on the horizontal and vertical cylinder heads, so 8 measurements in all. Check these against the clearance spec’s you wanted at the start and decide which shims, if any, you need to adjust to bring the clearances back into spec’. To work out the new shims needed you need to measure the old ones and add or subtract the amount the clearances were out of spec’.

Last edited by Macflurry; 03-09-2018 at 01:02 AM..
Macflurry is offline   Reply With Quote
Old 03-09-2018, 12:44 AM   #5
Macflurry
Registered User
 
Macflurry's Avatar
 
Join Date: Mar 2018
Location: Blakeney
Bike: M900
Posts: 134
3. Removing Shims.

1. To adjust the clearances, you need to remove the old shims and measure them to calculate the new sizes. First up block the oil drain in the bottom left of the picture with an allen key or an ear plug to stop anything that you’re working on dropping down. Then pry the black retaining clip in the top right off. Be careful as these can go flying across the room.


2. With the retaining clip removed the opener rocker arm can be slid to the side. I found that to do this I had press the closer rocker and valve down out of the way. To press the closer and valve down further I had to move the cam pulley to just before or just after TDC depending on which valve I was working on. With the valve out of the way the opener rocker can drop slightly and move to the side exposing the opener shim. The opener shim can now be pulled off from the valve.


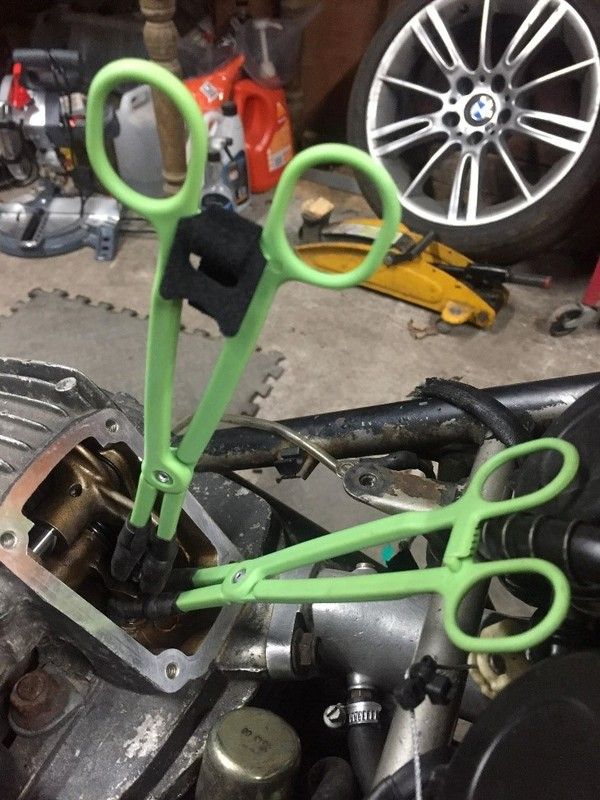
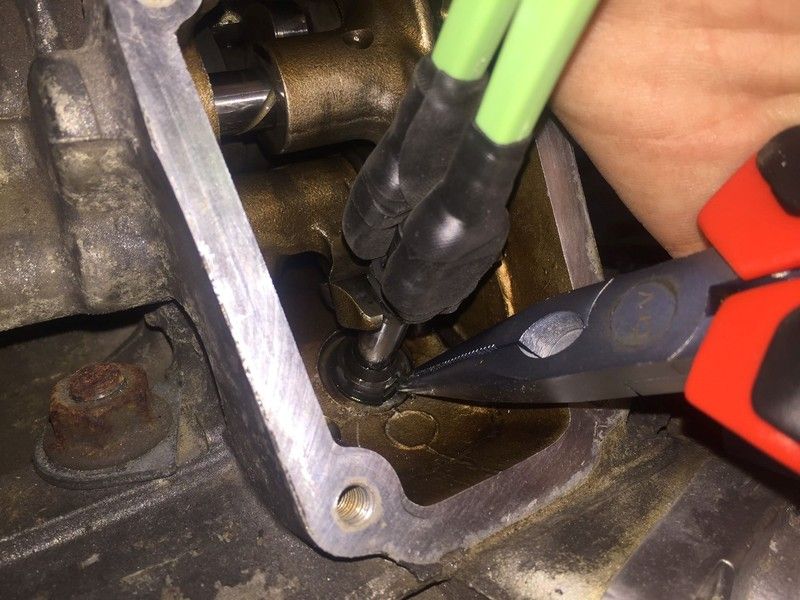
3. To remove the closer shim the closer rocker needs to be pressed all the way down so that the closer shim can be slid down the valve and the retaining collets can be removed. To press the closer rocker down the cams must be rotated to before or after TDC. But BEWARE, once the collets are removed there is nothing to stop the valve falling into the cylinder. One method I heard to prevent this was to fill the cylinder/head with rope through the spark plug hole, another was to use a long zip tie around the stem and weight the end of the tie with mole grips so the weight stops it falling and a third way that I read was to use forceps to grip the valve. I had a go with all three.

a. The rope worked but I was always wary that I hadn’t filled it enough, that as I worked the rope may shift and that I may be leaving debris in the cylinder. When you turn the engine back to TDC to compress the rope against the head it may compress and move too far so you cant depress the rocker as far as you need to remove the collets. So it’s a balancing act.

b. If you zip tie the top of the valve to remove the collets you then need to use another zip tie at the base before cutting the first off to remove the shim. If you just go for zip tying the base it may get in the way of the rocker depending on the size of the ties that you have. You also need to ensure that they are ratcheted right up as the valve can slip through the loop if you’re not careful, or put a slim piece of electrical/self amalgamating tape around the valve for the tie to bed into. That should help with slipping. Instead of mole grips as weight I also tried attaching the zip tie to the opposite rocker, with another zip tie, to hold the valve up.


c. I ended up going with the forceps method but it isn’t without flaws. I used two sets in the same places the zip ties were tried and they are quick and easy to switch between the two but they can be slippery so you need to double check they are locked and gripping before removing the second set. I wrapped self amalgamating tape around the tips and also cut half of the loop tip off to make them smaller to work around. If I was feeling paranoid about how well one was ripping I used a Velcro tie around the ratchet to stop it popping open.


Last edited by Macflurry; 03-09-2018 at 02:03 AM..
Macflurry is offline   Reply With Quote
Old 03-09-2018, 12:45 AM   #6
Macflurry
Registered User
 
Macflurry's Avatar
 
Join Date: Mar 2018
Location: Blakeney
Bike: M900
Posts: 134
4. My multitasking skills weren’t up to scratch to take pics for the next part so you’ll have to make do with an alternate pic. With your valve secured and cams moved away from the TDC point you are ready to press the closer rocker down and slide the closer shim down the valve stem exposing the collets. Working out how far to move the cams/pulley was a lot easier with the head off as you can twist it until it stops on its own just before the opposite valve would be about to open. When doing it with the back wheel it’s a bit more of a guessing game as to how far you’ve gone. With the collets exposed a magnet will easily whip them out safely and reduce your chances of dropping them down the oil drain… you did plug that up right??

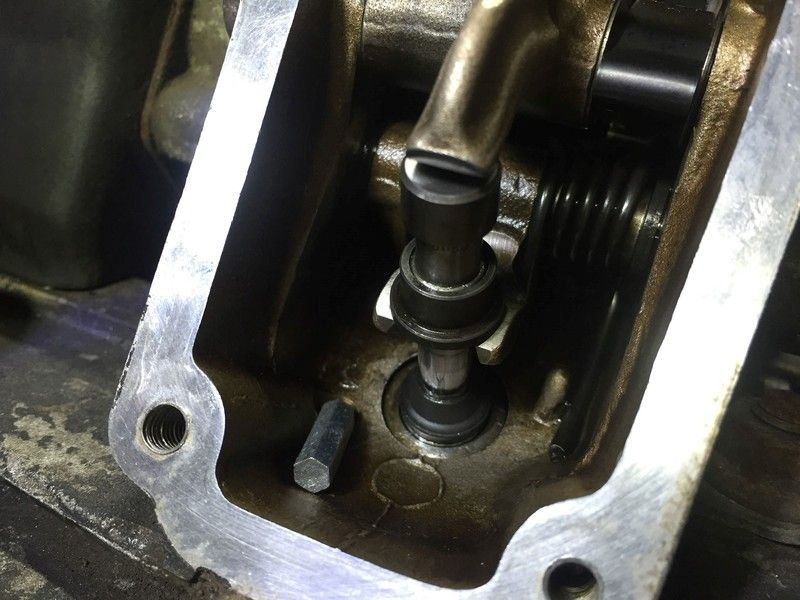
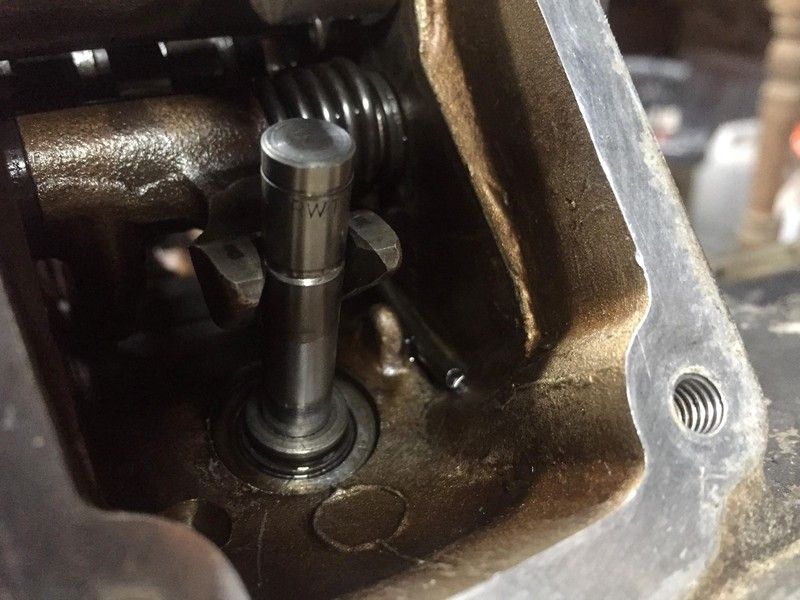
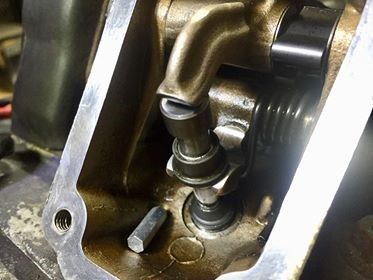
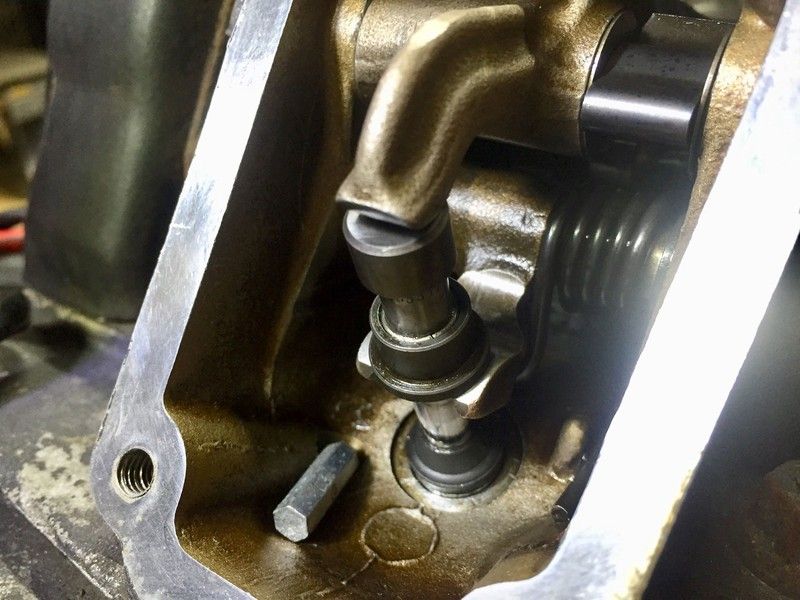
The image below shows the shim and collet removed but you can see that it’s a pretty big groove that you’re looking to completely expose so you’ll definitely know when the shim has moved out of the way enough. The face of the rocker either side of the groove can be pushed all the way to the bottom leaving plenty of room to remove the collets but the problem you will have is not having enough hands!! The difficulty comes with pressing the rocker down without slipping, sliding the shim down without moving the valve down, grabbing the magnet to get the collets out and also moving the collets around the groove if you cant get to the one at the back. Go slow, have patience. Don’t put a screwdriver on the shim, it’s bad enough using one on the back of the rocker, the lip is small and will be guaranteed to slip off and damage something like your valve stem seal or worse your hand (done it, not as fun as it sounds)!!

With the collets removed the shim can be slid up and off of the valve. For peace of mind at this point spin your wheel so the cylinder is back to TDC. In the event that something disturbs your zip ties or calipers you won’t lose the valve into the cylinder. I’d recommend doing them one by one so you don’t accidentally mix up parts as they are measured and refit.


Refitting.

1. Once your new shims arrive then refitting is the opposite of the removal process. But are a couple of points to note:
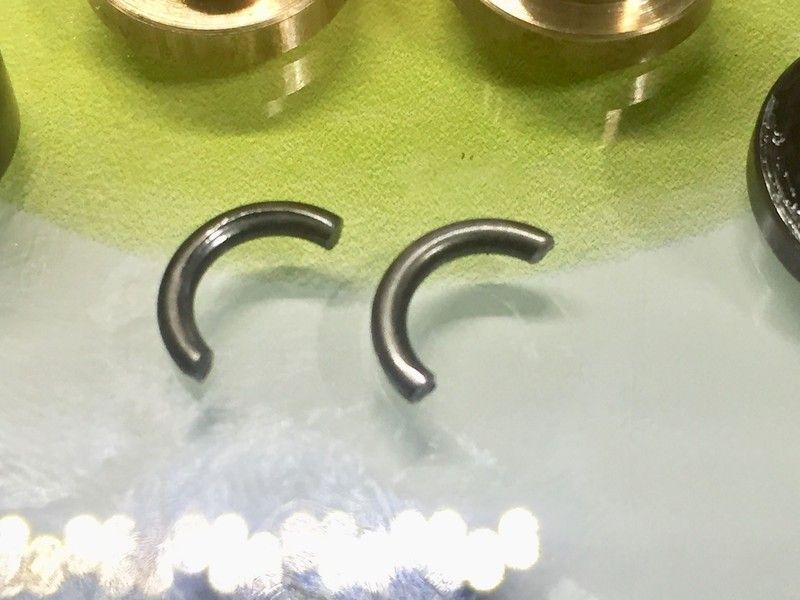
a. Collets – indentation. If you are reusing your collets then you will notice that over time a groove has been made into the inside of the collets one side. When refitting this should be on the top side of the collets as it was caused from being repeatedly pressed against the corner of the valves groove by the rocker and the shim. The picture below shows the groove worn into the top on the left collet and the round bottom on the right collet. Unfortunately zoomed aren’t the greatest quality ut hopefully it still works for you.

b. When the opener rocker is slid back into place, over the opener shim, ensure that a metal washer sits either side of the gap before refitting the black retaining clip. On the picture below, you can just make them out either side of the fitted clip.

c. Finally, remember to remove what ever you used to block the oil drains!!!

Last edited by Macflurry; 03-09-2018 at 02:03 AM..
Macflurry is offline   Reply With Quote
Old 03-09-2018, 12:46 AM   #7
Macflurry
Registered User
 
Macflurry's Avatar
 
Join Date: Mar 2018
Location: Blakeney
Bike: M900
Posts: 134
4. Measuring Shims.

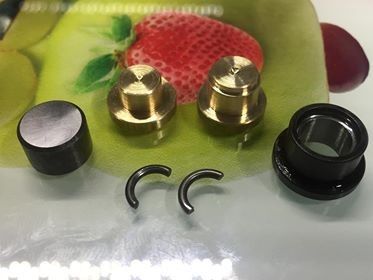
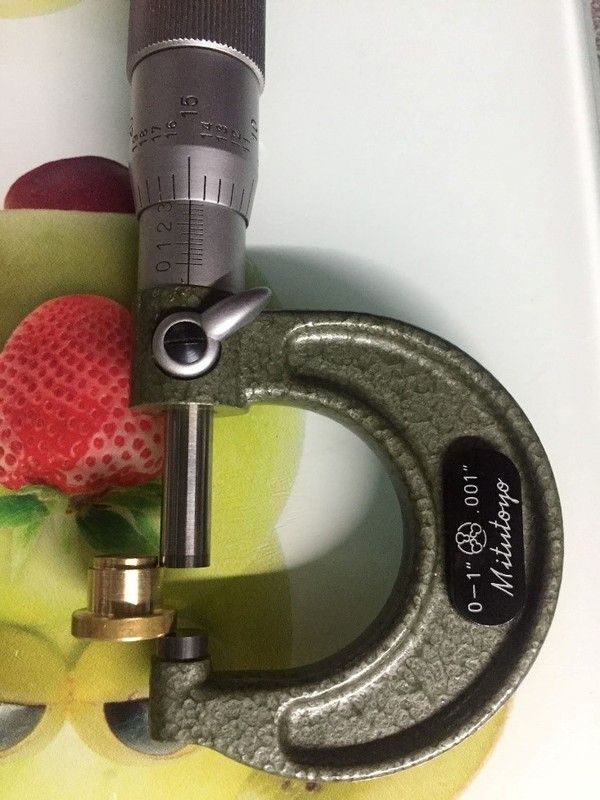
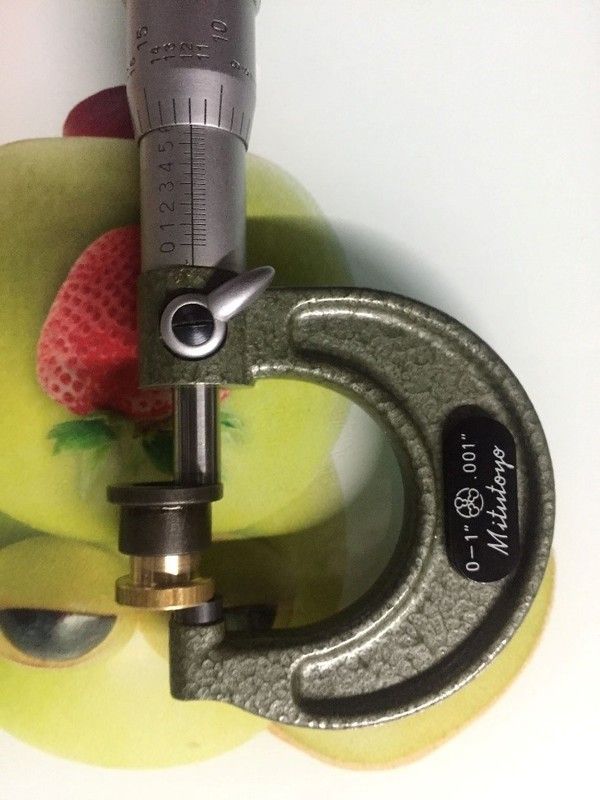
1. With the shims and collets removed from a valve you should ideally also have the measuring tools to accurately check which size shims you have (Picture below, left to right: opener shim, opener shim measuring tool, closer shim measuring tool, closer shim and bottom centre are the collets). The measuring tools are simply two adapters that slot into the shims. You simply:
a. Measure the tools and note the size. Each tool needs to be measured across specific points, which will be covered later, and not always the very top to the bottom.

b. Slot them into the relevant shim, measure both together and note the size.

c. The tools fit in and touch the point where the valve would make contact. Subtract the size of the tool from the total of both and what you have left is the size of the shim from the face to where it touches the valve.


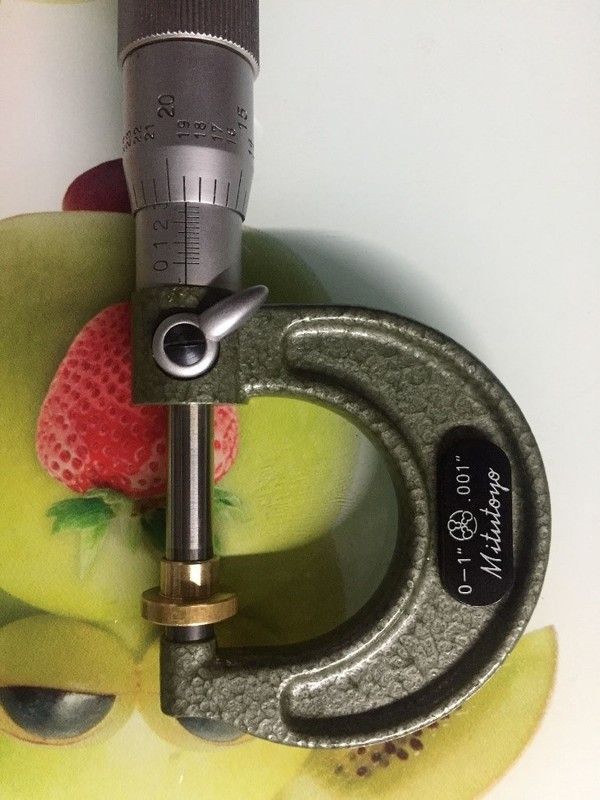
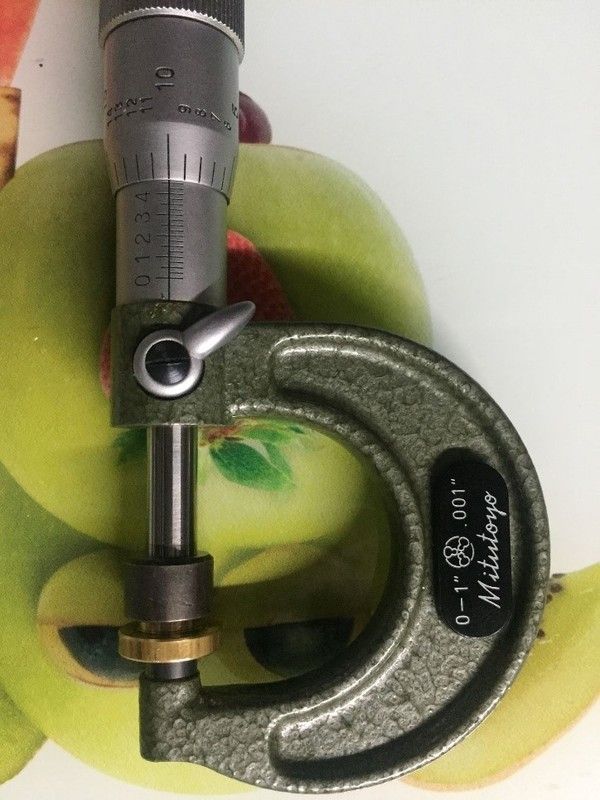
2. Opener shim: The tool for the opener is simply measured from top to bottom as shown below. This measurement is then subtracted from the measurement of both the tool and the shim slotted together, also below. The result is the thickness or size of the shim.


3. Closer shim: The tool for the opener is not measured from top to bottom but from the shoulder to the bottom as shown below. The top of the tool sits in the hole the valve would go through and touches nothing but the shoulder sits where the collets make contact. This measurement is then subtracted from the measurement of both the tool and the shim slotted together, also below. The result is the thickness or size of the shim.


4. Move through all of your shims that required adjustment after measuring your clearances. To work out your new shim sizes, take the amount the clearances were out of spec’ by and if the gap was too big then add it to the shim size to reduce the gap. If the gap was too small then subtract it from the shim size to make the gap bigger.

Last edited by Macflurry; 03-09-2018 at 02:04 AM..
Macflurry is offline   Reply With Quote
Old 03-09-2018, 12:46 AM   #8
Macflurry
Registered User
 
Macflurry's Avatar
 
Join Date: Mar 2018
Location: Blakeney
Bike: M900
Posts: 134
5. Swapping Out Valve Seals.

1. Follow the steps above as far as removing the closer shim, clamp the top of the valve so it doesn’t fall and remove the old seal like this:


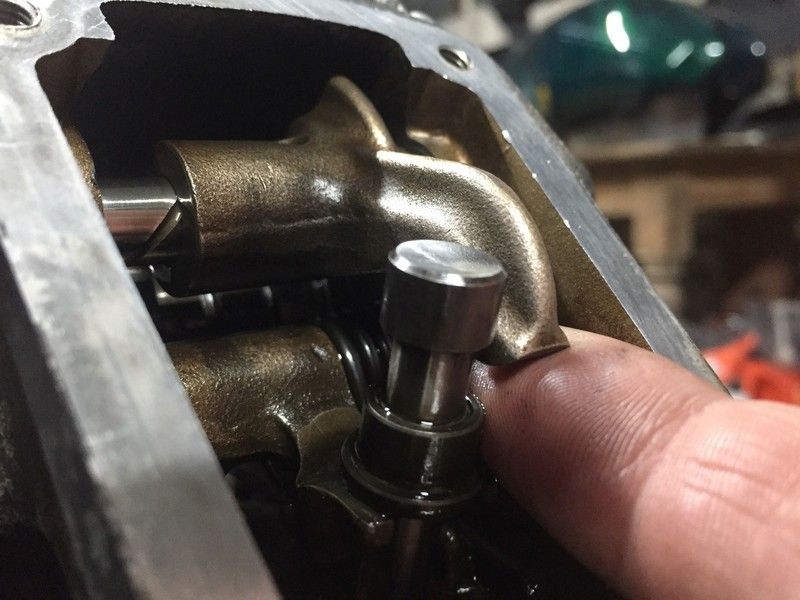
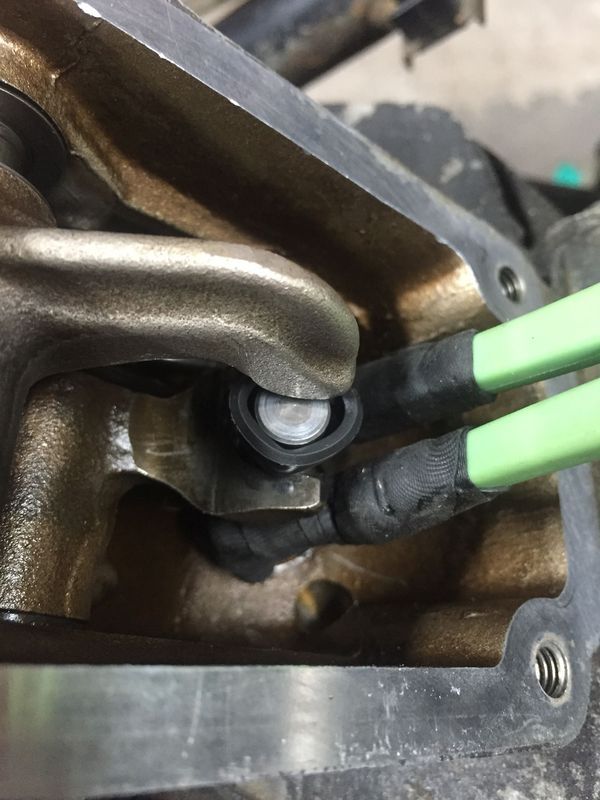
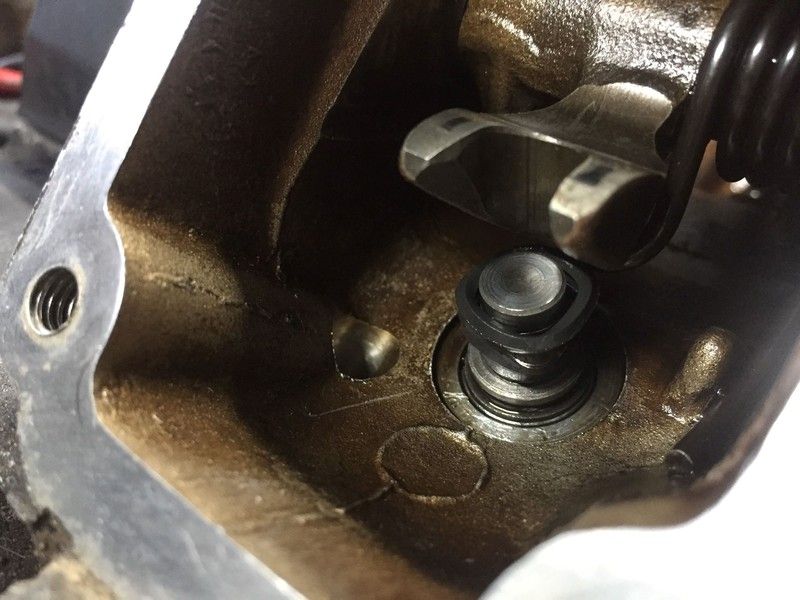
2. You will see from the pic below that there is not enough space around the valve to slide the seal past the rocker. I tried to stretch and manipulate one as well as trying to lower the rocker arm to increase the gap but ended up nicking a chunk out of the seal. Again, another method that required more hands than I had to press the rocker down and safely manipulate the seal without causing damage. With the clearance I achieved the gap was still too tight… you may fare better.


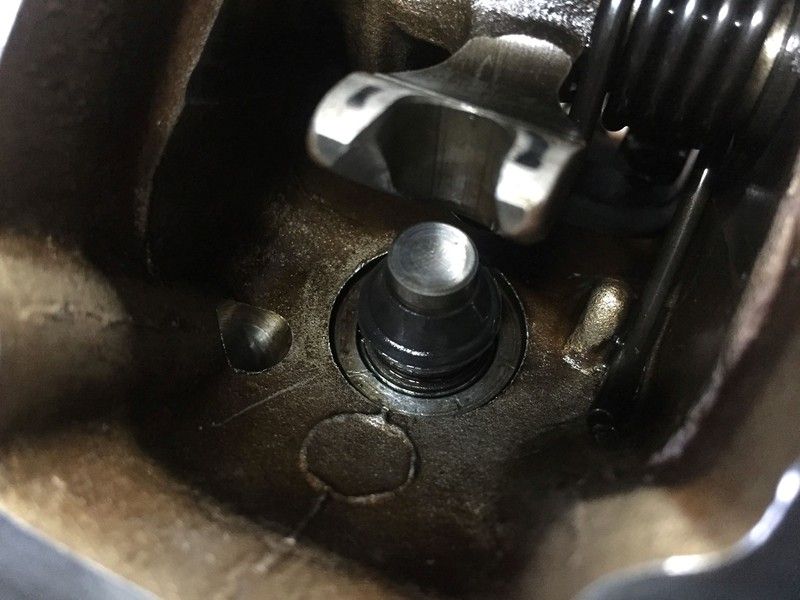
3. The option I went with was to move past TDC just enough to sit the valve on the piston but still have the tip of the stem showing enough to fit the new seal. The picture below shows how far I went to lower the piston but still see the valve and it was approximately two teeth on the pulley of travel.


4. With the valve safely lowered there is just enough clearance to slip the seal over the top.


5. You will notice in the picture above that the new seal has been turned inside out. Several people online recommended this method. Turn the seal inside out, slide the seal onto the valve upside down and then when it touches the valve guide roll the seal over itself from top to bottom. As the seal flips the right way it should seat in the groove around the guide… I tried it this way and didn’t get on with it. The rubber is pretty rigid and doesn’t like being manipulated too much. It eventually flipped but didn’t go over the guide, so it was back to square one. Again, you may get on with it better than me but I went a different way about it.

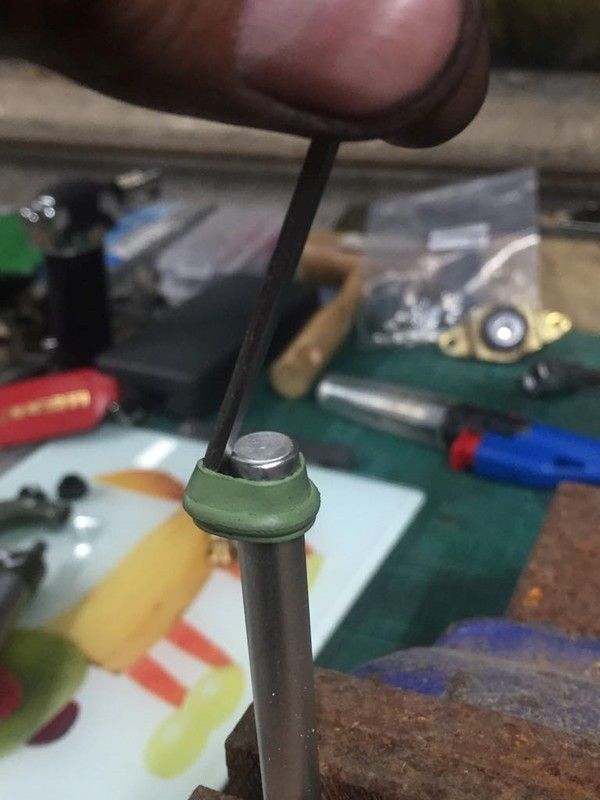
6. I took the new seal and warmed it up by running it between my fingers so it was slightly more flexible and then put some fresh oil inside and on the valve stem. I then used an allen key in the top of the seal with the tip wedged in the groove that slips over the valve guide and slid them both over the top of the valve. I didn’t get to take a picture as I did it but mocked this up after to show what I mean.


7. From here I ran the allen key around the edge of the seal and lifted it over the guide as it went. As the first part pops over hold it in place with your finger as it will try to pop off as you move around. Use your thumb and forefinger to give it a quick massage after to ensure that it is fully seated all around.


8. Slide the valve up enough to re-clamp it and then rebuild as above with your fresh new seals.


Last edited by Macflurry; 03-09-2018 at 02:04 AM..
Macflurry is offline   Reply With Quote
Old 03-09-2018, 12:57 AM   #9
Macflurry
Registered User
 
Macflurry's Avatar
 
Join Date: Mar 2018
Location: Blakeney
Bike: M900
Posts: 134
6. Additional Info.

Clearances should be checked every 6,000 miles (recommended).
Using MBP retainers instead of standard collets can extend servicing intervals but also require MBP shims to work with them. (Available from https://emsduc.com/)

Useful Links:

Most people swear by Chris Kellys Guides for DucatiTech/CA Cycleworks:

http://www.ducatitech.com/2v/maint/adjust/
https://www.youtube.com/watch?v=dIj3nSJGPZw&t=298s

DucatiSuite is a useful blog for info maintenance and modifications:

http://www.ducatisuite.com/valves.html

Mostly for older Ducatis but still has useful articles and links:

https://www.ducatimeccanica.com/desmo_valves.html

Last edited by Macflurry; 03-09-2018 at 09:16 AM..
Macflurry is offline   Reply With Quote
Old 03-09-2018, 12:57 AM   #10
Macflurry
Registered User
 
Macflurry's Avatar
 
Join Date: Mar 2018
Location: Blakeney
Bike: M900
Posts: 134
7. Remarks

1. Clearance spec's table didn't copy over neatly. Will reformat it and re-add it in the morning. (Temporarily added as .jpeg)
2. Pic's are all over the place in size, feedback needed for if they should be adjusted?? ***
3. 4V clearances and info source required.

Last edited by Macflurry; 03-09-2018 at 02:42 AM..
Macflurry is offline   Reply With Quote
Old 03-09-2018, 12:58 AM   #11
Macflurry
Registered User
 
Macflurry's Avatar
 
Join Date: Mar 2018
Location: Blakeney
Bike: M900
Posts: 134
***Reserved***

Last edited by Macflurry; 03-09-2018 at 02:07 AM..
Macflurry is offline   Reply With Quote
Old 03-09-2018, 02:36 AM   #12
Macflurry
Registered User
 
Macflurry's Avatar
 
Join Date: Mar 2018
Location: Blakeney
Bike: M900
Posts: 134
Still work to be done, bits to be added, images to tidy up and facts to check.

Please let me know anything that needs adding or changing!!

Hopefully it helps someone in the same position I was. Looking forward to hearing your feedback.

Enjoy!!
Macflurry is offline   Reply With Quote
Old 03-09-2018, 07:10 AM   #13
slob
.
 
slob's Avatar
 
Join Date: Jul 2003
Location: East London
Bike: Multiple Monsters
Posts: 9,733
Haven't had time to read it all yet but:

in section 2, the first thing to stress is the engine must be stone cold (left overnight) before you start making measurements
slob is offline   Reply With Quote
Old 03-09-2018, 08:33 AM   #14
Macflurry
Registered User
 
Macflurry's Avatar
 
Join Date: Mar 2018
Location: Blakeney
Bike: M900
Posts: 134
Quote:
Originally Posted by slob View Post
Haven't had time to read it all yet but:

in section 2, the first thing to stress is the engine must be stone cold (left overnight) before you start making measurements
*** Added ***

Awesome, thank you. It's stuff like this that I need to try and build it up and fix any errors.

Last edited by Macflurry; 03-09-2018 at 08:43 AM..
Macflurry is offline   Reply With Quote
Old 03-09-2018, 08:44 AM   #15
350TSS
Too much time on my hands member
 
350TSS's Avatar
 
Join Date: Jan 2013
Location: Shipbourne
Bike: M900
Posts: 1,422
Brilliant - just about to tackle this job for the first time - thanks so much for taking the time and trouble to document your experience and post it here
350TSS is offline   Reply With Quote
Reply

Tags
clearance, guide, seals, shims, valve


Posting Rules
You may not post new threads
You may not post replies
You may not post attachments
You may not edit your posts

BB code is On
Smilies are On
[IMG] code is On
HTML code is On

Forum Jump


All times are GMT. The time now is 01:01 AM.

vBulletin Skins by vBmode.com. Powered by vBulletin® Version 3.8.3
Copyright ©2000 - 2024, Jelsoft Enterprises Ltd.