UK Monster Owners Club Forum » Gallery » UKMOC Bikes » Dukedesmo's M900 project - the intro...

Reply
 
Thread Tools Rate Thread Display Modes
Old 02-02-2013, 08:39 PM   #76
nuttynick
Guest
 
Posts: n/a
Nice build!
  Reply With Quote
Old 03-02-2013, 02:31 AM   #77
utopia
No turn left unstoned
 
utopia's Avatar
 
Join Date: Jun 2010
Location: leicester
Bike: M750
Posts: 4,545
How do you plan to adjust the valve timing, if you should need to ?
I was half expecting to see the adjustable type belt pulleys in there, but you have the solid ones.
Not that I have any experience myself, beyond noting pictures of the two different types in the Haynes manual.
I've often wondered whether its worth changing my solid pulleys for the adjustable type, simply to be able to fine tune the valve timing....but up to now I've chickened out.
Then again, you wouldn't want the adjuster bolts to work loose, so maybe solid is safer.

A stepped key is the only other method I can think of, but that sounds like you could end up taking ages to get one that was just right......though I've never done that myself either.
But at least it couldn't slip, I guess.
utopia is offline   Reply With Quote
Old 03-02-2013, 10:53 AM   #78
Dukedesmo
Registered User
 
Dukedesmo's Avatar
 
Join Date: Sep 2010
Location: Leics
Bike: M900
Posts: 2,844
Quote:
Originally Posted by utopia View Post
How do you plan to adjust the valve timing, if you should need to ?
I was half expecting to see the adjustable type belt pulleys in there, but you have the solid ones.
Well spotted, I have actually got some adjustable pulleys but, for now I've fitted the originals as I want to see by how much (if at all) they need adjusting.

I should add that I'm taking it to a professional for the timing as I don't have the kit or experience, and whilst I'm sure I could figure it out, I reckon it would probably cost me as much plus I'll rest easier knowing that it's right first time.
__________________
M900, 916, LeMans II.

Dukedesmo is offline   Reply With Quote
Old 03-02-2013, 01:40 PM   #79
utopia
No turn left unstoned
 
utopia's Avatar
 
Join Date: Jun 2010
Location: leicester
Bike: M750
Posts: 4,545
Its probably sensible to leave it to an experienced professional, though it does mean that you have to have someone in mind who you can trust to do a good job.
Having occaisionally come across trained factory mechanics who fall short of the mark, I still tend to have more confidence my own work, even if my inexperience means that the job takes ages.
I dunno what kit you'd need, but I have a small dti gauge which might be useful. I'd be happy to loan it if you should fancy just checking it over yourself afterwards....just to be absolutely sure.
Thats possibly a bit excessive, but the offer's there if its any use to you.
I'm not far from you, so I could pop it over easily.
utopia is offline   Reply With Quote
Old 03-02-2013, 02:19 PM   #80
Dukedesmo
Registered User
 
Dukedesmo's Avatar
 
Join Date: Sep 2010
Location: Leics
Bike: M900
Posts: 2,844
Thanks for the offer! although I have got a dti gauge but would need the correct mounting brackets, timing wheel and no doubt a few other things, not to mention the all important know-how. All-in-all probably not worth the bother for a one-off job.

I know what you mean about trusting other mechanics though and that is one reason I do all (well, most) of my own work but as this is a job that I want absolutely spot-on, otherwise I could just leave it as it is which would be good enough (it's good enough for Ducati in the first place) but as with the crank shimming I'll be trusting this to an expert, someone that I know will do a proper job.
__________________
M900, 916, LeMans II.

Dukedesmo is offline   Reply With Quote
Old 03-02-2013, 08:19 PM   #81
andyboy
Guest
 
Posts: n/a
Really impressed with the qualty of this build,any chance it will be ready for the weekender
would be great to see it the flesh. Keep up the good work
  Reply With Quote
Old 03-02-2013, 08:42 PM   #82
Albie
Fanactical volunteer
 
Albie's Avatar
 
Join Date: Oct 2003
Location: Kent
Bike: M900
Posts: 9,031
Quote:
Originally Posted by andyboy View Post
Really impressed with the qualty of this build,any chance it will be ready for the weekender
would be great to see it the flesh. Keep up the good work
Yes try and get it there please. Be good to see ..
Albie is offline   Reply With Quote
Old 03-02-2013, 09:30 PM   #83
Dukedesmo
Registered User
 
Dukedesmo's Avatar
 
Join Date: Sep 2010
Location: Leics
Bike: M900
Posts: 2,844
Thanks, I'd like to think it would be finished by May but I'll have to pull my finger out.

Will try to make an appearance if possible.
__________________
M900, 916, LeMans II.

Dukedesmo is offline   Reply With Quote
Old 16-02-2013, 07:34 AM   #84
Spike
Guest
 
Posts: n/a
Who are you getting to do the timing work, I'd recomend GTECH as they're quite local to the area.
  Reply With Quote
Old 16-02-2013, 06:25 PM   #85
Dukedesmo
Registered User
 
Dukedesmo's Avatar
 
Join Date: Sep 2010
Location: Leics
Bike: M900
Posts: 2,844
Got the timing checked at Cornerspeed, didn't need adjusting - rear cyl was spot on and front so near that it wasn't worth moving.

That out of the way I started putting a few bits together today, starting to look like a bike again;

__________________
M900, 916, LeMans II.

Dukedesmo is offline   Reply With Quote
Old 19-02-2013, 11:38 AM   #86
Nottsbiker
Guest
 
Posts: n/a
I like this project, mainly because it is on very similar lines to what I intend on doing (one day).

The upgraded parts that look stock are my favourite part
  Reply With Quote
Old 19-02-2013, 12:32 PM   #87
Kato
Dismantled
 
Kato's Avatar
 
Join Date: Feb 2006
Location: East Molesey
Bike: Multiple Monsters
Posts: 2,223
Liking this a lot mate really nice work
__________________
"Political correctness is just intellectual colonialism and psychological fascism for the creation of thought crime"

Kato is offline   Reply With Quote
Old 19-02-2013, 08:08 PM   #88
Dukedesmo
Registered User
 
Dukedesmo's Avatar
 
Join Date: Sep 2010
Location: Leics
Bike: M900
Posts: 2,844
Wiring...

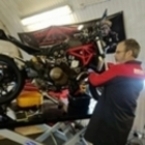
So today I made a start on the wiring loom but needed to sort out a battery holder to start from so I cut up the battery box part of the old airbox, reinforced the base by 'sandwiching' it with a couple of bits of aluminium plate (otherwise it was flexing badly due to having lost all it's support) and fitted the carbs so that I can position things in the former airbox area.

Battery is a tight fit between cylinder head and tank but box works fine although I'll probably make a new custom box with extra mounting points etc from aluminium sheet eventually.


Wiring loom is from the '99 frame rather than the '95 engine and so has a few differences; a 1-wire neutral switch and a 'mystery' 2 pin plug on a long cable.


I'm thinking this maybe a sidestand switch connector? but need to investigate further.


Other than the above mentioned long plug I think I've identified all the connectors but I do need to extend a few leads and modify others, for example the fuel tank connector only has a fuel level connection and I also need to power an electric fuel pump which will need a relay fitting somewhere.

I'm not using the Monster instruments (don't even have them) so thinking on whether to get a connector for the 12 pin metal plug to connect up my dash or may just cut it off and fit the appropriate connectors to the wires I need to save some complication.


Moved coils and solenoid to the front of the 'void' as there is no space at the rear due to having moved the battery backwards and lower plus having to leave some space for the horizontal cylinders vertical air filter. Ignitech box mounted just in front of the battery - away from the coils as I understand they can cause interference if fitted to close?

Also need to fabricate a bracket of some sort to hold a couple of extra components; relays, headlight ballast etc so the component layout is still 'experimental' at the moment.


More tomorrow...
__________________
M900, 916, LeMans II.


Last edited by Dukedesmo; 19-02-2013 at 08:10 PM..
Dukedesmo is offline   Reply With Quote
Old 20-02-2013, 06:26 PM   #89
Blah blah
Upsetting normal people..
 
Blah blah's Avatar
 
Join Date: Mar 2007
Location: Portreath
Bike: S2r
Posts: 833
Quote:
Originally Posted by Dukedesmo View Post
Wiring loom is from the '99 frame rather than the '95 engine and so has a few differences; a 1-wire neutral switch and a 'mystery' 2 pin plug on a long cable.


I'm thinking this maybe a sidestand switch connector? but need to investigate further.
.
Looks a bit like the oil pressure switch connector thingy
__________________
Power is nothing without control... I have neither !
Blah blah is offline   Reply With Quote
Old 20-02-2013, 07:35 PM   #90
Dukedesmo
Registered User
 
Dukedesmo's Avatar
 
Join Date: Sep 2010
Location: Leics
Bike: M900
Posts: 2,844
Quote:
Originally Posted by Blah blah View Post
Looks a bit like the oil pressure switch connector thingy
Does a bit but it's a bad picture, it's actually a 2-way plug but seen from the side.

Wiring is not the most exciting subject but have been test fitting various parts today to see how they fit with each other and have, for now got something more resembling a bike.

Attached Images
File Type: jpg IMG_1633b.jpg (32.2 KB, 306 views)
__________________
M900, 916, LeMans II.

Dukedesmo is offline   Reply With Quote
Reply


Posting Rules
You may not post new threads
You may not post replies
You may not post attachments
You may not edit your posts

BB code is On
Smilies are On
[IMG] code is On
HTML code is Off

Forum Jump


All times are GMT. The time now is 05:17 AM.

vBulletin Skins by vBmode.com. Powered by vBulletin® Version 3.8.3
Copyright ©2000 - 2024, Jelsoft Enterprises Ltd.