UK Monster Owners Club Forum » .: Technical :. » Cans, Tyres, Brakes, etc. » Bleeding brakes!

Reply
 
Thread Tools Display Modes
Old 28-01-2020, 02:35 PM   #1
Luddite
Registered User
 
Luddite's Avatar
 
Join Date: Aug 2011
Location: Southampton
Bike: M1100evo
Posts: 2,465
Bleeding brakes!

Each year, there are some things you can always rely on: Marc Marquez will be MotoGP champ; There will be a new Royal scandal; Saints will be struggling to avoid relegation and...the Evo's rear brake will need bleeding...again!

With previous bleeding, I've always removed the caliper and flipped it so the nipple faces upward in an effort to remove all the air.


Flipped caliper

However, despite this and, even though the brake works perfectly after bleeding, you can guarantee that, sooner or later, the sponginess will return.

I think one of the reasons for this may be the master cylinder's proximity to the exhaust. There's no heat-shielding for the cylinder or pipework so continued exposure to the exhaust heat may well contribute to a gradual deterioration of the fluid.

With the bike laid up over winter, I noticed that pedal travel had increased again so I was determined to try to achieve a longer term solution.

In an effort to achieve this, I've employed the following strategies:

• Get the caliper higher than the ABS
• Use a MityVac to keep the fluid (and any air bubbles) flowing
• Switch to DOT 5.1 from DOT 4, which should resist high temperatures better as its boiling point is 260° against 230° for DOT 4.

Taking the caliper off is straightforward enough once the exhaust and wheel have been removed. To get it higher than the ABS, you first need to detach the two wire hose guides. The top one is visible and is held on by the hugger mounting screw and the second one is on the underside by the right footrest. Both screws are 4mm cap heads and should be Loctited on replacement.

With the hose guides removed, you can pull the hose from the black plastic guide on the underside of the swinging arm. There's no need to remove the guide, there's enough flex to get the hose out, (and back in again), in situ. Just note that there's a black cable tie at the engine end of the guide, which needs snipping off.

With the caliper free, pass it up between the swinging arm and engine and there's enough hose to move it above the ABS unit with the bleed nipple uppermost.


Ready for bleeding
Luddite is offline   Reply With Quote
Old 28-01-2020, 02:38 PM   #2
Luddite
Registered User
 
Luddite's Avatar
 
Join Date: Aug 2011
Location: Southampton
Bike: M1100evo
Posts: 2,465
On to the bleeding.

Tip: ALWAYS READ THE MANUAL!
Earlier this month, I was browsing the workshop manual for fuel filter information and spotted a section mentioning bleeding the ABS unit, which I'd never seen before, despite referring to this manual numerous times over the past eight years. It says:

"Bleeding of the ABS braking system
Before bleeding a brake pump, move back the calliper pistons... to drain in the pump the air collected near the ABS control unit
Bleeding must be carried out by means of the corresponding joints placed near the callipers and the brake cylinders.


Evo ABS pump schematic

Important
Do not undo the fixing screws of the joints of the pipes on the ABS hydraulic control unit, unless control unit replacement is necessary.
"

I don't think I've ever done that for the rear caliper so maybe that was the missing link preventing a successful bleed. Bear that in mind if you're thinking of doing this job yourself.

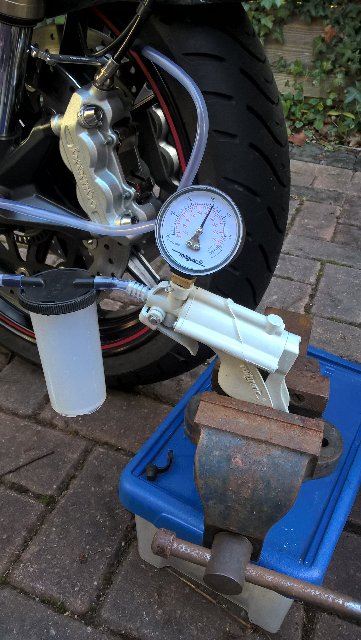
The MityVac comes with various connectors to cater for different braking systems but I used an old one from a manual bleeder as that has a nylon clip, which makes a tight seal and stops the pipe popping off.


Adapters

I also applied some PTFE tape around the bleed nipple in case the MityVac could draw air in past the threads. It was satisfyingly snug when I wound it back in.


Taped bleed nipple

The actual bleeding process was so much quicker and easier than the traditional way (as you'd hope). The first advantage of the MityVac was that you can use it to drain the reservoir before you start so you don't have to pump the old fluid all the way through the system.

Once connected to the caliper and pumped up, I cracked the nipple and the fluid began flowing. Be aware that the fluid drains pretty quickly so you need to keep a close eye on the reservoir to ensure it doesn't run dry. I propped the pump next to the airbox and just kept topping up the reservoir while a continuous flow of DOT 5.1 ran into the MityVac. After three reservoirs full and with the fluid running bubble-free, I closed the nipple and removed the MityVac. Another advantage of the MityVac is that the old fluid stays within the pump so less chance of an accidental spillage.

It was only a five-minute job to replace the caliper. So, how did it feel? For a moment I was disappointed as it still felt spongy (spot the deliberate mistake!). I'd forgotten that I'd previously pushed the pistons right back and, once the pads had been pumped against the disc, it felt perfect.

Of course, the real test will be how long will this last?

Hopefully, by pushing the pistons back, raising the caliper, filling with DOT 5.1 and using the vacuum bleeder, I'll end up with a more permanent solution.

I shall report back in due course.

Even if I do need to re-bleed the caliper, the MityVac makes it so easy, it won't be the chore it used to be. In fact, I might just do the front brakes now, even though they don't need it, just to use up the rest of the DOT 5.1.

Last edited by Luddite; 28-01-2020 at 02:44 PM..
Luddite is offline   Reply With Quote
Old 28-01-2020, 03:47 PM   #3
bigredduke
Nothing to see here
 
bigredduke's Avatar
 
Join Date: May 2005
Location: brough
Bike: M1100evo
Posts: 1,546
Interesting & informative as ever.

Thanks for taking the extra time & trouble to document & photograph the operation (glad it wasn't Rob's btw) very few people would bother.
bigredduke is offline   Reply With Quote
Old 28-01-2020, 04:27 PM   #4
Luddite
Registered User
 
Luddite's Avatar
 
Join Date: Aug 2011
Location: Southampton
Bike: M1100evo
Posts: 2,465
Quote:
Originally Posted by bigredduke View Post
Thanks for taking the extra time & trouble to document & photograph the operation
Well hopefully it works, Paul and hopefully again it'll help fellow 696/796/1100 owners.

Fingers crossed!
Luddite is offline   Reply With Quote
Old 28-01-2020, 05:55 PM   #5
Rrawlings
Member
 
Join Date: May 2019
Location: Bradford
Bike: M1100evo
Posts: 175
Just on with a thorough once over of everything on my evo whilst it’s too cold to ride. Very interesting post and really helpful. I could borrow a mityvac from my brother in-law so if you do the front let us all know how you got on Vince as if it’s the future I’ll borrow it with view to a future purchase. Keep up the good work!
Rrawlings is offline   Reply With Quote
Old 28-01-2020, 05:56 PM   #6
350TSS
Too much time on my hands member
 
350TSS's Avatar
 
Join Date: Jan 2013
Location: Shipbourne
Bike: M900
Posts: 1,419
To note the warning at the bottom of this article

https://epicbleedsolutions.com/blogs...-1-brake-fluid
350TSS is offline   Reply With Quote
Old 28-01-2020, 06:22 PM   #7
Luddite
Registered User
 
Luddite's Avatar
 
Join Date: Aug 2011
Location: Southampton
Bike: M1100evo
Posts: 2,465
Quote:
Originally Posted by 350TSS View Post
To note the warning at the bottom of this article

https://epicbleedsolutions.com/blogs...-1-brake-fluid
Noted thanks, Richard. As far as I'm aware, all DOT 5 is dyed bright purple to easily distinguish it from the glycol-based fluids.
Luddite is offline   Reply With Quote
Old 28-01-2020, 06:31 PM   #8
Luddite
Registered User
 
Luddite's Avatar
 
Join Date: Aug 2011
Location: Southampton
Bike: M1100evo
Posts: 2,465
Quote:
Originally Posted by Rrawlings View Post
...if you do the front let us all know how you got on...
I think I will do them, Ryan, as throwing away the rest of that DOT 5.1 fluid goes against my religion (orthodox tightwad!).

I'll let you know how it goes.
Luddite is offline   Reply With Quote
Old 29-01-2020, 09:02 AM   #9
the lodger
Registered User
 
the lodger's Avatar
 
Join Date: Oct 2019
Location: Chorley
Bike: M900
Posts: 160
A word of support for DOT 5 silicone brake fluid. You will find some negativity around its use on the internet but my personal experience of it is all positive. If I had a brand new brake system ( lines, seals etc. ) I would use it over DOT 5.1 or 4 , not least because I invariably manage to get brake fluid everywhere when changing it .

Yes it is purple and costs about the same as other brake fluids although you do have to try harder to buy it.
__________________
Contents may settle !
the lodger is offline   Reply With Quote
Old 29-01-2020, 09:39 AM   #10
Dukedesmo
Registered User
 
Dukedesmo's Avatar
 
Join Date: Sep 2010
Location: Leics
Bike: M900
Posts: 2,842
Quote:
Originally Posted by Luddite View Post

I think one of the reasons for this may be the master cylinder's proximity to the exhaust. There's no heat-shielding for the cylinder or pipework so continued exposure to the exhaust heat may well contribute to a gradual deterioration of the fluid.
As 916 owners will testify, the rear brake (as well as being weak) needs bleeding regularly. I am convinced that heat plays a major part in this as the setup is essentially the same as an, old style, Monster aside from a slightly smaller disc and, crucially that the master cylinder bracket on the 916 is bolted directly to the engine case and also serves as a support bracket for the exhaust mid-pipe and so gets very hot indeed.

Not sure if later SSSA Monsters have a similar setup but if so then have Ducati learnt nothing?
__________________
M900, 916, LeMans II.

Dukedesmo is offline   Reply With Quote
Old 29-01-2020, 10:10 AM   #11
Luddite
Registered User
 
Luddite's Avatar
 
Join Date: Aug 2011
Location: Southampton
Bike: M1100evo
Posts: 2,465
Quote:
Originally Posted by Dukedesmo View Post
... have Ducati learnt nothing?
Probably not!

Maybe it's an Italian thing. A friend of mine has had both v-twin and v4 Aprilia Tuonos and both have suffered with poor rear brakes that needed frequent bleeding. Like the Ducatis, the underslung caliper had the nipple on the underside and the position of the master cylinder made it susceptible to engine and exhaust heat.
Luddite is offline   Reply With Quote
Old 01-02-2020, 11:46 AM   #12
Luddite
Registered User
 
Luddite's Avatar
 
Join Date: Aug 2011
Location: Southampton
Bike: M1100evo
Posts: 2,465
Well, that was a worthwhile exercise. Despite being happy with my front brakes, after filling with the rest of my DOT 5.1 and pulling it through with the MityVac, there's a noticeable improvement in firmness at the lever. To the extent that I've backed off the lever adjuster a couple of clicks to bring it closer to the bars.

No real problems with the bleeding process but, as with most things, preparation is important. I think the key to getting the best out of the MityVac is to ensure there's a good seal between the bleed tube and nipple and between the nipple itself and the caliper. I did try bleeding without modifying the nipple but it was evident that air was being drawn into the tube past the threads in the caliper. This obviously reduces the vacuum effect but also makes it impossible to see when bleeding is complete as there is always a steady stream of bubbles showing in the fluid.

I then added some PTFE tape to seal the nipples. It was a messier task than for the rear caliper because, with the calipers low down, fluid starts to flow as soon as you loosen the nipple. However, a short M6 x 1 screw with PTFE tape makes an effective blanking plug and kept the leakage to a minimum. No need to screw it all the way in, just a couple of turns by hand is enough to stop the flow.

If you are going to remove the nipple, I'd suggest also removing the pads first so there's no danger of contamination from spilled fluid.

Anyway, once taped, the nipples sealed perfectly and bleeding was straightforward. As with the rear caliper and following the handbook, I pushed the calipers right back after first draining the reservoir. I then bled the left caliper first and fashioned a makeshift stand for the MityVac so I could leave it drawing through the fluid while I kept the reservoir topped up.


Supporting the Mityvac ready for bleeding

The last nipple by the master cylinder was strange as I couldn't get a seal on it. It was clear from the fluid in the tube that air was being drawn in even with the nipple closed, so I didn't even bother to tape it. Because of that, I just used the traditional bleeding method; a couple of pumps of the brake lever using the MityVac pot to catch the fluid, (which was clear of bubbles anyway).

When refitting the calipers, it's good practice to centre them on the calipers. So before tightening them, apply the brake and then tighten the bolts while holding the brake on. (That's what the workshop manual recommends.)

And, job done. As I said before, the lever is noticeably firmer, so I'm glad I did it. And now the nipples have been taped, the next fluid change/bleed should be no more than a five minute job.

I'd definitely recommend the MityVac - just be sure to keep a close eye on the reservoir while bleeding as the fluid can get drawn through surprisingly quickly. (I came worryingly close on a couple of occasions !)
Luddite is offline   Reply With Quote
Old 01-02-2020, 08:51 PM   #13
Rrawlings
Member
 
Join Date: May 2019
Location: Bradford
Bike: M1100evo
Posts: 175
Thinks for update Vince. Finally made a start on my Evo today. Collecting the mityvac tomorrow so will follow your work. I’ll put a post on my fork oil swap and any other stuff that I think will help others
Rrawlings is offline   Reply With Quote
Old 01-02-2020, 09:36 PM   #14
The Clockie
Guest
 
Posts: n/a
Very interesting account! I've often wondered about getting a MityVac but there seem to be so many different versions available. I don't know if they all come with the bits you show (reservoir etc.) or if that's only in the kits? I see a kit with the MV8500 for this side of 50 smackers. Is this a good buy or will one at half that price do the job?

Nick
  Reply With Quote
Old 02-02-2020, 10:27 AM   #15
Luddite
Registered User
 
Luddite's Avatar
 
Join Date: Aug 2011
Location: Southampton
Bike: M1100evo
Posts: 2,465
Quote:
Originally Posted by The Clockie View Post
I don't know if they all come with the bits you show (reservoir etc.) or if that's only in the kits?
I'm not sure what the different kits contain but the one I got was the MV8000, which contains this:


Whichever kit you go for, you definitely need the reservoir if you're going to use it for bleeding.

I got mine from here and it was about £46 shortly before Christmas.

https://www.ebay.co.uk/itm/Mityvac-M...t/362351080934
Luddite is offline   Reply With Quote
Reply


Posting Rules
You may not post new threads
You may not post replies
You may not post attachments
You may not edit your posts

BB code is On
Smilies are On
[IMG] code is On
HTML code is Off

Forum Jump


All times are GMT. The time now is 10:55 PM.

vBulletin Skins by vBmode.com. Powered by vBulletin® Version 3.8.3
Copyright ©2000 - 2024, Jelsoft Enterprises Ltd.