UK Monster Owners Club Forum » .: Technical :. » Mods & How To's » Ducati 1000 DS custom build

Reply
 
Thread Tools Display Modes
Old 07-03-2023, 05:40 PM   #46
Mark64
Bronze Member
 
Mark64's Avatar
 
Join Date: Nov 2014
Location: Hondon de los Frailes
Bike: S4r
Posts: 285
Got to be really dedicated to keep it that clean, very impressive.
Mark64 is offline   Reply With Quote
Old 08-03-2023, 07:06 AM   #47
Bitza
Bronze Member
 
Bitza's Avatar
 
Join Date: Jul 2006
Location: Poole
Bike: M900ie
Posts: 470
Polished foot pegs, well what's to say, you're certainly putting the effort in, just remember to take a photo when you finish.
__________________
Bitza
Bitza is offline   Reply With Quote
Old 08-03-2023, 04:05 PM   #48
buzzer
Registered User
 
buzzer's Avatar
 
Join Date: Jun 2018
Location: Wolverhampton
Bike: M900
Posts: 392
Quote:
Originally Posted by Kato View Post
Not as mentally draning as it is to keep it like that once the bike is in use

Can't fault the effort it took, but everyone I know who have done the same gave up trying to maintain it after a few rides
I must admit I havent found that to be a problem. when finished I put some ACF 50 in the spray gun and turn the presure up so it atomises, and give the bike a good coat. keeps everything nice!

the engine parts I had been waiting for came, and I finished off the belt covers. I also made the housing for the hall effect triggers, the most accurate bit of machining I have done in years as I needed to locate the sensors exactly 135 degrees apart. I will post some pictures later on that. But for now here is the engine!


__________________
check out my blog! www.jtccc.wordpress.com
buzzer is offline   Reply With Quote
Old 09-03-2023, 09:43 AM   #49
walkingpictures
preneolithic frebie
 
walkingpictures's Avatar
 
Join Date: Sep 2002
Location: Cambridge
Bike: S4Rs
Posts: 319
That's looking fabulous Tony,a credit to you as always,good luck with the rest of the build

Kimbo
walkingpictures is offline   Reply With Quote
Old 09-03-2023, 09:57 AM   #50
Mr Gazza
Lord of the Rings
 
Mr Gazza's Avatar
 
Join Date: May 2013
Location: Norwich
Bike: M900sie
Posts: 5,805
There's usually at least a hose pipe at the moto cross tracks, so most of the grime should just slide off that high finish.
__________________
Mr Gazza is offline   Reply With Quote
Old 10-03-2023, 01:08 PM   #51
buzzer
Registered User
 
buzzer's Avatar
 
Join Date: Jun 2018
Location: Wolverhampton
Bike: M900
Posts: 392
A nice part of the build is when you start to pull it all together. All that preparation of parts for months before all comes together quite quickly.


__________________
check out my blog! www.jtccc.wordpress.com
buzzer is offline   Reply With Quote
Old 11-03-2023, 07:44 PM   #52
Albie
Fanactical volunteer
 
Albie's Avatar
 
Join Date: Oct 2003
Location: Kent
Bike: M900
Posts: 9,030
Looking great again. I have a new project at work soon. An elefant with st3 engine. Looking forward to that.
Keep up the good work
Albie is offline   Reply With Quote
Old 12-03-2023, 02:52 PM   #53
buzzer
Registered User
 
buzzer's Avatar
 
Join Date: Jun 2018
Location: Wolverhampton
Bike: M900
Posts: 392
Quote:
Originally Posted by Albie View Post
Looking great again. I have a new project at work soon. An elefant with st3 engine. Looking forward to that.
Keep up the good work

that will be an interesting build!

One of the things that was missing on the bike when I bought it was a gear lever. No problem I though… until I saw the price! so I decided to make one, and while I was on, make it slightly longer to suit my big feet. I took the one off my other bike as a pattern. I milled it out of a solid piece of alloy plate, and then hand filed it all to shape, and gave it a polish, I was quite pleased with the result!

__________________
check out my blog! www.jtccc.wordpress.com
buzzer is offline   Reply With Quote
Old 13-03-2023, 04:44 PM   #54
buzzer
Registered User
 
buzzer's Avatar
 
Join Date: Jun 2018
Location: Wolverhampton
Bike: M900
Posts: 392
out in the daylight for the first time in a while ;D

__________________
check out my blog! www.jtccc.wordpress.com
buzzer is offline   Reply With Quote
Old 16-03-2023, 09:08 AM   #55
buzzer
Registered User
 
buzzer's Avatar
 
Join Date: Jun 2018
Location: Wolverhampton
Bike: M900
Posts: 392
One of the things I wanted on this build was a clean looking rear end. I struggled to find a rear light that was suitable, so in the end I have fitted three 10mm superbrite LED’s as a rear light, and used a resister and diode so its bright and then brighter to act as a stop light.

https://www.youtube.com/watch?v=g6Mc2fn0_Kc
__________________
check out my blog! www.jtccc.wordpress.com
buzzer is offline   Reply With Quote
Old 19-03-2023, 12:32 PM   #56
buzzer
Registered User
 
buzzer's Avatar
 
Join Date: Jun 2018
Location: Wolverhampton
Bike: M900
Posts: 392
I have made a few similar Hall Effect ignition pickups in the past and they have worked brilliantly. This is a refinement on those. This time I have used an alloy cam wheel and put the magnets directly into that, rather than use a separate wheel. the magnets are 3mm as opposed to the 4mm ones I have used in the past, lets hope they are OK! I also swapped out the allen bolts for some none magnetic A4 ones just in case it picked those up.

Previously I have had a small discrepancy in the timing cylinder to cylinder, which is OK as I can compensate for that in the Ignitech software... But it irritated me that I had to do that! I put it down to my rotary table that is not the best and only measures degrees and its difficult to get the holes for the sensors precisely 135 degrees apart. This this time I borrowed a mates table that is very accurate and can measure to minutes. It was a pleasure to use such a wonderful piece of quality kit! Making the pickup plate took some time, probably the most accurate work I have done in a while!

I am not sure i needed the heat sink, but it looked aesthetically pleasing so I used it.


__________________
check out my blog! www.jtccc.wordpress.com
buzzer is offline   Reply With Quote
Old 19-03-2023, 02:05 PM   #57
Dukedesmo
Registered User
 
Dukedesmo's Avatar
 
Join Date: Sep 2010
Location: Leics
Bike: M900
Posts: 2,842
Nice, not sure if applicable on DS motors? but on the old 2V it would get rid of the wasted spark plus avoid having to remove the case cover/alternator/drain the oil for any servicing.
__________________
M900, 916, LeMans II.

Dukedesmo is offline   Reply With Quote
Old 14-04-2023, 04:02 PM   #58
buzzer
Registered User
 
buzzer's Avatar
 
Join Date: Jun 2018
Location: Wolverhampton
Bike: M900
Posts: 392
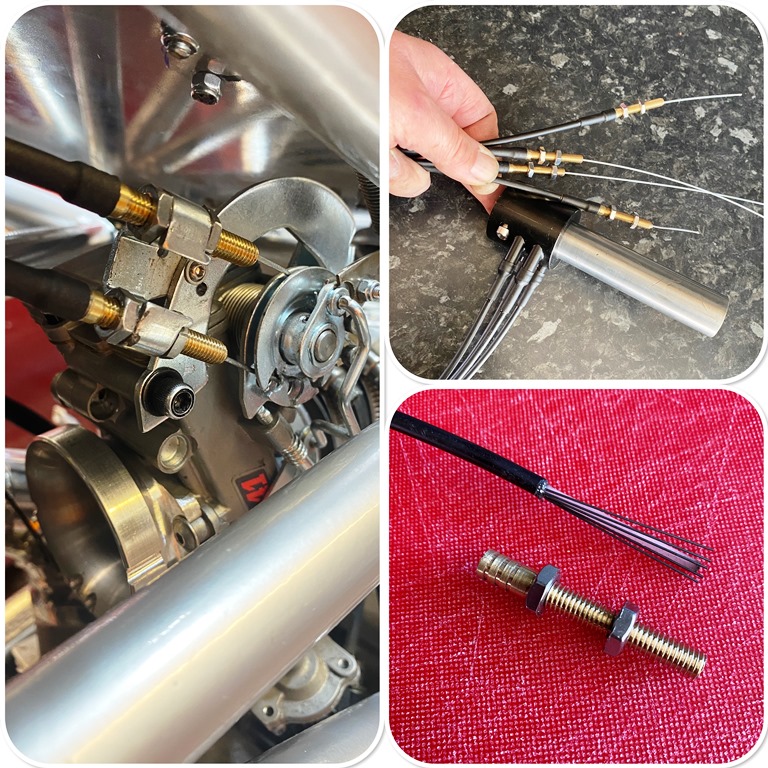
I finished the throttle off... I had to make the adjusters as they needed to be a custom size. I also used cycle gear cable as the nice thing about it is the outer wire is longitudinal, which has several advantages, the one being that you can cut it so the inner liner can extend into the adjusters and into the throttle which makes the entire run of the inner cable within the liner. I was very pleased with the light action, and only a 1/4 of a turn closed to open. We all know a fast action throttle adds 20 BHP ;D


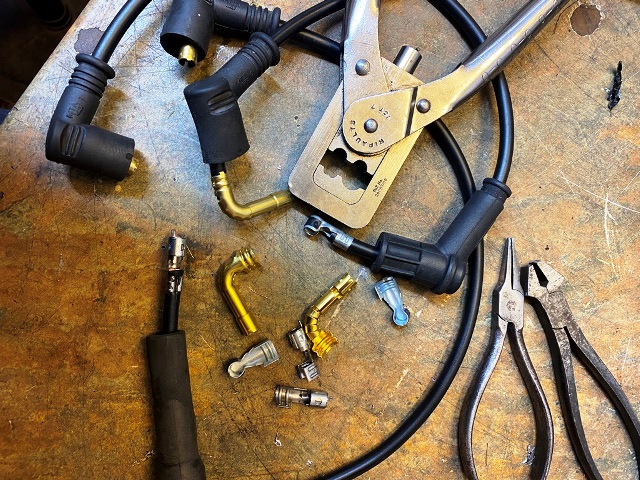
I know that I should use suppressed leads, but I prefer to use copper cored ones. they are easy to make up and you can make them to the spot on length. I have had that crimp tool 50 years!


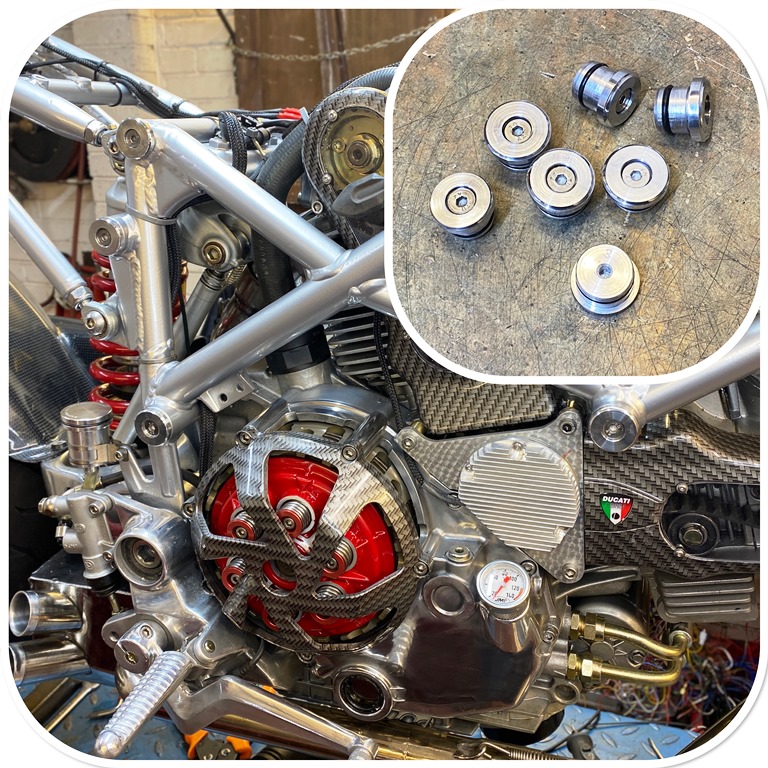
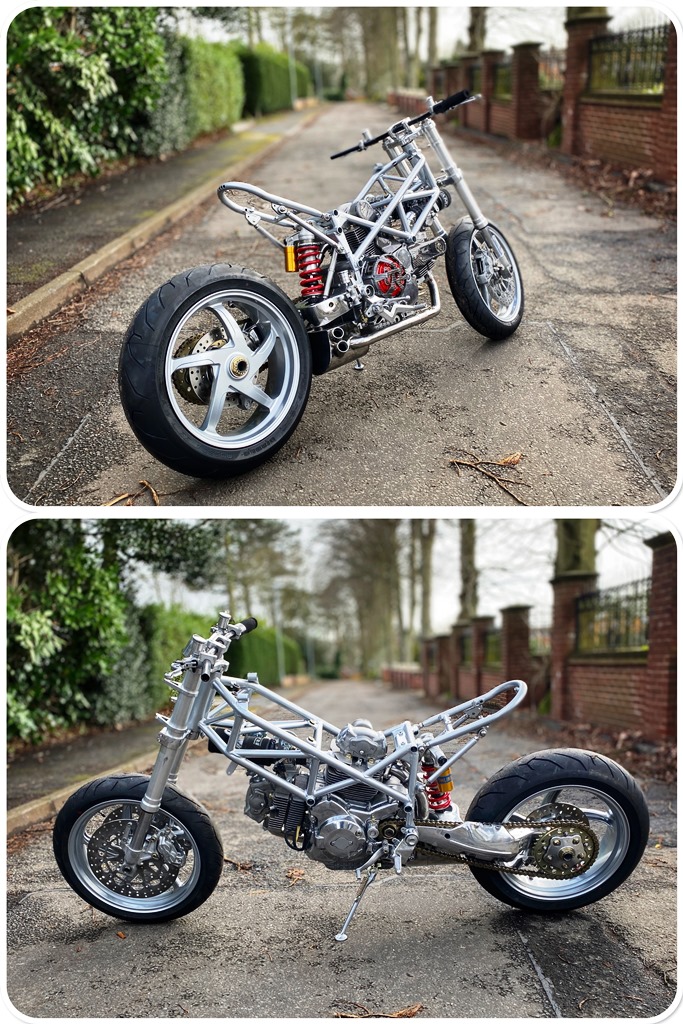
one of the things I wanted to do was get rid of the rubber frame bungs… so I turned up some alloy ones. I needed some alloy bar, so I popped into my local metal recyclers… he had several skips of alloy round bar and machined square and oblong billets, all different sizes… many marked on the end with the material specification! They were just about to be taken away so I had to be quick, I really had to restrain myself though, it was like Christmas had come early!

__________________
check out my blog! www.jtccc.wordpress.com
buzzer is offline   Reply With Quote
Old 15-04-2023, 06:27 PM   #59
buzzer
Registered User
 
buzzer's Avatar
 
Join Date: Jun 2018
Location: Wolverhampton
Bike: M900
Posts: 392
Things don't always go to plan... I tried to starts it... I had a spark, and lots of backfires, but it would not run. I checked a few things and came to the conclusion it was the pickups... I wasn't sure if it was the actual hall sensors, or the magnets and spacing. I decided to try the magnets and spacing first, and it turned out to be that. not sure if it was the strength of the magnets, or the spacing (I suspect it was the spacing) but either way I had to re design the rotor. soon as I did this, it fired up and settled to a nice tickover. I also breathed a sigh of relief as I had put a lot of effort into the exhaust and didn't know what it would sound like! To me it sounded awesome! here is a short video.

https://www.youtube.com/watch?v=t4z1kqUoEVk
__________________
check out my blog! www.jtccc.wordpress.com
buzzer is offline   Reply With Quote
Old 17-04-2023, 09:06 AM   #60
buzzer
Registered User
 
buzzer's Avatar
 
Join Date: Jun 2018
Location: Wolverhampton
Bike: M900
Posts: 392
the fuel tap proved to be a challenge. It couldn’t go on the tank, but I also didn’t want to on show. In the end I made a small bracket and mounted it out of sight.


I popped into the paint supplier where my mate works… he persuaded me to try some new lacquer which he said the customers were raving about… I reluctantly agreed to try it. Although I had prepped the tank, I thought I would try it on the mudguard first… I am glad I did! It was easy enough to spray, and gave a nice gloss from the gun, BUT it took almost two hours before it was dust free… That may be ok in a heated, dust free paint booth, but in my garage its a distinct disadvantage. So its back to what I know and I went back for some of the formula I always use!

__________________
check out my blog! www.jtccc.wordpress.com
buzzer is offline   Reply With Quote
Reply


Posting Rules
You may not post new threads
You may not post replies
You may not post attachments
You may not edit your posts

BB code is On
Smilies are On
[IMG] code is On
HTML code is Off

Forum Jump


All times are GMT. The time now is 04:32 PM.

vBulletin Skins by vBmode.com. Powered by vBulletin® Version 3.8.3
Copyright ©2000 - 2024, Jelsoft Enterprises Ltd.