UK Monster Owners Club Forum » Gallery » UKMOC Bikes » Ross' Yellow M750

Reply
 
Thread Tools Rate Thread Display Modes
Old 07-05-2016, 07:37 PM   #16
RossObey01
Guest
 
Posts: n/a
I got around to changing the lights, front and back today. Got rid of those horrendous twin lights for a regular round lamp and a red LED unit on the back, instead of the clear lens jobbie from before.


... and finished off with a trip to Wells-next-the-sea for an ice-cream.

  Reply With Quote
Old 07-05-2016, 07:47 PM   #17
Mr Gazza
Lord of the Rings
 
Mr Gazza's Avatar
 
Join Date: May 2013
Location: Norwich
Bike: M900sie
Posts: 5,801
That's looking much better Ross...Well done.

Have they moved the bike park to the other end of the Quay?
__________________
Mr Gazza is offline   Reply With Quote
Old 07-05-2016, 07:51 PM   #18
RossObey01
Guest
 
Posts: n/a
Yeah I'd not been to the old bike park, but it's now the far end. Just a small bit set aside for bikes, not even any bays marked out. Full of fish boxes as you can see.

Still, it's out of the way and close enough to the front to get some chips. Just make sure you're easy on the accelerator turning off the road and don't go straight over the edge!
  Reply With Quote
Old 07-05-2016, 07:54 PM   #19
Mr Gazza
Lord of the Rings
 
Mr Gazza's Avatar
 
Join Date: May 2013
Location: Norwich
Bike: M900sie
Posts: 5,801
I was born in Wells and first lived in a little cottage less than 100 yards from that spot...I used to have recurring nightmares about "the edge" into my teens...
__________________
Mr Gazza is offline   Reply With Quote
Old 07-05-2016, 11:52 PM   #20
Dirty
Bockloks
 
Dirty's Avatar
 
Join Date: Jan 2012
Location: London
Bike: No Bike Yet!
Posts: 4,601
Quote:
Originally Posted by Mr Gazza View Post
I was born in Wells and first lived in a little cottage less than 100 yards from that spot...I used to have recurring nightmares about "the edge" into my teens...
Not a big U2 fan?
__________________
Wounds heal, chicks dig scars, glory lasts forever


Dirty is offline   Reply With Quote
Old 08-05-2016, 09:03 AM   #21
Nottsbiker
Guest
 
Posts: n/a
No! Not that pretentious tw@ Bonio as well, now that would give me nightmares
  Reply With Quote
Old 08-05-2016, 10:02 AM   #22
Mr Gazza
Lord of the Rings
 
Mr Gazza's Avatar
 
Join Date: May 2013
Location: Norwich
Bike: M900sie
Posts: 5,801
In those days a U2 was something you put in your torch....

http://www.wellsharbour.co.uk/cam/index2.htm
__________________

Last edited by Mr Gazza; 08-05-2016 at 10:06 AM.. Reason: Wells Quay live web cam link added
Mr Gazza is offline   Reply With Quote
Old 15-11-2016, 07:13 AM   #23
RossObey01
Guest
 
Posts: n/a
I had a spare couple of hours after work yesterday, so decided to drop the engine out in readiness for it getting a winter treatment. Valves need doing and I want to take the time to give it a bit of TLC, new paint on the engine, exhausts, footrest hangers powdercoated, etc.


  Reply With Quote
Old 15-11-2016, 05:12 PM   #24
RossObey01
Guest
 
Posts: n/a
Got the engine up onto the bench and stripped down a little further. The stubborn inlet nut could then come off, along with belt covers, oil cooler, swingarm etc.

I'm now thinking of sending the swing arm off to be powder coated, too, to match the footrest hangers. It's not in a terrible state but has the usual scores at the end.

However, taking the swing arm off revealed a good amount of water sitting inside the engine casing, past the bearing seals. No grease left on the bearings, but it's not a job I fancy tackling from what I've read so far. I'll investigate the bearings and see if I think I'll get away with a good application of grease and new seals.

Rose-joints will also be getting changed, one is free but the r/h is seized solid.

Will be checking valve clearances before it starts getting prepped for paint. From previous measurements I think it will need a few new shims, so that's another job for the list!


  Reply With Quote
Old 15-11-2016, 07:22 PM   #25
Mr Gazza
Lord of the Rings
 
Mr Gazza's Avatar
 
Join Date: May 2013
Location: Norwich
Bike: M900sie
Posts: 5,801
That's a nice finish on your hangers.
You'll regret not doing the swinging arm if you put it back together with those nice hangers and a fresh painted engine.

Check your swinging arm pivot pin for ovality, then push it through the bearings to feel for roughness or play.
I don't think there are any seals on the bearings? But there should be shims either side, between engine and arm... They should go back on the same sides as they came out.

Looking good... Keep us posted on progress...
__________________
Mr Gazza is offline   Reply With Quote
Old 15-11-2016, 07:54 PM   #26
RossObey01
Guest
 
Posts: n/a
Yeah I think I'll get it stripped down tomorrow and sent off. I assumed there were seals on the bearings as they're open to the elements otherwise? I saw someone quote a part number when I was reading earlier, 0755.49.265 for seals. Will do some investigating.

Will check for ovality of the pin, noted on the shims. I did take note that on the r/h side there was one thick and one thin shim, but on the left side just the one thick. I didn't think to check if the thick ones were both the same size, but they're now in an envelope... together. Bugger.

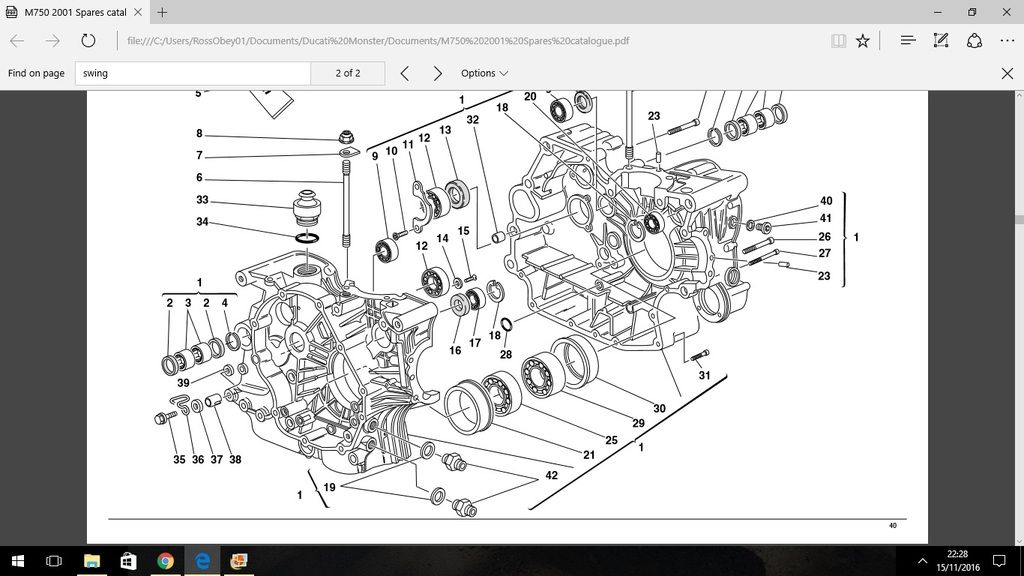
Parts manual lists bearings, seals and snap rings (?)

2: 0755.49.265 Anello di tenuta Seal ring
3: 76400.0004 Astuccio a rullini Needle bearing
4: 76266.2668 Anello elastico Snap ring

I'm assuming looking at the snap ring, that this is the lip people mention the bearings sitting up against, making them harder to knock out with a drift?


Last edited by RossObey01; 15-11-2016 at 09:37 PM..
  Reply With Quote
Old 16-11-2016, 01:16 AM   #27
utopia
No turn left unstoned
 
utopia's Avatar
 
Join Date: Jun 2010
Location: leicester
Bike: M750
Posts: 4,545
Yep, the snap ring is the "lip" and in my experience the bearings are next to impossible to knock out with a drift.
There are inboard and outboard seals on both sides, with a pair of bearings between them, so four of each in total.
The (my) bearings are a really tight fit in the cases and require seriously focussed efforts to extract them without resorting to a dremel (and risking damage to the cases).
I had to buy a heat gun, to warm the cases, and a blind bearing puller (which I then had to modify), and still it was not an easy job at all. ... and the kit cost £50.
Then I had to tweek out all the rollers and remove the cages from each bearing, so I could dremel a weakening groove in the outer shells, before they could be got out. And heat the cases.

But ....
If they're gone (and the presence of water in the cases suggests that they are), you'll have to change them.
If you're extremely lucky and they're ok (look out for flying pigs !!) then you'll need new outer seals each side ...and they're easy peasy.
If the bearings are shot, you will probably see corresponding wear on the shaft where they roll (in direct contact). ...and you will therefore possibly need a new shaft too.

My advice would be to get someone else to change them .. someone who has done it before and knows the score. (possibly BSD at Peterborough in your case ?).
It may cost you but it will be worth it to avoid the frustration and torment of doing it yourself ... and you'd need £50 worth of tools anyway.

Even then its not all over as there is a very high chance of nicking the new seals when you put it all back together and refit the shaft.
I have a sneaking suspicion that a fair proportion came out of the factory with nicked seals from new.
Its just a difficult assembly and, beyond making sure the shaft has no sharp edges (my new one had loads) and is well lubed, there's not a lot you can do to avoid it.
Assembling with a twisting motion may help.
I will be replacing my outer seals (and regreasing the bearings) every couple of years from now on.

The two thick shims are the same size, so can go either side.
The extra, thin shims all go on the brake side, if I remember correctly (will edit if not, but I'm pretty sure).
utopia is offline   Reply With Quote
Old 16-11-2016, 07:12 AM   #28
RossObey01
Guest
 
Posts: n/a
Thanks for that Utopia, will have a good look today and decide what I'm going to do. I only had the one thin shim on my brake side, is it normal to have more? Shaft seemed to be in reasonable condition, there weren't any obvious bearing marks on there.

Thanks for the sugggestion of BSD, but I'm currently in Devon for a little while, so may have a look around the Exeter/Plymouth area.
  Reply With Quote
Old 16-11-2016, 11:28 AM   #29
RossObey01
Guest
 
Posts: n/a
Swing arm shaft

Closer inspection of the swing arm shaft shows some grooves worn into it, by the location I think it might be the outer seals, which had very little rubber left on them.

The bearings themselves do not look damaged, spin freely but admittedly didn't have much grease on them. With the shaft inserted there's no play on the bearings. I'm now wondering if I will have to replace the shaft and whether to attack the bearings or pack them with grease and see how they feel.

Edit, looking at the photos now on a big screen, it looks like the scores might be in line with where the swing arm clamps onto them? Any thoughts?


  Reply With Quote
Old 16-11-2016, 11:45 AM   #30
RossObey01
Guest
 
Posts: n/a
Note to self more than anything, because I'll certainly lose this bit of paper.

Swing arm shaft 396 1004 1A £80.46
Bearings 76400 0004 £6.48
Seals 0755 49 265 £2.27
Inlet gaskets £0.60
Exhaust gaskets £2.02
Exhaust half rings £4.52 (each half)
Exhaust studs £0.78 and nuts £0.34

Prices inc. VAT from Moto Rapido 16/11/16
  Reply With Quote
Reply


Posting Rules
You may not post new threads
You may not post replies
You may not post attachments
You may not edit your posts

BB code is On
Smilies are On
[IMG] code is On
HTML code is Off

Forum Jump


All times are GMT. The time now is 07:24 AM.

vBulletin Skins by vBmode.com. Powered by vBulletin® Version 3.8.3
Copyright ©2000 - 2024, Jelsoft Enterprises Ltd.