UK Monster Owners Club Forum » .: Technical :. » Mods & How To's » Guzzi 1100 custom build

Reply
 
Thread Tools Display Modes
Old 02-03-2022, 12:35 PM   #16
buzzer
Registered User
 
buzzer's Avatar
 
Join Date: Jun 2018
Location: Wolverhampton
Bike: M900
Posts: 392
As I am taking off the linked brakes I needed to use a different rear caliper. I toyed around with making the rear caliper floating and using a torque arm… but in the end decided to use a neater, smaller bracket instead. It also meant that I could mount the speed sensor for the speedo as I am using a combined speedo / tacho.

__________________
check out my blog! www.jtccc.wordpress.com
buzzer is offline   Reply With Quote
Old 04-03-2022, 09:25 AM   #17
buzzer
Registered User
 
buzzer's Avatar
 
Join Date: Jun 2018
Location: Wolverhampton
Bike: M900
Posts: 392
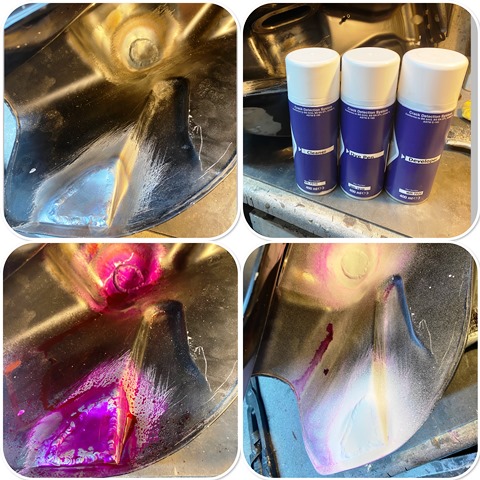
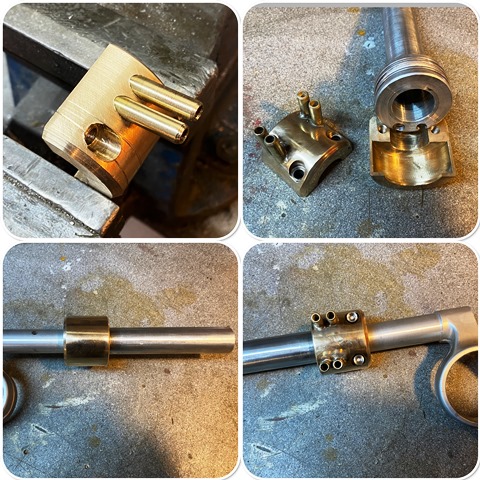
The tank I am using is off a V7… It was cheap to buy because it had a couple of big dents, which I have managed to get out. To do this I had to cut a couple of holes in the bottom to give access with a 20mm bar with a dome on the end, which I then used to knock most of the dent out, just needing a skim of filler. I then welded some plates on the holes and leak tested them with dye penetrant.

I use this a lot, its great for checking for holes and cracks, they show up immediately. fortunately all was good in this case. I prefer doing it this way to filling it with petrol as if you do have a leak its a pain to clean it out again. I have taken to using the dye penetrant on frames before I have them blasted… its surprising how many have cracks! especially Ducati!

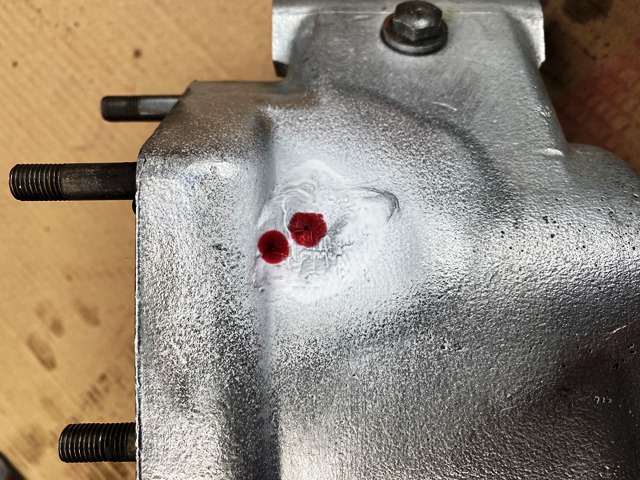
A while ago my mate welded an RGV 250 engine mounting on the alloy frame. When he had welded it, he used some dye penetrant around the joints on the frame to check for cracks… There were quite a few! he welded them up and re-checked. Here is a gearbox I recently welded that still had a leak after someone had already welded it, you could not see it with the naked eye, but its easily visible with the dye…


__________________
check out my blog! www.jtccc.wordpress.com
buzzer is offline   Reply With Quote
Old 12-03-2022, 02:45 PM   #18
buzzer
Registered User
 
buzzer's Avatar
 
Join Date: Jun 2018
Location: Wolverhampton
Bike: M900
Posts: 392
With the new master cylinder mounted I looked at a way of mounting a reservoir. I could have used one of the small plastic ones, but instead decided to make one. I am pleased with the way it came out! here is a short video of how I made it! Last update for a while... I have to go on holiday apparently!

https://www.youtube.com/watch?v=e0-kGpvQDjI


__________________
check out my blog! www.jtccc.wordpress.com
buzzer is offline   Reply With Quote
Old 12-03-2022, 03:43 PM   #19
Jam911
Registered User
 
Join Date: Jun 2021
Location: Stratford Upon Avon
Bike: Multiple Monsters
Posts: 288
That looks great. Unique.
Jam911 is offline   Reply With Quote
Old 13-03-2022, 02:00 AM   #20
jerry
Old Git
 
jerry's Avatar
 
Join Date: May 2006
Location: Cricklade
Bike: Multiple Monsters
Posts: 2,816
Brilliant inventive engineering skills yo certainly have , I am in awe
__________________
MONSTERMAN
jerry is offline   Reply With Quote
Old 26-03-2022, 03:18 PM   #21
buzzer
Registered User
 
buzzer's Avatar
 
Join Date: Jun 2018
Location: Wolverhampton
Bike: M900
Posts: 392
Back from holiday where I unfortunaly got a dose of the virus! Not too bad though, I have had worse colds… But for a few day I have kept out the garage, and did some computer time instead and constructed the wiring diagram… I like to keep it simple, and wire from scratch, so many builds are spoiled by patching up the old loom. I am using an ignitech for the ECU, and its interesting that the the unit uses the cam sensor for one cylinder, and the crank sensor for the other. I like that idea!

__________________
check out my blog! www.jtccc.wordpress.com
buzzer is offline   Reply With Quote
Old 27-03-2022, 11:28 AM   #22
buzzer
Registered User
 
buzzer's Avatar
 
Join Date: Jun 2018
Location: Wolverhampton
Bike: M900
Posts: 392
I have agonised over the rear light / number plate arrangement…

No matter how I plan it, it just does not look right with the number plate on the back, So I am going for a side mounted plate. that leaves the rear light to consider… the rear of the seat is angled (more later) so I needed an angled plinth to mount the light I am using on… here it is, bar a good polish.

A new addition to the workshop is a bandsaw... How did I manage without one all these years! I modified the top and bottom guides so they have bearing supports and it works an absolute treat!


__________________
check out my blog! www.jtccc.wordpress.com
buzzer is offline   Reply With Quote
Old 29-03-2022, 03:24 PM   #23
buzzer
Registered User
 
buzzer's Avatar
 
Join Date: Jun 2018
Location: Wolverhampton
Bike: M900
Posts: 392
One thing I always like on a build is a light throttle… in these days of EFI its easy to forget just how heavy some carb throttles were, always a balance of lightness Vs a throttle spring strong enough to prevent sticking, As I am using flat slides on this build I really wanted to use a pull / pull throttle set up, which would either mean a pair of splitters, or a dual throttle. that way I can retain the light springs. Try as I might I couldn’t find a dual pull / pull one so I have ended up making one! If anyone knows of a company that makes them… DONT TELL ME! here is the story in pictures…


__________________
check out my blog! www.jtccc.wordpress.com
buzzer is offline   Reply With Quote
Old 01-04-2022, 10:28 AM   #24
buzzer
Registered User
 
buzzer's Avatar
 
Join Date: Jun 2018
Location: Wolverhampton
Bike: M900
Posts: 392
the wheels are back from the vapour blasters… they have come out FAR better than I expected, and I quite like the finish, so I will be leaving them as they are. just a coat of ACF – 50 should keep them looking good. the spokes are stainless and have also come up well. First time in MANY years I have put my own tyres on! they are tubeless so went on very easily. just got to get them balanced.


__________________
check out my blog! www.jtccc.wordpress.com
buzzer is offline   Reply With Quote
Old 02-04-2022, 02:05 PM   #25
buzzer
Registered User
 
buzzer's Avatar
 
Join Date: Jun 2018
Location: Wolverhampton
Bike: M900
Posts: 392
seat next… I needed to bend the front to clear the tank bolt… So I made a former to press it into shape. I also made a tool so I could press some dimples where the rivinuts go, to raise the seat a little so the seat doesn’t sit directly on the frame rails…

Things don’t always go to plan… I decided to mount the rear light on the frame, and cover with a piece of alloy… which I did, but then realised that on full bump the tyre would hit the plate! I had designed the rear to cater for full bump, but promptly forgot! I realised I needed to mount the light on the seat base, but I hate wires showing… so I decided to make a conduit out of copper tube so the wires can be hidden under the seat cushion.

The seat is off to the trimmers today. I have not used this guy before… The girl I used for years to trim my seats left the company she worked for… the last guy I used was OK, but no where near her standard. So lets see what this new guy is like… Oh, and here she is in the daylight for the first time in a while…


__________________
check out my blog! www.jtccc.wordpress.com
buzzer is offline   Reply With Quote
Old 02-04-2022, 02:43 PM   #26
Darren69
Transmaniacon MOC
 
Darren69's Avatar
 
Join Date: Sep 2013
Location: Sutton In Ashfield
Bike: Multiple Monsters
Posts: 6,022
Don't take this the wrong way, I hate to be critical and I fully appreciate the engineering efforts and get where you're going with it but it still looks like a raked out chopper to me which is no surprise considering its origins. Still a lot better than the ugly lump that you started with though! So its all good in my book really.
__________________
Roast Beef Monster!

Termignoni and Bucci - Italian for pipe and slippers!

S4 Fogarty, S4R 07T, 748, Series 1 Mirage

Last edited by Darren69; 02-04-2022 at 02:45 PM..
Darren69 is offline   Reply With Quote
Old 02-04-2022, 05:57 PM   #27
buzzer
Registered User
 
buzzer's Avatar
 
Join Date: Jun 2018
Location: Wolverhampton
Bike: M900
Posts: 392
Quote:
Originally Posted by Darren69 View Post
Don't take this the wrong way, I hate to be critical and I fully appreciate the engineering efforts and get where you're going with it but it still looks like a raked out chopper to me which is no surprise considering its origins. Still a lot better than the ugly lump that you started with though! So its all good in my book really.

I don't take it the wrong way... you are right! i would have liked to have shortened the swinging arm and moved the top shock mounts forward... and reduced the length of the headstock, and shortened the forks... but where do you stop...

I made the mistake many years ago in modifying a BSA frame, quite radically... it handles like a pig!

If I do another (I probably will.... although have this chopper thing niggling away) I will start with maybe a T3
__________________
check out my blog! www.jtccc.wordpress.com
buzzer is offline   Reply With Quote
Old 03-04-2022, 12:19 PM   #28
Darren69
Transmaniacon MOC
 
Darren69's Avatar
 
Join Date: Sep 2013
Location: Sutton In Ashfield
Bike: Multiple Monsters
Posts: 6,022
Yea, any sort of frame re-engineering is tricky and risky too, you could do more damage than good. I'm no Guzzi expert either but are there different yokes with a different offset available from another model maybe? Those forks are way too long and too high but you're right there's probably not an easy solution. A LM based model like a T3 would certainly be a better starting point from that point of view but probably nowhere near as a affordable as something based on a Cali cruiser?
__________________
Roast Beef Monster!

Termignoni and Bucci - Italian for pipe and slippers!

S4 Fogarty, S4R 07T, 748, Series 1 Mirage
Darren69 is offline   Reply With Quote
Old 03-04-2022, 12:43 PM   #29
buzzer
Registered User
 
buzzer's Avatar
 
Join Date: Jun 2018
Location: Wolverhampton
Bike: M900
Posts: 392
yea, a T3 would be better I feel... But in comparison to a California they tend to be a lot more... This base bike came for £500... and I have recovered just over that from selling the parts I don't need. that makes it a cheap build!

I would even consider a T3 restoration if the right bike came along... Lets see how this one goes when its finished.
__________________
check out my blog! www.jtccc.wordpress.com
buzzer is offline   Reply With Quote
Old 03-04-2022, 02:04 PM   #30
Dukedesmo
Registered User
 
Dukedesmo's Avatar
 
Join Date: Sep 2010
Location: Leics
Bike: M900
Posts: 2,842
Quote:
Originally Posted by buzzer View Post
I don't take it the wrong way... you are right! i would have liked to have shortened the swinging arm and moved the top shock mounts forward... and reduced the length of the headstock, and shortened the forks... but where do you stop...

I made the mistake many years ago in modifying a BSA frame, quite radically... it handles like a pig!

If I do another (I probably will.... although have this chopper thing niggling away) I will start with maybe a T3
Surely that's a 'Tonti' frame? if so it is basically like a T3/Le Mans etc. it certainly looks like the frame on my Le Mans.

Granted the forks and steerer tube are longer but I would imagine that wouldn't be too hard to alter or, just use clip-ons to lower the bars.

Interesting build though but I have to ask, where do you find these £500 base bikes?

__________________
M900, 916, LeMans II.

Dukedesmo is offline   Reply With Quote
Reply


Posting Rules
You may not post new threads
You may not post replies
You may not post attachments
You may not edit your posts

BB code is On
Smilies are On
[IMG] code is On
HTML code is Off

Forum Jump


All times are GMT. The time now is 04:55 PM.

vBulletin Skins by vBmode.com. Powered by vBulletin® Version 3.8.3
Copyright ©2000 - 2024, Jelsoft Enterprises Ltd.