UK Monster Owners Club Forum » .: Technical :. » Engines, Clutch, Gears » ££££Expensive afternoon...?????

Reply
 
Thread Tools Display Modes
Old 06-08-2020, 06:44 PM   #31
crawsue
Bronze Member
 
crawsue's Avatar
 
Join Date: Nov 2016
Location: Glasgow
Bike: M1100evo
Posts: 256
Thanks, guys, I think I've got enough stuff to run up a puller, the leak is really very slight so I'm hoping removal and a reseal might do the trick..... perhaps with some liquid metal at the ready.
I see a few 2nd hand ones in USA around £120 + p&p.... hopefully it won't come to that.
crawsue is offline   Reply With Quote
Old 07-08-2020, 11:55 AM   #32
crawsue
Bronze Member
 
crawsue's Avatar
 
Join Date: Nov 2016
Location: Glasgow
Bike: M1100evo
Posts: 256
Not counting various other bolt (clutch page erc) I'm counting 13 holding bolts for the cover...can anyone confirm? C
crawsue is offline   Reply With Quote
Old 07-08-2020, 12:01 PM   #33
Luddite
Registered User
 
Luddite's Avatar
 
Join Date: Aug 2011
Location: Southampton
Bike: M1100evo
Posts: 2,465
Quote:
Originally Posted by crawsue View Post
Not counting various other bolt (clutch page erc) I'm counting 13 holding bolts for the cover...can anyone confirm? C
Spot on! From: http://www.ukmonster.co.uk/monster/s...ad.php?t=57676 (post #2).

Quote:
Originally Posted by Luddite View Post
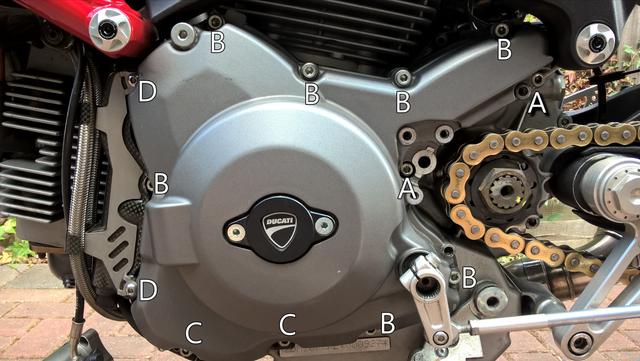
Remove all the screws (13 x M6 - 13.5Nm) holding on the alternator cover. The screws are shown here and, to aid reassembly, the lengths are:

A = M6 x 20mm (x 2)
B = M6 x 25mm (x 7)
C = M6 x 30mm (x 2)
D = M6 x 30mm (special screws x 2)


Remove the inspection cover (2 x M6 - 5Nm) being careful not to lose or damage the o-ring.

Attach the puller using the two vacant inspection cover screw holes and nip it up. Then tighten down the centre screw against the end of the crankshaft until the bond between the covers is broken. Pull the outer cover away and, if you're not unplugging and removing it completely, use a bungee or similar to suspend it from the handlebars so as not to stress the cabling.

Use a scraper and/or silicone gasket dissolver to completely remove all traces of the existing sealant. I used Threebond's own 3911D, which really speeds up a tedious job. It's designed to be sprayed on but I used a brush as I didn't want to risk it damaging the paint. Cover the inside of the cases to prevent bits of old gasket from dropping inside and possibly finding their way into the oilways.

Reassembly, as they say, is the reverse of removal. Completely degrease the mating surfaces and then apply a continuous, even bead of Threebond 1215 on the cover only, being particularly careful around the screw holes and dowels.

It may not strictly be necessary, but the manual says to replace the gearchange shaft oil seal (937831524) and at only around £3, it would be a false economy not to. The seal should be replaced after the casing has been bolted back on and after damping with alcohol.

I also replaced the two o-rings (88641731A) on the clutch pushrod as they're less than a quid a pair.

Hope that's helpful to someone.
Luddite is offline   Reply With Quote
Old 07-08-2020, 12:21 PM   #34
crawsue
Bronze Member
 
crawsue's Avatar
 
Join Date: Nov 2016
Location: Glasgow
Bike: M1100evo
Posts: 256
Clutch slave, that should be...C
crawsue is offline   Reply With Quote
Old 07-08-2020, 12:24 PM   #35
crawsue
Bronze Member
 
crawsue's Avatar
 
Join Date: Nov 2016
Location: Glasgow
Bike: M1100evo
Posts: 256
Excellent, Vince... onwards and upwards....C
crawsue is offline   Reply With Quote
Old 02-09-2020, 11:12 AM   #36
crawsue
Bronze Member
 
crawsue's Avatar
 
Join Date: Nov 2016
Location: Glasgow
Bike: M1100evo
Posts: 256
A quick update and hopefully postscript, after discovering an oil weep where the chain had crushed the side casing in and off the facing with the main crankcase, I had it welded and dressed, this of course compromised the casing finish.
After thorough cleaning I gave it 4 coats of Techniq caliper paint (eBay) in Audi Thunder Grey.
Now reassembled with new clutch push rod "O" rings and gear selector shaft oil seal, it is oil tight and looking "as new". There was a little collateral damage to the 6mm fixing points for the sprocket cover, but they were salvageable with a tapered 6mm tap.
I have still to fit my crankcase protector, hopefully ,that's a job for the next set weekend.....until then, it's time to get some riding in!
Thanks to everyone for ideas and suggestions and in particular Vince for his help and generous loan of puller.
crawsue is offline   Reply With Quote
Old 02-09-2020, 11:27 AM   #37
crawsue
Bronze Member
 
crawsue's Avatar
 
Join Date: Nov 2016
Location: Glasgow
Bike: M1100evo
Posts: 256


[url=https://postimg.cc/GTysnJCh][/url


This is the casing after 4 coats. Gear lever position now adjusted to correct spline! C.
crawsue is offline   Reply With Quote
Old 02-09-2020, 11:32 AM   #38
Luddite
Registered User
 
Luddite's Avatar
 
Join Date: Aug 2011
Location: Southampton
Bike: M1100evo
Posts: 2,465
Lovely job!

That case now looks better than mine!
Luddite is offline   Reply With Quote
Old 02-09-2020, 10:53 PM   #39
jerry
Old Git
 
jerry's Avatar
 
Join Date: May 2006
Location: Cricklade
Bike: Multiple Monsters
Posts: 2,803
Thats a brilliant paint colour choice i bet its tough stuff too ??? ,, nice job ,I might try that paint on one of my bikes

how did u prepare the case for painting ???
__________________
MONSTERMAN

Last edited by jerry; 02-09-2020 at 10:55 PM..
jerry is offline   Reply With Quote
Old 11-09-2020, 05:04 AM   #40
Lessaint
Registered User
 
Lessaint's Avatar
 
Join Date: Aug 2020
Location: New Ollerton
Bike: S4Rs
Posts: 61
Quote:
Originally Posted by Mr Gazza View Post
Oh dear! I think your title could be quite prophetic!

It sounds like the chain could have heavily whiplashed the engine cases round the clutch pushrod area? Preventing the pushrod from moving.
If so this will not be a simple repair. You need to remove the sprocket cover and clutch slave to assess the damage.

I hope I have given a very worst case scenario.... Good luck.
Gazza did the same thing to my YZF750 in the 90s on a track day,luckily i know a brilliant ali welder.
Lessaint is offline   Reply With Quote
Old 23-09-2020, 03:02 PM   #41
crawsue
Bronze Member
 
crawsue's Avatar
 
Join Date: Nov 2016
Location: Glasgow
Bike: M1100evo
Posts: 256
Preparation was minimal, proper clean with brake cleaner, fine Emery any blemishes, the original coating has a good "grippy" texture....then lots of light coats in a good ambient temperature....job done.
I'll be interested in seeing how resilient it is .
crawsue is offline   Reply With Quote
Reply


Posting Rules
You may not post new threads
You may not post replies
You may not post attachments
You may not edit your posts

BB code is On
Smilies are On
[IMG] code is On
HTML code is On

Forum Jump


All times are GMT. The time now is 05:08 AM.

vBulletin Skins by vBmode.com. Powered by vBulletin® Version 3.8.3
Copyright ©2000 - 2024, Jelsoft Enterprises Ltd.