UK Monster Owners Club Forum » .: Technical :. » Engines, Clutch, Gears » Rough running low down and high idle when warm

Reply
 
Thread Tools Display Modes
Old 16-03-2020, 07:24 PM   #31
FrankenDesmo
Member
 
FrankenDesmo's Avatar
 
Join Date: Sep 2019
Location: Glasgow
Bike: M900
Posts: 108
Forgot to mention earlier - I appear to be running 175 mains, which seems a bit excessive given that the workshop manual states 140!

Edit: aaaand the stock pilot air jet is a 1.4! This bike has definitely been fiddled with. I'm going to get another 1.3 as is already in it, clean everything up and put them back together. The needle jets (emulsion tubes) look like they're quite round so probably don't need replacing (although I may decide to yet). I suspect it's been jetted following the exhaust and airbox mod, but the engine could also have had some work - who knows. I'll also take the intake runners & rubbers off and give them a thorough check for any air leaks.

Last edited by FrankenDesmo; 16-03-2020 at 07:31 PM..
FrankenDesmo is offline   Reply With Quote
Old 17-03-2020, 09:51 AM   #32
manwithredbike
aka Phil
 
manwithredbike's Avatar
 
Join Date: Nov 2005
Location: derry
Bike: M900
Posts: 376
Quote:
Originally Posted by FrankenDesmo View Post
Bah.

Stripping down the other carb tonight (French ski resorts all closed so no going away for me), and I got to the point of getting this wee jet out of the top, had the screwdriver set in there nice and square, taking care and all, and as soon as I turn it CRACK


I'm guessing I'll need to get this to a specialist of some kind for extraction, or will any old engineering shop do? Also can anyone tell me the name of that jet...
Not to derail the thread but i was in France over the weekend skiing and they closed the resorts on Saturday night - after assuring us that they were to remain open. Big dash home, booking new flights etc. Mad times.
__________________
..
~
manwithredbike is offline   Reply With Quote
Old 17-03-2020, 09:52 AM   #33
FrankenDesmo
Member
 
FrankenDesmo's Avatar
 
Join Date: Sep 2019
Location: Glasgow
Bike: M900
Posts: 108
I was supposed to fly out on the Sunday morning, so I'm glad I found out when I did, but since they didn't cancel flights or shutdown the chalet operators I'm not sure how much luck I'm going to have with the insurance claim. Worth a crack, though.
FrankenDesmo is offline   Reply With Quote
Old 17-03-2020, 09:59 AM   #34
FrankenDesmo
Member
 
FrankenDesmo's Avatar
 
Join Date: Sep 2019
Location: Glasgow
Bike: M900
Posts: 108
Further to my post about the main jets - I haven't seen a mikuni symbol on them, so I suspect it has a dynojet kit in it and it's a dynojet 175, which is somewhere between a mikuni 162.5 and 165. I'm not getting too bothered about it though as the main jet doesn't really matter a whole lot for me at the moment - I rarely full throttle it.

Having thought about it, the needle jets are ~£17 each from Allens, so I might as well replace them. I'll keep those pilot air jets to 1.3.

The aim is to cure the issue with high idle/really rough running at lower revs, so if I find it's not 'perfect', I can come back with a factory pro kit at a later date (don't really have the £££s for it at the moment given that I'm buying tools more than anything for this).

Also probably going to get the bevel head 90deg screwdriver from Morgan Carbtune to make the sync & idle adjustments easier (possible, even!).
FrankenDesmo is offline   Reply With Quote
Old 17-03-2020, 10:04 AM   #35
manwithredbike
aka Phil
 
manwithredbike's Avatar
 
Join Date: Nov 2005
Location: derry
Bike: M900
Posts: 376
Quote:
Originally Posted by FrankenDesmo View Post
I was supposed to fly out on the Sunday morning, so I'm glad I found out when I did, but since they didn't cancel flights or shutdown the chalet operators I'm not sure how much luck I'm going to have with the insurance claim. Worth a crack, though.
They pulled the plug on Saturday night so you shoud be on the right side of it if you were planned for Sunday - and you have travel disruption on your policy.
__________________
..
~
manwithredbike is offline   Reply With Quote
Old 17-03-2020, 12:03 PM   #36
FrankenDesmo
Member
 
FrankenDesmo's Avatar
 
Join Date: Sep 2019
Location: Glasgow
Bike: M900
Posts: 108
Took the carb to dynotech ecosse to get the jet removed - was told it likely can't be done without damaging the carb, so leave it in as it's fine otherwise (which was my own first thought), especially for an ultrasonic clean. So that sorts that.

I've ordered replacement needle jets, so now I'm just waiting for those and the ultrasonic cleaner.

In the meantime, valve clearance checking and mounting a new headlight.
FrankenDesmo is offline   Reply With Quote
Old 18-03-2020, 06:56 PM   #37
FrankenDesmo
Member
 
FrankenDesmo's Avatar
 
Join Date: Sep 2019
Location: Glasgow
Bike: M900
Posts: 108
Quote:
Originally Posted by manwithredbike View Post
They pulled the plug on Saturday night so you shoud be on the right side of it if you were planned for Sunday - and you have travel disruption on your policy.
Not travel disruption specifically, but Cancellation/Curtailment. I'm crossing all my fingers, toes, and the pair of unmentionables.

Edit: BTW I love your bike - reminds me of my first one, which was nearly identical (different colour pipes & frame).

Last edited by FrankenDesmo; 18-03-2020 at 06:59 PM..
FrankenDesmo is offline   Reply With Quote
Old 19-03-2020, 11:15 PM   #38
FrankenDesmo
Member
 
FrankenDesmo's Avatar
 
Join Date: Sep 2019
Location: Glasgow
Bike: M900
Posts: 108
Ok, carbs are back together - see this post for the results of my adventure with an ebay ultrasonic cleaner (spoiler: it was a rousing success).

New gaskets & o-rings, left the needle clip at 3rd from top (manual says 4th but I'm clearly not running stock), replaced the needle jets (at least one of the old ones looked a bit ovaled by comparison to the new ones) and the JIS screws for cap screws.

Tomorrow I'm going to do some more reading to figure out the best way to measure the float heights, and where to set the idle mixture screws (I've got them on 2.5 turns out which is the Dynojet stage 2 recommendation, as I suspect it has at the very least a dynojet main in it). I'll also see about doing a bit of a bench sync to get a baseline before syncing & adjusting idle when they're back on.

Before they go back on I still need to check the valve adjustment - checking looks to be simple enough, and I'm hoping they're within spec so that I don't need to order shims! (I'm itching to get the bike running - but I'll do what it needs, so if it needs shims, then I'll wait until I have shims).
FrankenDesmo is offline   Reply With Quote
Old 20-03-2020, 10:39 AM   #39
FrankenDesmo
Member
 
FrankenDesmo's Avatar
 
Join Date: Sep 2019
Location: Glasgow
Bike: M900
Posts: 108
Float heights are both bang on 12mm, so I'm going to leave them there based on advice in another thread (12mm-16mm), and the fact that they're both the same.

Bench set the idle & sync using a .5mm bit of wire - no idea what that will net me but hopefully it'll work as a baseline!

Idle mixture is the big unknown - 175 non-mikuni main, std pilot, 1.3 pilot air, needle clip at #3 from top - I'll stick with 2.5 turns out (I really should have taken note of what they were when I took the carbs out, but I'm a bit of an idiot and rush into things sometimes every time).

Here they are ready to go, looking much cleaner than when they came out:


Now off to the shed to check the valve clearances, and the intake rubbers/runners for any potential leaks that may have been missed.

Last edited by FrankenDesmo; 20-03-2020 at 10:42 AM..
FrankenDesmo is offline   Reply With Quote
Old 20-03-2020, 11:59 AM   #40
Flip
Registered User
 
Flip's Avatar
 
Join Date: Mar 2010
Location: Beachtown
Bike: M900
Posts: 2,188
175 Main Jet is standard for a Dynojet Stage two kit, to fit fitted with open pipes and a cut open air box lid and free flowing filter so it may not be as messed about with as you think it has.

The Main jet is a press in jet secured by a plate next to the large headed Mikuni jet which you have to remove to free the plate- there should also be a little O-ring fitted to the Main jet (the one marked 175).

As for your pilot jet being 1.3 rather than 1.4 that is so close it probably wouldn't matter and may have been fitted at the factory if that is all they had in stock- remember Ducati just bought in the carbs from Mikuni and Dynojet never change this anyway.

The Pilot circuit is roughly the first 25% of throttle opening and the bike should run at idle whether the air box is fitted or not at that point- it just won't take a handful of gas.

Fit the Circlip on the needle on the fifth groove from the top- there should also be a little (Dynojet) washer that sits above the clip

Fuel mixture screw backed out 2.5 turns from fully (but lightly) seated.
__________________
You're perfect, yes, it's true- But without me you're only you!
Flip is offline   Reply With Quote
Old 20-03-2020, 12:15 PM   #41
FrankenDesmo
Member
 
FrankenDesmo's Avatar
 
Join Date: Sep 2019
Location: Glasgow
Bike: M900
Posts: 108
I was also thinking the pilot air jet can't be different enough to hurt, and I also noticed that dynojet and factory pro don't replace this, so probably isn't considered that important (good seeing as one on them is now permanently fitted!).

All the orings got replaced - incl the main, so should be good there. I'll move the needle clips to fifth down before I re-fit them as you suggest (which raises the needle & riches it up, correct?). Yes they both have a washer on top of the needle - I managed to lose one but Allen's had one of the same size in stock so got that with the replacement needle jets.

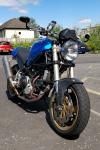
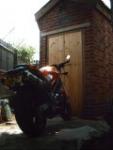
My problem definitely isn't with the main circuit as beyond half throttle the bike pulls very strongly up to around 9k rpm (IIRC my old M900 ran out of puff around 7.5-8k). Headers & cans are definitely not stock (SR-Racing on the cans, presumably they did the headers too), and the airbox lid has been cut open (and then a metal strip silicone to the front - see pic below), which I've put the fresh pipercross filter in.

Thanks flip, that's given me some reassurance that I'm headed in the right direction at least.

Just looking at the valve clearances as we speak, and I haven't found any evidence of other vacuum leaks, so if the valves are all good then fingers crossed the carbs just needed a good clean out (and possibly new needle jets).

FrankenDesmo is offline   Reply With Quote
Old 20-03-2020, 12:24 PM   #42
Flip
Registered User
 
Flip's Avatar
 
Join Date: Mar 2010
Location: Beachtown
Bike: M900
Posts: 2,188
If it's just low down running that is rough then again, I would say unlikely that the headers would have a bearing on this whether they are standard or otherwise. Standard headers have that very restrictive squashed X where they join as a kind of collector which can also mislead into thinking there is a problem as often one can will be hotter than the other to touch.

Just to confirm-I know you have checked through the alternator and RR wiring but has the battery also been replaced?
__________________
You're perfect, yes, it's true- But without me you're only you!
Flip is offline   Reply With Quote
Old 20-03-2020, 02:30 PM   #43
FrankenDesmo
Member
 
FrankenDesmo's Avatar
 
Join Date: Sep 2019
Location: Glasgow
Bike: M900
Posts: 108
Aye, it definitely seemed to be a sudden issue that had developed while sitting over the winter (rather than incorrect jetting). The battery was new on the bike when I got it, but it hasn't been replaced since the RR was replaced (it holds a strong charge though, and was off the bike and kept topped-up with a trickle charge over the winter). I'm hoping it was old fuel gumming up the works, but I'll see when I go to start it again.

However, I've just done the valve clearance checks...

Vertical Inlet Open: 0.04mm (0.05 required a tiny amount of force)
Vertical Inlet Close: 0.14mm
Vertical Exhaust Open: 0.04mm
Vertical Exhaust Close: 0.09mm
Horizontal Inlet Open: <0.04mm (didn't have a feeler gauge smaller, 0.04 required a tiny amount of force)
Horizontal Inlet Close: <0.09mm
Horizontal Exhaust Open: <0.04mm (same as Inlet)
Horizontal Exhaust Close: <0.09mm

I used the 'loaded gap' method from Chris Kelly to measure the Closer gaps, so the <0.09mm on the horizontal Closers means 0.13-<0.04, so probably 0.10 assuming the Openers are 0.03mm.

I triple-checked these measurements, going up and down feelers (where possible) to ensure I had the one that slid in without force. Where I need to apply a tiny amount of force, it was really minute and more aligning the gauge with the gap by using a finger at each end of the gauge, but I assume that counts as the gauge being just too thick.

My Closers seem to be within spec (0.03-0.20 according to Haynes), however it looks like all four openers are out of spec as Haynes has the lower bound at 0.05mm.

I gather that this means that the Opener shims need to be ground down by 0.01-0.02mm, in order to open the gap a bit.

Bugger, I was hoping to not have to go that far just yet. Still - could be worse. Off to machine mart to get a micrometer, some 400 & 600 grit, and a flat surface.

Last edited by FrankenDesmo; 20-03-2020 at 02:39 PM..
FrankenDesmo is offline   Reply With Quote
Old 20-03-2020, 07:04 PM   #44
utopia
No turn left unstoned
 
utopia's Avatar
 
Join Date: Jun 2010
Location: leicester
Bike: M750
Posts: 4,545
I've done my own valve clearance checks three times now.
I also have enough engineering experience to have a decent amount of "feel" with measuring systems.
Just thought I'd pass on what I've learned from work on my own M750, namely ....

The results you get are significantly dependent on the method used.
I favour the method used by Chris Kelly to check the closer clearances but I also measure them directly and compare the results.
Also, no matter what method I'm using, I usually go through the whole lot two or three times, keeping notes as I go.
I always get discrepancies and I'm not satisfied until I have reasonable parity between both the different measurement methods and the repeated attempts at the same method.
This whole process usually takes me two or three days and this is partly because I like to leave a decent gap between my various attempts to reduce the chances of robotic repeats.
I have found in the past that after a few attempts I become much more confident in the validity of my individual measurements and my overall result.
In the past I have been able to detect differences which arise simply from, for example, the method that I use to load the closing rocker.
If you think about it, this isn't surprising as you are measuring the effect of an assembly of parts, each of which has a working clearance.
I also bear in mind that oil on the mating surfaces can affect the results.

I tend to be happy to adjust any clearances which are a little tight and need opening up a bit but I'm more wary of adjusting any that are loose and need closing up ... particularly the closer clearances.
I also disregard any recommendations to aim for zero clearances because I'd rather have a little noise than risk a damaging interference.
Valve clearances which are a small amount out of tolerance, as long as there is no interference, should not cause what you could call a running "fault" with the engine ... they would only fractionally reduce the running efficiency.
Finally, I keep detailed notes of everything as I go along. I also edit these notes into a suitable record for future use.

Personally, I'm not a fan of rubbing shims down to reduce their size. I tend to prefer buying a new shim (or accepting a small amount of difference from perfection).
Its too easy, in my opinion, to change a dead flat surface into a curved or tapered one in the process.
Also bear in mind that the shims are hardened (probably case hardened if they're original Ducati shims but there are aftermarket shims which are hardened right through .. or so I'm told).
But I know there are plenty who do rub shims down in size and seem to get away with it. ... you pays yer money ....

A mirror will provide a reasonable flat surface to work from if you do decide to rub shims down.
It can also make a useful substitution for an engineering surface plate for use in making measurements.

Sorry that's all a bit lengthy, both in words and in the work suggested, but in these days of social isolation you might as well spend a bit longer in the shed, eh ?

Last edited by utopia; 21-03-2020 at 12:59 AM..
utopia is offline   Reply With Quote
Old 20-03-2020, 07:53 PM   #45
Flip
Registered User
 
Flip's Avatar
 
Join Date: Mar 2010
Location: Beachtown
Bike: M900
Posts: 2,188
For another view on valve adjustment and how service intervals and the subsequent running costs of Ducati’s have changed over the years as a result, have a ponder over Neil Spalding’s thoughts.

http://www.sigmaperformance.com/service-interval.html

Now onto the reason I asked about the battery- it is just possible that yours is starting to ‘soft-short’. It’s really hard to detect and it usually won’t register as weak on an Optimate type charger and even more tricky it will often pass a ‘drop test’ too. Only after the bike has been running a few minutes (especially if the charging system is putting in 14v+ which is too high for a sealed battery float charge) it can then show up as a mis-fire, admittedly this would be more likely in a fuel injected motor running a fuel pump and associated ECU but I suppose it is possible it’s somehow sapping power to the coils or igniter boxes?

There’s a lot to read but worth it here:

https://batteryuniversity.com/learn/...internal_short
__________________
You're perfect, yes, it's true- But without me you're only you!
Flip is offline   Reply With Quote
Reply


Posting Rules
You may not post new threads
You may not post replies
You may not post attachments
You may not edit your posts

BB code is On
Smilies are On
[IMG] code is On
HTML code is On

Forum Jump


All times are GMT. The time now is 02:33 PM.

vBulletin Skins by vBmode.com. Powered by vBulletin® Version 3.8.3
Copyright ©2000 - 2024, Jelsoft Enterprises Ltd.