UK Monster Owners Club Forum » .: Technical :. » Mods & How To's » Slow Monster rebuild

Reply
 
Thread Tools Display Modes
Old 27-04-2018, 09:31 PM   #676
350TSS
Too much time on my hands member
 
350TSS's Avatar
 
Join Date: Jan 2013
Location: Shipbourne
Bike: M900
Posts: 1,419
Mr Gazza - yes please ask your mate - I know I could paint them but the chrome effect will look so good on the engine against the anthracite and it will tie in nicely with the frame/swinging arm.
350TSS is offline   Reply With Quote
Old 28-04-2018, 06:03 AM   #677
Darren69
Transmaniacon MOC
 
Darren69's Avatar
 
Join Date: Sep 2013
Location: Sutton In Ashfield
Bike: Multiple Monsters
Posts: 6,023
As an alternative to coating you could alwys polish them and laquer over. Getting them professionally done wouldn't be that expensive I don't think. A guy near me did my exhaust headers and manifold for £50 and it looks amazing.
__________________
Roast Beef Monster!

Termignoni and Bucci - Italian for pipe and slippers!

S4 Fogarty, S4R 07T, 748, Series 1 Mirage
Darren69 is online now   Reply With Quote
Old 28-04-2018, 08:08 AM   #678
Albie
Fanactical volunteer
 
Albie's Avatar
 
Join Date: Oct 2003
Location: Kent
Bike: M900
Posts: 9,033
I really think you need to do this Richard as I think I know you better now. You get an idea and you follow it through. Cant say I blame you at all. Worst case scenario on flat edges is some care flat scraping back. On bearing and seals its a pita but go for it with the powdercoaters advice if and when they give it.
Albie is offline   Reply With Quote
Old 28-04-2018, 09:04 AM   #679
Mr Gazza
Lord of the Rings
 
Mr Gazza's Avatar
 
Join Date: May 2013
Location: Norwich
Bike: M900sie
Posts: 5,815
Quote:
Originally Posted by Albie View Post
I really think you need to do this Richard as I think I know you better now. You get an idea and you follow it through.
I think I get the picture!
I hope it goes better than I predict, but if it were me I would polish.
__________________
Mr Gazza is offline   Reply With Quote
Old 01-05-2018, 06:06 PM   #680
350TSS
Too much time on my hands member
 
350TSS's Avatar
 
Join Date: Jan 2013
Location: Shipbourne
Bike: M900
Posts: 1,419
Been prevaricating for the last few days over whether or not to send the alternator and the clutch case for “chrome” powder coating. It was all boxed up and ready to go but I was I was pondering Mr Gazza’s advice very hard.
I gave Aerocoat a ring and had a good long chat about my concerns a) longevity/ resilience of the coating to temperature and cycling of hot and cold; b) compromising of the gasket faces; c) with the cases screwed to plates would getting the screws out post coating create a problem and d) the effect of leaving the glass oil level window and rubber seal in the case whilst it was heated (I could not get the bloody thing out).
Basically, Aerocoat said that longevity was not an issue and they had done lots of engine cases and would deal with all my concerns, probably removing the cases from the plates and masking up and using special sealants themselves. In the immortal words of Mandy Rice Davies “ …they would say that wouldn’t they…” but I was convinced despite my natural scepticism/cynicism. The cases are now winging their way there via Parcel Monkey (approximately half the price of Parcelforce) to Sr Olaves.
My last birthday present was one of these which was acquired in the knowledge that the next or the next but one project will be restoring my Moto Morini 3.1/2 which has acres of polished aluminium cases/fork legs /yokes to do. This afternoon I took it out of the box and set it up on an old frame from a kitchen cabinet.
image hosting gif
After another unscheduled hour the top and bottom yokes looked like this – well pleased with the result. There is an annoying bit between the instrument mounting holes and the fork tube holes that is difficult to get at with the polishing wheel but this will be dealt with by application of Autosolvol and elbow grease.
350TSS is offline   Reply With Quote
Old 01-05-2018, 08:50 PM   #681
Albie
Fanactical volunteer
 
Albie's Avatar
 
Join Date: Oct 2003
Location: Kent
Bike: M900
Posts: 9,033
Looking good Richard.
Albie is offline   Reply With Quote
Old 02-05-2018, 05:24 PM   #682
Mr Gazza
Lord of the Rings
 
Mr Gazza's Avatar
 
Join Date: May 2013
Location: Norwich
Bike: M900sie
Posts: 5,815
Glad you had a chat with Aerocoat about your cases... They know what they're doing.

Sorry, I didn't manage to contact my powder coater mate. He should have delivered some stuff today, but didn't show, so I will miss him now, as I'm off work till Wednesday.
Aerocoat will probably know the sealant I referred to, or at least something equivalent.

I will find out eventually though.
__________________
Mr Gazza is offline   Reply With Quote
Old 02-05-2018, 05:35 PM   #683
Capo
You Are What You Is
 
Join Date: May 2005
Location: A Foward Location
Bike: S4r
Posts: 1,948
This was done by Aerocoat


Last edited by Capo; 02-05-2018 at 05:37 PM..
Capo is offline   Reply With Quote
Old 04-05-2018, 04:07 PM   #684
350TSS
Too much time on my hands member
 
350TSS's Avatar
 
Join Date: Jan 2013
Location: Shipbourne
Bike: M900
Posts: 1,419
An unwelcome additional project
A moment’s inattention by my daughter and her very recent 18th birthday present looks like this.
image url upload


Quite a lot of damage for about 10 – 15mph collision. Fortunately, the radiator survived and the airbags did not go off and after I reset the inertia fuel cut out I drove it home and it ran straight with no pulling on the brakes so as far as I am concerned it is salvageable. It has only done 35k miles.
The insurer’s will almost certainly write it off as beyond economic repair so I shall get on e bay and buy the necessary 2nd hand bits (about £200) then have a bit of fun trying to straighten it out. Monster progress will therefore suffer over the next week or so.
I did manage today in the balmy weather to get the first coat of high gloss resin on the patterns, all except the tank which I am still pondering whether or not I can get away with a mould split 2 ways rather than 3.


Anxious not to create any dust whilst the resin was curing I decided to spend the rest of the afternoon machining up my top hat spacers for the rear brake hanger, 40mm steel bar bored 25mm and turned down to 32mm, leaving a 40mm brim to the hat. They just need a couple more skims and then parting off.
Hope the weather stays good for the weekender attendees - maybe next year
350TSS is offline   Reply With Quote
Old 04-05-2018, 05:18 PM   #685
Darkness
.
 
Darkness's Avatar
 
Join Date: May 2007
Location: Stockbridge
Bike: M900
Posts: 1,984
That should polish out?

Shouldn’t be too hard to get the bits, but may need paint. https://www.ebay.co.uk/itm/Honda-Jaz...8AAOSwX8da51PR
__________________
Original and Best since 1993
Darkness is offline   Reply With Quote
Old 29-05-2018, 07:01 PM   #686
350TSS
Too much time on my hands member
 
350TSS's Avatar
 
Join Date: Jan 2013
Location: Shipbourne
Bike: M900
Posts: 1,419
Rained all day long so nothing better to do than making Monster progress.
I primed the tank pattern (2 coats) and it is amazing how colour on it made it look real, unfortunately the black primer also highlights the more major imperfections (not quite symmetrical either side of the centre line, about 4mm so a central stripe in the final paint is definitely out of the question) and all the slightest imperfections (pinholes in the filler, tank top to side radiuses with very slight flats on them etc etc).
The asymmetry will have to stay, sitting on the bike it is barely noticeable, but the rest will get sorted with yet more filler and rubbing down. It is going to be a long summer.
I have decided to concentrate on the bodywork stuff for the next month or so as I cannot move in the garage with all the patterns laid out and I do not want to start any engine work with all the dust around. It is definitely best to do the engine before it goes back into the frame.
Posts and pictures will therefore be limited until the moulds are made as you cannot tell from photographs whether any real progress has been made on the patterns.
350TSS is offline   Reply With Quote
Old 16-06-2018, 12:59 AM   #687
350TSS
Too much time on my hands member
 
350TSS's Avatar
 
Join Date: Jan 2013
Location: Shipbourne
Bike: M900
Posts: 1,419
Been a while since last post. After 3 solid days of spraying and rubbing down, I have reached the point with the CF patterns where I am almost ready to make the moulds (petrol tank excepted). My objective was to make the patterns as flawless as possible so the moulds and the finished products would be near perfect. This involved at least 2 layers of primer resin, with a rub down between each. The primer resin is brilliant stuff provided it is sprayed. It is like liquid filler, you can put it on fairly thickly to hide imperfections and it is very easy to rub down. If it is brush painted the brush striations tend to be quite deep and in loosing them you virtually rub the whole coat off. It can be rubbed down after about 4 hours but I tend to leave it overnight as I am on the lean side with the catalyst to give me the maximum working time in the spray gun
The primer has been followed by a minimum of 3 coats of high gloss pattern resin, with rub downs between each coat. This resin does give a high gloss but is very hard and needs a minimum 12 hours curing. It is good if you can put on one wet looking coat, it does not like being over-sprayed as you get a moon crater finish that takes hours to rub out. It must be rubbed down wet as the paper clogs badly and you end up scoring/scratching the surface if you try rubbing down dry. Rubbing down wet also has its problems as you cannot tell whether you have eradicated the high spot or have already broken through to the primer.
I have now reached the stage where with each application of high gloss I am creating more imperfections than I am curing with the post application rub down, it is time to say that is as good as it is going to get. Besides I am very bored with it. I use a block wherever possible but on the more intricate patterns it is folded wet and dry and sore fingertips on the right hand. The patterns are far from perfect but the best I can do and still have a bike to ride next year. My working life always had the stress between quality and time and time always won despite my best intentions.
I bought one of these

– very highly recommended - I am a novice at spraying, having only previously used rattle cans or electric spray guns suitable for fences. It is quite air use heavy as my compressor can just about keep up, but is one of those tools that is very satisfying to use as it has turned me from “inept” status to “almost competent”.
https://www.spraygunsdirect.co.uk/in....r3KLXG6q.dpbs.
I also decided to invest in a kit of valve shims from these people: https://emsduc.com/.
Not cheap (c $300) with postage but will also do for my 750SS when I get round to that, (27000 miles and never had a shim changed from new).
350TSS is offline   Reply With Quote
Old 16-06-2018, 08:48 AM   #688
jerry
Old Git
 
jerry's Avatar
 
Join Date: May 2006
Location: Cricklade
Bike: Multiple Monsters
Posts: 2,822
EMSDUC shim kits are fantastic , i picked up a 4v kit from mike at his home in sacramento great guy back in 2007
__________________
MONSTERMAN
jerry is offline   Reply With Quote
Old 22-06-2018, 09:55 PM   #689
350TSS
Too much time on my hands member
 
350TSS's Avatar
 
Join Date: Jan 2013
Location: Shipbourne
Bike: M900
Posts: 1,419
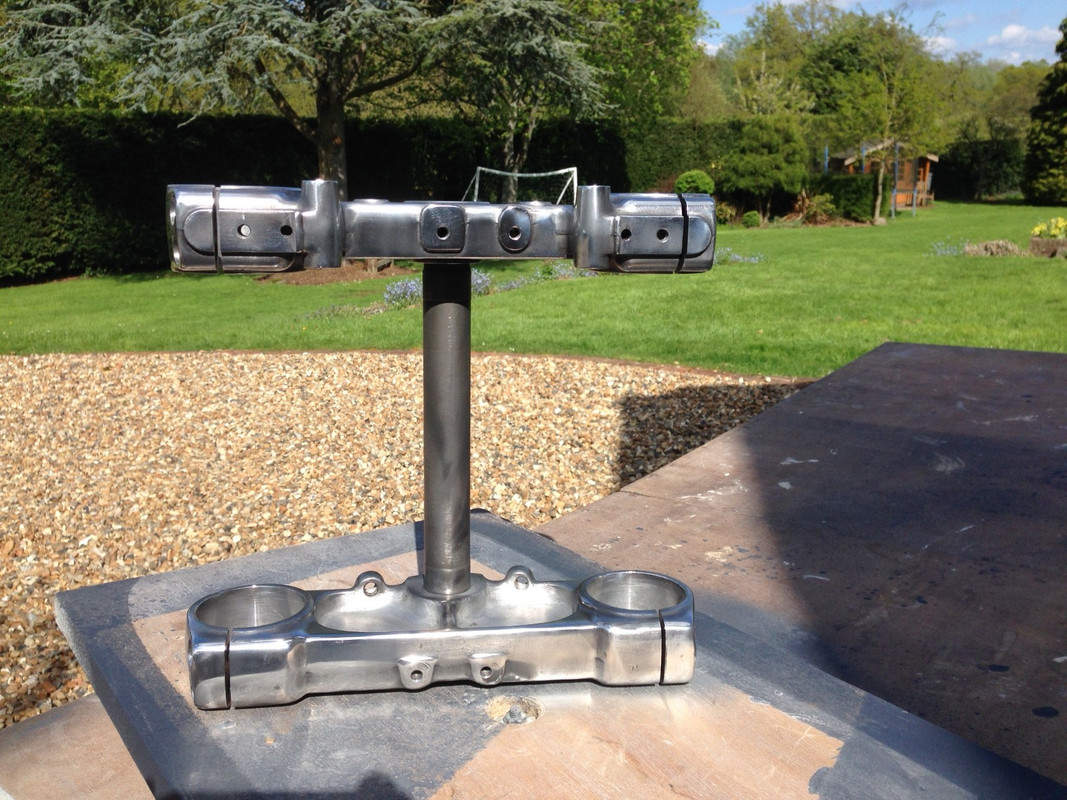
Shiny stuff from Norfolk and Shipbourne
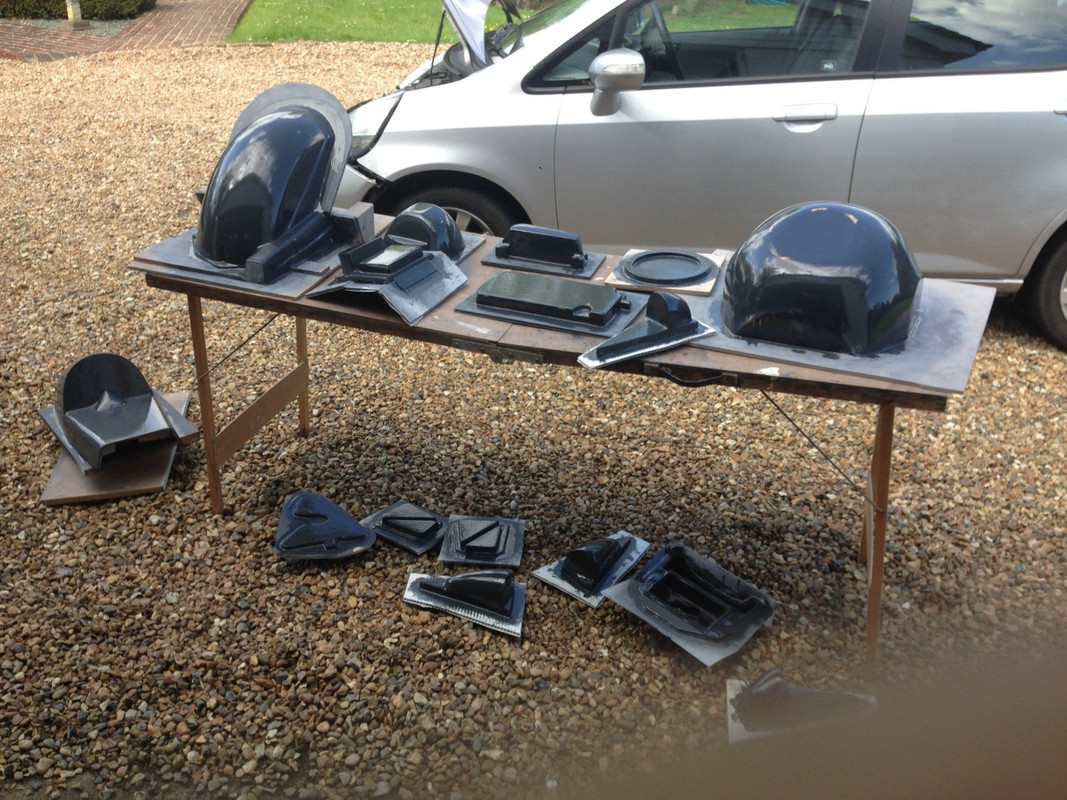
Large parcel arrived today with enough bubble wrap to re-float a sunken battleship, within were these:

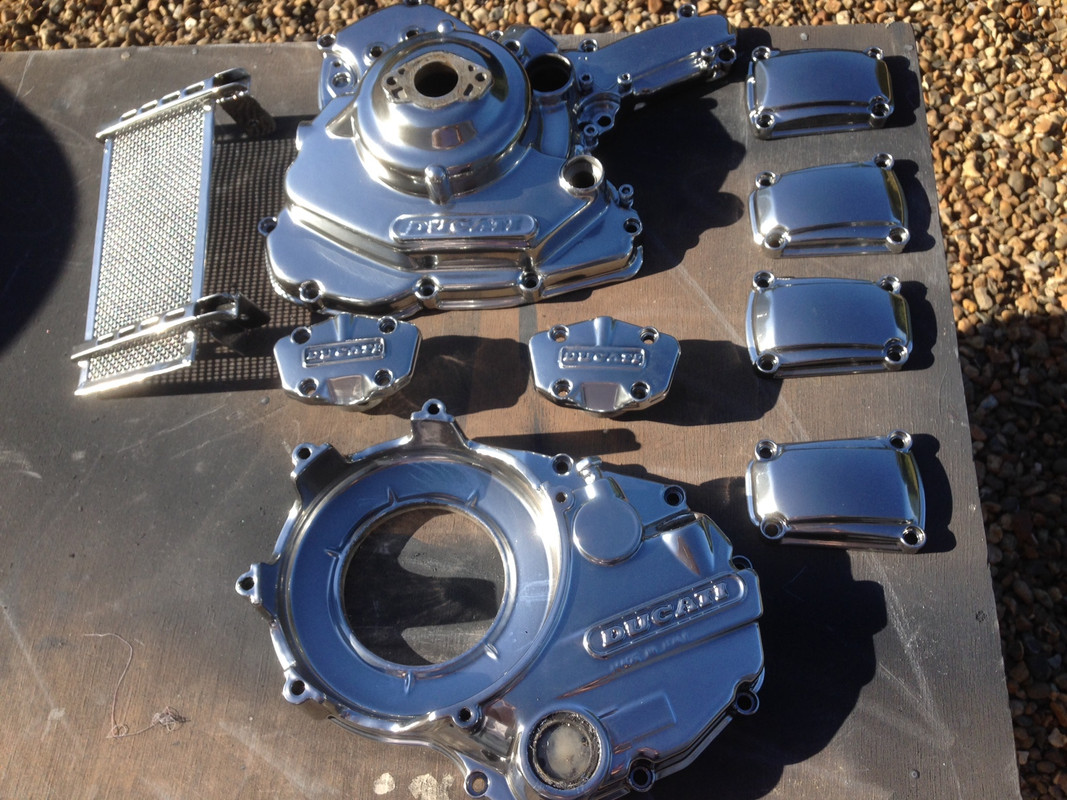
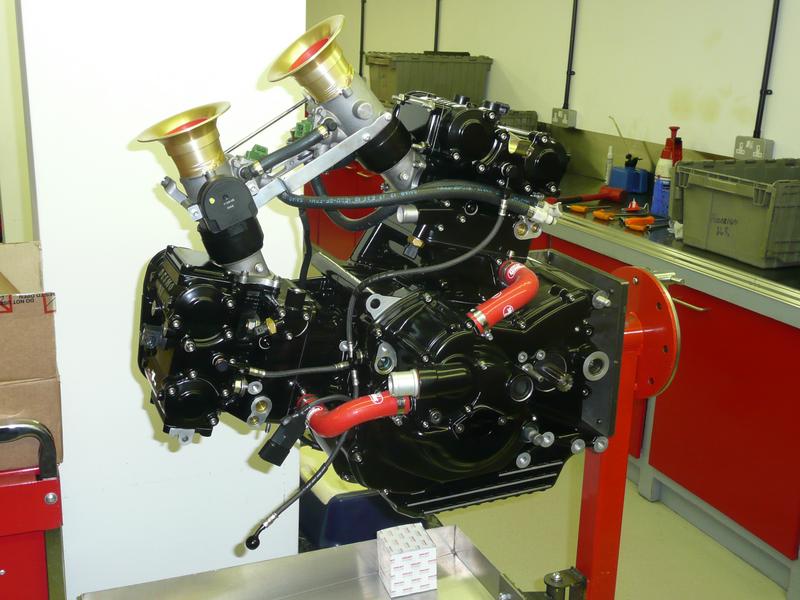
Well pleased with 90% of the results and cannot wait to see what they look like attached to the engine.
The exhaust hanger bracket did not come out well though, the underside is black rather than chrome look and it looks as though a contaminant has ruined the finish around one of the eyes. I am considering sending it back, maybe my silicon bathroom sealant resilient mounting did not like the heat and bled over the powder coating as it was melting/flowing.
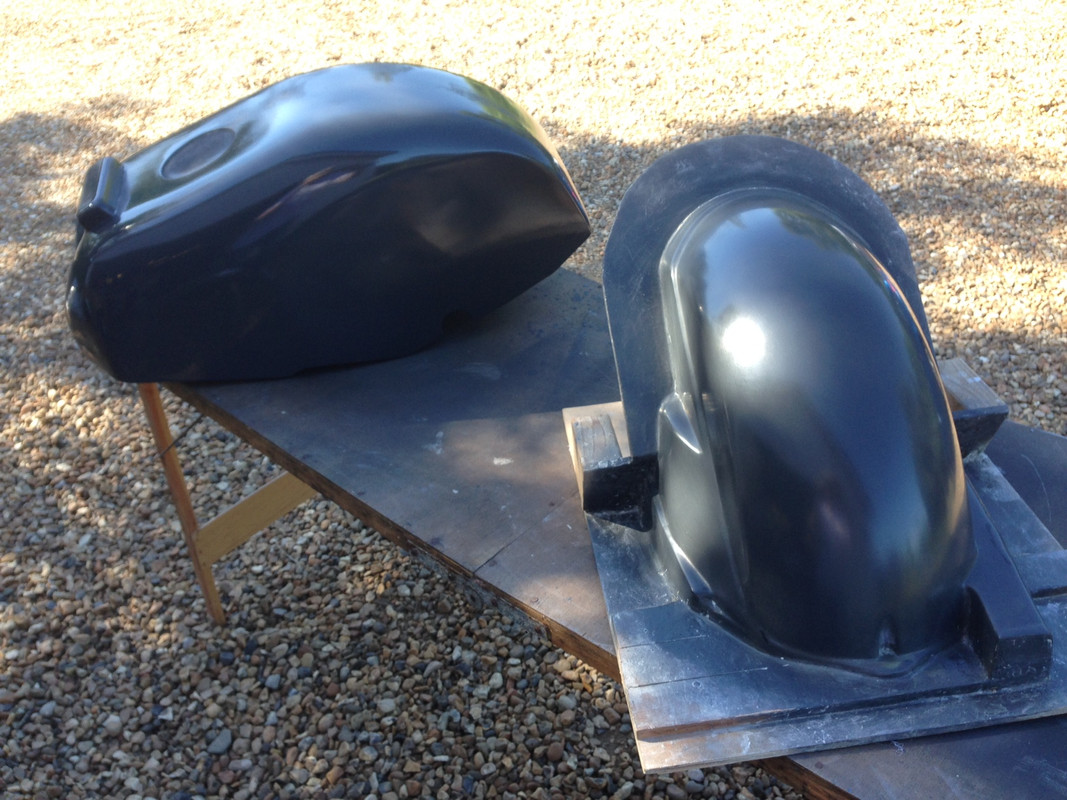
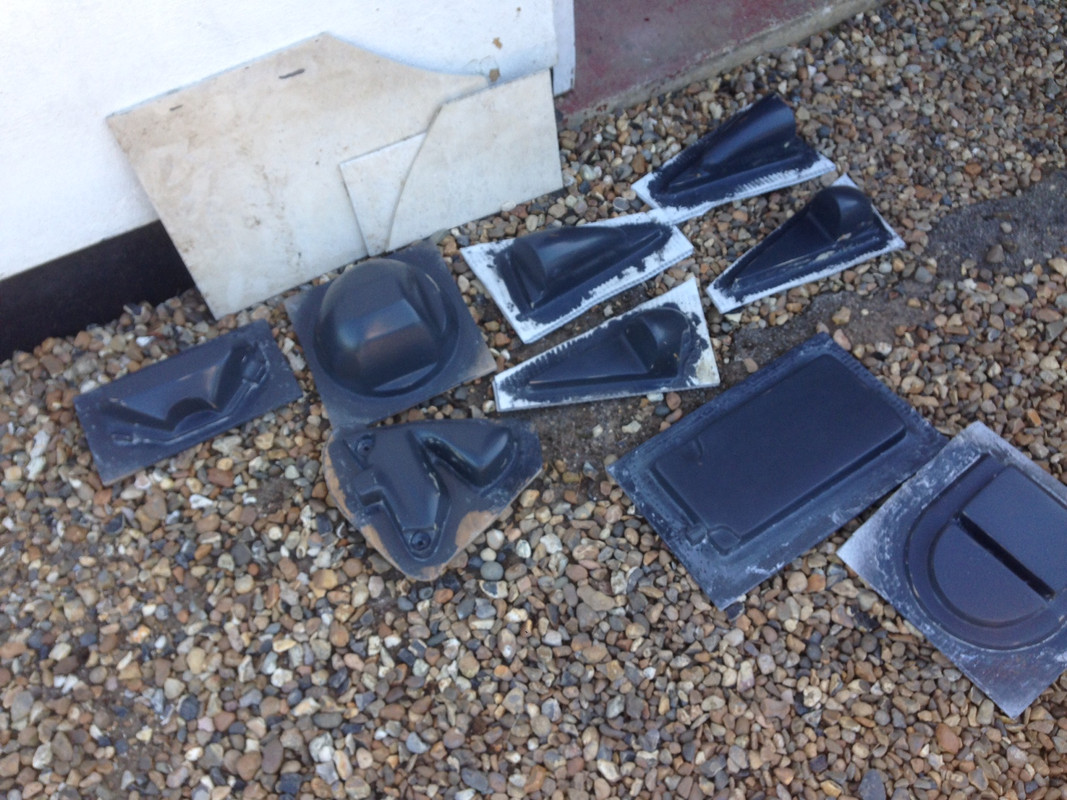
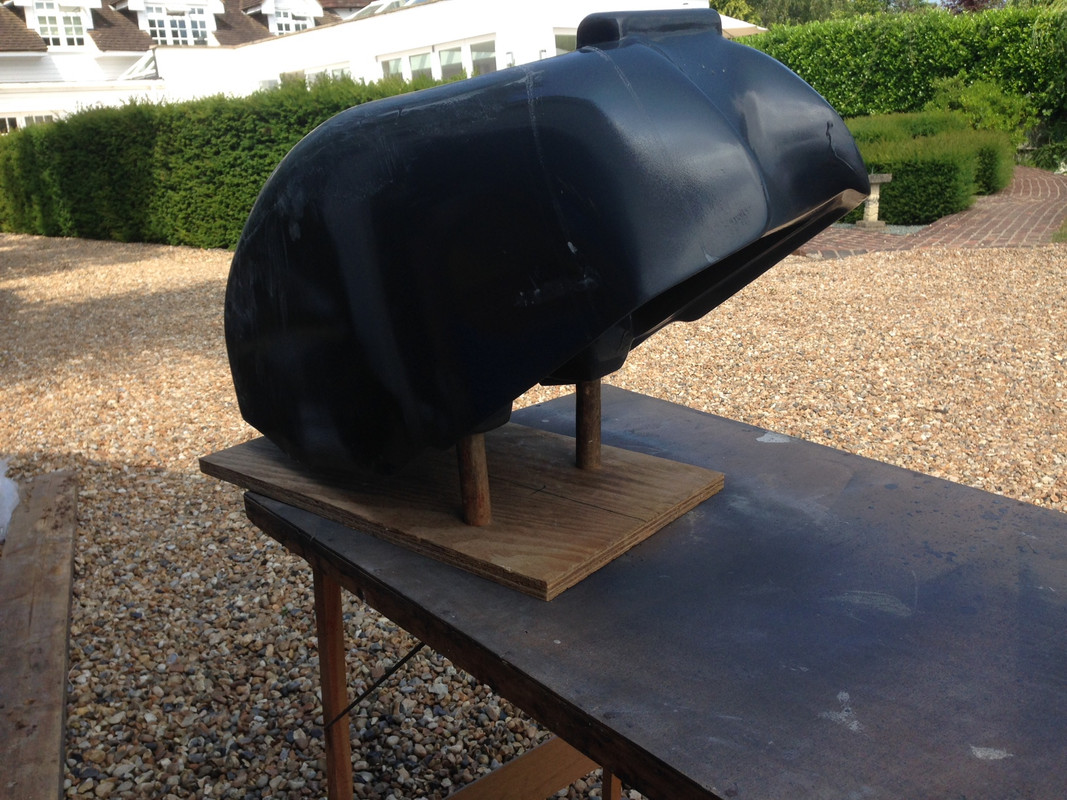
The rubbing down continues on the patterns, all except the tank are now polished and ready for 5 applications each of release agent. The tank is in its first coat of high gloss pattern resin the hugger is polished ready for release agent.

print screen windows xp

Someone on here suggested the use of these when repairing/renovating carbon fibre.


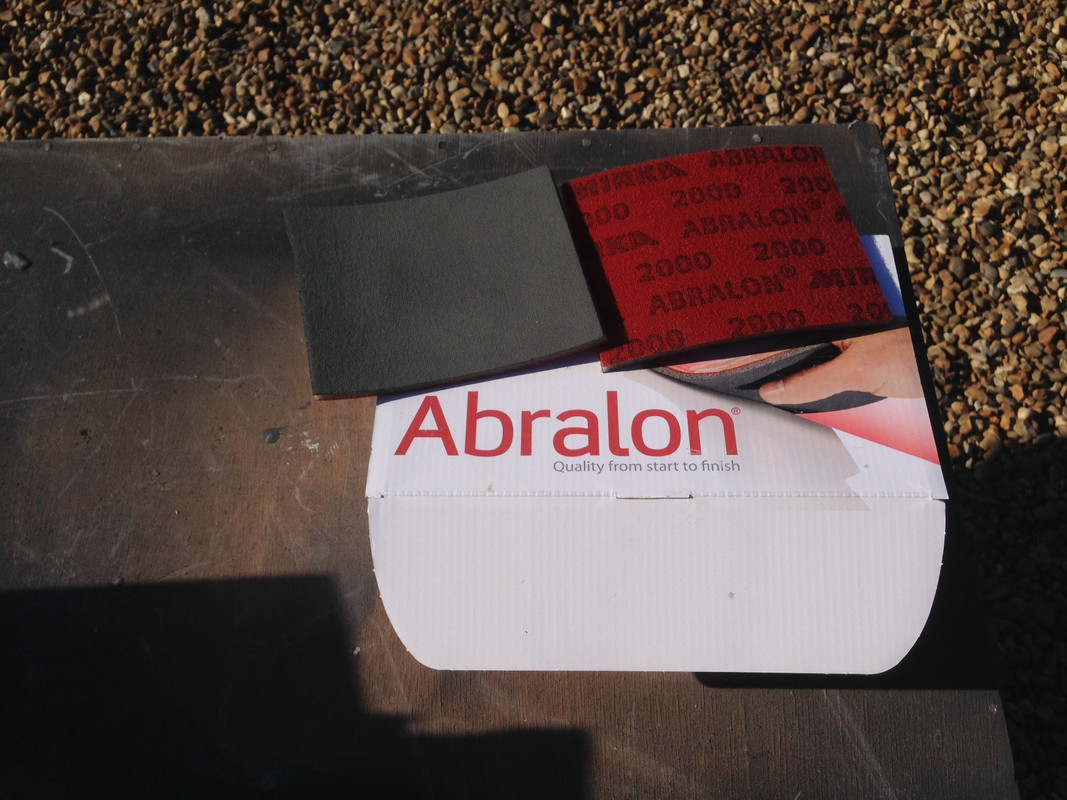
They are brilliant, so much better than wet and dry, they are foam backed abrasive pads which are great for polishing. I have been rubbing down with 600, 800 and 100 grade wet and dry. The 1000 grade does not last long and as with most wet and dry papers they are either too wet or too dry and you cannot assess progress whilst you are working, rather you have to stop and clean /dry the part to see where your efforts need to be targeted. These foam backed pads retain just enough water to work and still see what is going on. They are not cheap at £1.79 per pad but they last and last. I bought 2000 grade and 4000 grade, the latter for final finishing of the painted carbon fibre
The next steps with the patterns after the application of release agent is tooling gel coat x 2 coats then I coat of coupling resin with 100g chopped fibreglass followed by 4 layers of 300g chopped fibreglass in tooling resin. When that has hardened hopefully the mould will come off the pattern and I will have a moulds to make CF parts.
I will do first those patterns that do not require a split mould just to get my eye in so to speak. The tank, seat and fly-screen will definitely require split moulds
350TSS is offline   Reply With Quote
Old 29-06-2018, 03:13 AM   #690
350TSS
Too much time on my hands member
 
350TSS's Avatar
 
Join Date: Jan 2013
Location: Shipbourne
Bike: M900
Posts: 1,419
A setback and some worries
I went to rub down the first gloss coat on the tank pattern and found a distorted the lower edge.

pictures upload

This side panels were made from 4mm hardboard (just because that is what I had handy) and the use of water in rubbing down the primer resin and obviously an incomplete seal at the edge combined with the weight of the pattern (about 15kg) has caused the belling of that spot on the pattern. These things are sent to try us. Obviously with more resin coating and rubbing down to do and the weight of the pattern not going to change a solution was needed so I knocked up this from some 18mm ply and lengths of broom handle.

free image hosting

The broom handle ends fit in the indentations in the bottom of the tank made for the rubber isolation mount. It seems to work OK.
Two hours was spent rubbing down the first coat and a second coat applied but I used less acetone thinner on the second coat (normally use about 10 to 12%) and I got 2 huge runs so more rubbing down and at least another coat required.
350TSS is offline   Reply With Quote
Reply


Posting Rules
You may not post new threads
You may not post replies
You may not post attachments
You may not edit your posts

BB code is On
Smilies are On
[IMG] code is On
HTML code is Off

Forum Jump


All times are GMT. The time now is 04:36 PM.

vBulletin Skins by vBmode.com. Powered by vBulletin® Version 3.8.3
Copyright ©2000 - 2024, Jelsoft Enterprises Ltd.