UK Monster Owners Club Forum » .: Technical :. » Mods & How To's » Slow Monster rebuild

Reply
 
Thread Tools Display Modes
Old 14-08-2019, 06:24 PM   #1
350TSS
Too much time on my hands member
 
350TSS's Avatar
 
Join Date: Jan 2013
Location: Shipbourne
Bike: M900
Posts: 1,421
sorry wrong picture
350TSS is offline   Reply With Quote
Old 15-08-2019, 08:04 PM   #2
350TSS
Too much time on my hands member
 
350TSS's Avatar
 
Join Date: Jan 2013
Location: Shipbourne
Bike: M900
Posts: 1,421
Not so much achieved today on the Monster as it was A level results day and No 1 son got the required grades to go to his first choice university. He worked very hard through the spring and early summer and deserved his place.
I did a lot of filing today, first I went to remake the seat bracket I botched yesterday and then realised I had no aluminium sheet (abandoned road sign) left, so I had to modify the old one. This bracket will have some captive nuts attached to the upper surface and 4 x inverted saddles (2 each side) will be screwed on to sit on the frame. It shall be bonded into the seat structure. The main purpose is to provide a flat base for the saddles to be screwed on to so that they are the right distance apart and parallel with the frame tubes and if necessary packing pieces can be added between the plate and the saddles to raise or lower the seat.
Then I modified my instrument surround to take out the top lug so that the fly-screen can sit over it. I may yet have to remove the lugs on either side to obtain the necessary clearance in which case there is enough meat below the existing holes to drill and tap 6mm to attach the fly-screen to.
350TSS is offline   Reply With Quote
Old 16-08-2019, 05:24 PM   #3
350TSS
Too much time on my hands member
 
350TSS's Avatar
 
Join Date: Jan 2013
Location: Shipbourne
Bike: M900
Posts: 1,421
I was about to treat the inner surfaces of the tank to some ethanol resistant resin when I realised that my fuel filler insert would be a wonderful water trap. If I left it out in the rain it would soon fill up and seep past the locking lid into the fuel compartment. Since water will not flow uphill, the drain I need will have to go through the tank itself. Designing something that drained from ground zero within the filler cap insert exercised “ lonely” (my solitary remaining brain cell) for an hour or so.
Finding a suitable piece of 14mm hexagon aluminium bar was the catalyst for a couple of hours on the lathe. Here are the results:

The top drain mount has a through drilling and this connects to 3 x 3mm holes drilled across the flats of the head as close to the bottom edge of the nut as possible without breaking through. When making it I forgot about 5 x the captive nut plate that retains the filler cap assembly but I simply drilled and tapped it 8mm and screwed the drain into it then sealed the bottom of the thread with araldite. All the ararldited bits will get a coat of ethanol resistant resin before the two halves get bonded together.
I will bond the top end into the insert (obviously on the downside when the bike is on the side stand).
I have put the outlet pip next to the fuel tap because the pipe internal to the tank will have to be connected before the two halves are bonded together and the greater the distance between the input and the output the better chance I have of absorbing the slack necessary to connect them before bonding I.e no loops on the internal pipe. I will protect the internal pipe with some larger diameter pipes where they are likely to chafe on the internal baffles.
None of the last four or five day’s work has been on my schedule of tasks which counts towards the ETTC. This now stands at 180 hours
350TSS is offline   Reply With Quote
Old 17-08-2019, 12:16 PM   #4
Jez900ie
Pleasantly surprised!
 
Jez900ie's Avatar
 
Join Date: Nov 2016
Location: Stoke on Trent
Bike: M900ie
Posts: 780
Such an incredible amount of work and the detailed explanations are similarly brilliant. Just 180 more hours!

Hats (OK hemets) off to you sir, you are an inspiration.
__________________
Monsters don't hide under the bed, they sleep inside the shed
Jez900ie is offline   Reply With Quote
Old 17-08-2019, 11:48 PM   #5
350TSS
Too much time on my hands member
 
350TSS's Avatar
 
Join Date: Jan 2013
Location: Shipbourne
Bike: M900
Posts: 1,421
Thanks Jez, being retired with nothing better to do helps.
Today I rubbed down the filler on the modifications to the underside of the tank and re-modified the aluminium instrument frame. As I suspected the “ears” interfered with the positioning of the fly-screen so they had to go. Two new holes were drilled and tapped 6mm but the lug that the fly screen will have to pick up on is now very small.
Finally I gave the fly-screen a coat of primer to highlight any pin holes in the surface and was pleasantly surprised to find none. Pictures to follow.
350TSS is offline   Reply With Quote
Old 19-08-2019, 05:55 PM   #6
350TSS
Too much time on my hands member
 
350TSS's Avatar
 
Join Date: Jan 2013
Location: Shipbourne
Bike: M900
Posts: 1,421
share images free
Roughly hung in place.

And the instrument surround shorn of most of its "ears"
nearest sbi bank
350TSS is offline   Reply With Quote
Old 19-08-2019, 05:58 PM   #7
350TSS
Too much time on my hands member
 
350TSS's Avatar
 
Join Date: Jan 2013
Location: Shipbourne
Bike: M900
Posts: 1,421
I started to make the front seat mounting arrangement, basically copying the original Monster concept of two hooks that will engage with the bridge of the frame and keep the front of my seat attached to the bike.
The design will have to be asymetrical left to right, as the chain oiler reservoir constrains space on the LH side. It consists of a 3mm aluminium plate 150mm x 58mm across the width of the seat with “captive nuts” ( two blocks of 6mm aluminium plate 58mm x 13mm each drilled and tapped 5mm) attached to the uppermost surface from beneath by 3mm csk allen screws.
get url for picture

This plate will be set in “oasis” foam and bonded/laminated to the CF seat base.(hopefully at an angle that means the hooks are not more than about 25mm deep otherwise there will be too much leverage on the 5mm screws holding the hooks to the 3mm plate).


The hooks will be 2 x 10mm plates shaped and attached by 5mm socket screws to the 3mm plate bonded to the seat. These hooks will extend forward of the front edge of the seat pan by about 25mm to engage in the frame bridge. Getting the shape and angle of the hooks right will not be easy and I foresee a lengthy tweaking process to get the seat to sit right.
Another imponderable is whether the foam and upholstery material extends beneath the lower edge of the seat base or only the upholstery material, this could make a 6 to 8mm difference in the bottom edge of the seat. Ideally the bottom line from the tank should extend upwards and follow the frame line, a 6 or 8mm discontinuity in this line will just look shoddy.
This seems an extraordinarily complex way of doing it, but there are no lugs or bolt holes anywhere near to attach a simple inverted U shaped aluminium bracket and I really like the idea of the seat being QD via a single sprung loaded latch at the back. The hooks are an essential component to that working and mounting them the way I am proposing means that I can adjust the height of each hook by packing them away from the bonded in 3mm plate.
350TSS is offline   Reply With Quote
Old 20-08-2019, 07:53 PM   #8
350TSS
Too much time on my hands member
 
350TSS's Avatar
 
Join Date: Jan 2013
Location: Shipbourne
Bike: M900
Posts: 1,421
Really productive day today, I started by locating the tank breather. Originally I wanted to locate it on the leading edge of the tank blister but that would have meant the entry hole would be about 15mm below the top of the blister and with a full tank and heavy braking the cheapo Chinese non-return valve would have been subject to fuel pressure not just air pressure. That meant it had to be top of the blister mounted. Obviously a central location had to be determined, but which centre - of the tank or centre of the blister which unfortunately are not exactly the same place, whichever I chose would look odd. I settled on the LH end so that the pipe does not get in the way of my turning the ignition key. The original part I made to act as the internal nut would not fit with the depth of CF inside the blister so I had to knock up an 8mm aluminium nut on the lathe.

open gas station near my location
Next I turned my attention to the positioning of the cotton reel at the back of the tank which will locate the 5mm bungee cord which will pull the tank down onto the rubber Isolation mounts. I will use the standard Monster over centre latch at the front and with QD petrol pipe unions the tank should be removable in about 20 seconds.
Moving the tank backwards by about 8 to 10mm has compounded a problem I had already foreseen, namely because the frame mounting point for the bungee is the bridge across the frame and this is now about 25mm forward of the rear edge of the tank the bungee will chafe the rear edge of the tank and damage the paint and possibly the CF. I came up with this escutcheon:


It is 0.5mm stainless steel cut from an old cooker hood trunking. It took ages to make, cutting it out with tin snips (they was the only tool I could use) left the inevitable crenulated edge which had to be addressed between the heads of two hammers, which left some minor denting which had to be polished out with 600 wet and dry. It was araladited to the tank and the cotton reel installed which pressed out surplus araldite which then got everywhere and had to be cleaned off with more wet and dry. Still I am quite pleased with the result and the curvatures around the cotton reel seem to look relatively uniform.
Then I spent half an hour or so pouring resin into the recesses for the isolation mounts. I will leave this to cure for a couple of days before re-cutting the recesses 10mm further forward


The last hour I started to make the rear seat latch which will follow the same principles as the other seat mounts. This I should finish tomorrow.
chase bank near me open hours
350TSS is offline   Reply With Quote
Old 21-08-2019, 07:44 PM   #9
350TSS
Too much time on my hands member
 
350TSS's Avatar
 
Join Date: Jan 2013
Location: Shipbourne
Bike: M900
Posts: 1,421
Today the plan was to:
a) Finish the rear seat mounting metalwork – completed see below
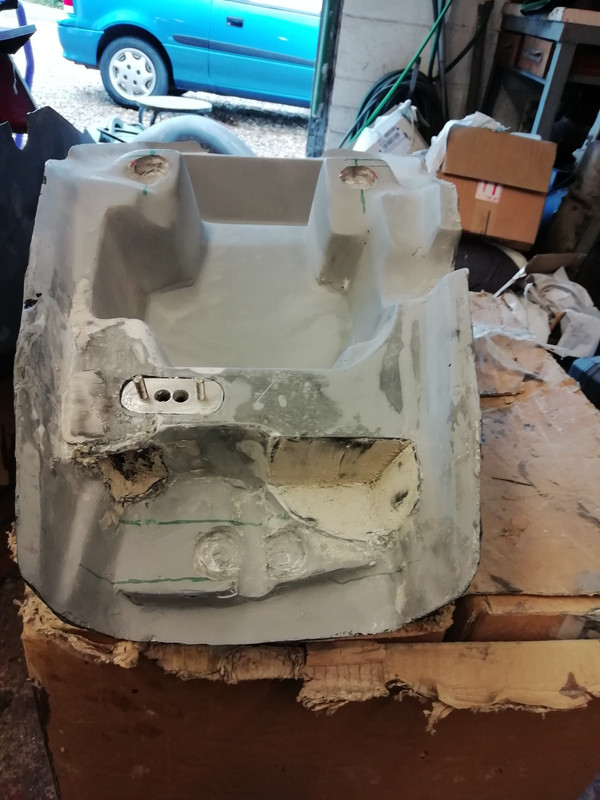
b) modify the tool tray to permit the central seat mount to rest on the frame – I am awaiting delivery of some plastic saddles so I have had to guess the dimensions in order to make progress – completed
c) sort out the mounting of the front tank latch – little bit of guess work involved here as well as the tank is not yet properly mounted but the latch has, I think, sufficient adjustment to accommodate any inaccuracy in my guesswork – not started
d) coat the inside surfaces of the tank (top and bottom) with ethanol resistant resin -. not started.
The metal work for the rear seat mounting absorbed an inordinate amount of time, mainly because in handling the parts I managed to mark up one of the plates for drilling the wrong way up, I didn’t notice until I trial fitted it together, the hole for the latch locating post was obviously in the wrong place. I rescued it by machining a brass bush from hexagon and attaching it in the right place almost breaking through to one of my lightening/bonding facilitation holes. I raised the bush by 9mm above the plate and countersunk a lead in to the hole to guide the post before the latch engages. It works a treat with the latch snapping shut with a satisfying click.
closest mobil gas station near me
A small problem I have encountered is that the powder coating has closed the holes for mounting the latch to the frame. I am frightened of using a drill to clear it as I fear it may snag and tear /chip the finish in the surrounding area. It is a lot worse for the bell crank for the rear suspension, the steel through bush inside the needle rollers will not go between the two mounting lugs. I hate the thought of taking a sanding disc to the finish but I cannot see any other way.
At the moment the critical path is the bonding of the tank and it’s positioning on the frame, I am awaiting delivery of resin putty to do the bonding. Also, I have to wait a couple of days for the resin to cure in the isolation mount indents before I can machine them in a different position. The seat mounting arrangements can only be finalised when the tank is bonded together and correctly positioned on the frame.
So I switched my attention to the engine.
A job I must do is to ensure the provision of adequate cam belt covers. The original rubber steel vertical cylinder one pretty well disintegrated when I took it off so I made some 6mm aluminium plate inner covers with quite a large weight saving. When I failed with my home brewed CF cam belt covers which were designed to work with the aluminium plate I bought some off the shelf CF replacements. These are obviously made to fit the original backing to the cover so I have a gap and nowhere to screw the camshaft end of the new vertical cylinder cover to.
Today, I machined some 10mm round aluminium bar to provide 2 x threaded posts. These posts were 28.5 mm long and my tap was not long enough to thread all the way through so I drilled and tapped one end 5mm and the other end 6mm.
I now need to make the gap filler which I think will be made from 2mm aluminium sheet screwed either to the 6mm plate. Getting the finished product to look half decent will be a bit of a challenge as the original moulded rubber was quite a convoluted shape. I do not think the covers were ever designed to be water tight and judging by the fine grit and road grime I removed when the originals came off I think they were only designed to stop road chippings/gravel getting between the belt and the pulleys.
online photo hosting
350TSS is offline   Reply With Quote
Old 22-08-2019, 07:51 PM   #10
350TSS
Too much time on my hands member
 
350TSS's Avatar
 
Join Date: Jan 2013
Location: Shipbourne
Bike: M900
Posts: 1,421
A couple of minor setbacks today, the first is that the Monster tank front over centre latch will not fit my tank, it has too big curvature designed in. No big deal, I would prefer some sort of mechanical latch but I think I will have to make do with bungee, which means I will have to make another “cotton reel”.
The second took absorbed a greater part of the day and is only half finished. I decided to make the gap filler for the cam belt covers. I cut my 2mm aluminium sheet and annealed it (rub with soap and heat until the soap turns brown - job done). I then knocked up a pattern out of an old oak door threshold and played with some clamps to shape it.


After a bit of a struggle this seemed to work. In doing so I realised that the outside profile of the new CF belt cover did not match the outside profile of the 6mm aluminium I had made previously. They were not a little bit out they just did not match within 3mm, it is hardly surprising as I drew the profile for the 6mm plate from the old inner belt cover and this was made of moulded rubber with a large radius curve towards the back plate. The only solution is to re-make both the 6mm plates.
350TSS is offline   Reply With Quote
Old 23-08-2019, 10:29 AM   #11
utopia
No turn left unstoned
 
utopia's Avatar
 
Join Date: Jun 2010
Location: leicester
Bike: M750
Posts: 4,546
A couple of minor snippets ....
I have been told that acetone might soften your frame powder-coat, which might enable you to clean up the offending area without cracking the surrounding coating ....?
You could even try nail varnish remover, which I believe is usually acetone based.
Also, I dunno if I'm reading your seat attachment correctly but I'm wondering if the "hooks" which engage with the frame would be better made out of black nylon rather than ally, for a softer, less scratchy fit ....?
utopia is offline   Reply With Quote
Old 23-08-2019, 02:10 PM   #12
350TSS
Too much time on my hands member
 
350TSS's Avatar
 
Join Date: Jan 2013
Location: Shipbourne
Bike: M900
Posts: 1,421
Thanks Utopia
I will try the Acetone - I have 2 x 5 litres of it to clean brushes after laying up CF.
Nylon is an excellent suggestion - just have to research where I can buy 10mm thick sheet.
350TSS is offline   Reply With Quote
Old 23-08-2019, 05:10 PM   #13
Albie
Fanactical volunteer
 
Albie's Avatar
 
Join Date: Oct 2003
Location: Kent
Bike: M900
Posts: 9,033
Quote:
Originally Posted by 350TSS View Post
Thanks Utopia
I will try the Acetone - I have 2 x 5 litres of it to clean brushes after laying up CF.
Nylon is an excellent suggestion - just have to research where I can buy 10mm thick sheet.
Buy a cheap kitchen chopping board for nylon. Some are thick some are thin.
Albie is offline   Reply With Quote
Old 23-08-2019, 06:09 PM   #14
350TSS
Too much time on my hands member
 
350TSS's Avatar
 
Join Date: Jan 2013
Location: Shipbourne
Bike: M900
Posts: 1,421
Good call but too late for me - I paid 35 sobs for a bit 250mm x 250mm - bugger - 1000mm x 500mm was 135 squid
350TSS is offline   Reply With Quote
Old 04-09-2019, 07:07 PM   #15
350TSS
Too much time on my hands member
 
350TSS's Avatar
 
Join Date: Jan 2013
Location: Shipbourne
Bike: M900
Posts: 1,421
Had a week away in Cyprus – brilliant – lazed about and read a lot – “Chickenhawks” about US Huey pilots in Vietnam (not what I expected and very good) and re-read a book I read about 40 years ago “A day in the life of Ivan Denisovic” also compelling and better second time around.
Back in the garage today – even more brilliant.
Tasks planned were all about getting the petrol tank ready to join top and bottom halves so that I can move on to the seat.
First job was to machine out the indents that take the isolation mounts and move the tank rearward by about 10mm so that I can get full lock without recourse to adjusting the lock stops i.e. the frame/front fork tubes are the first point of contact. This took a little while as I needed to ensure the two indents were made a) as far forward as possible in the tank base to give the best chance that the lock stop adjustment was not necessary; b) centrally in relation to the actual location of the isolation mounts on the frame cross member; and c) that in addition to a) and b) the frame bridge did not clash with the tank base near the petrol tap. Points a) and b) were fine. Point c) will require further fettling (grinding out and a couple of layers of CF over the hole), still, better to get it right now than find the tank leaking because the frame bridge has worn a hole in it. Not good to have a hole there either as it is almost directly above the rear cylinder /spark plug.

upload image to url

Second job was to manufacture the “cotton reel” to hold the tank front retaining bungee, a mirror image of the rear tank retaining “cotton reel”. While I was at it I made an 8mm threaded nut out of some 13mm hexagon aluminium bar to secure it on the inside which was bonded in with araldite. Whenever I use a larger diameter hole saw to cut 3, 4, 6 or 10mm plate I always save the bit (washer) formed between the inner side of the cutting edge and the central drill hole. A 3mm thick one about 35mm dia was used to spread the load where the bungee will pull on the CF.

how to host pictures online
Next, I thought about the routeing of the water drain pipe through the petrol tank itself from the filler insert to the outlet pipe alongside the petrol tap. Particularly, how to protect the nitrile pipe from being damaged (holed and allowing water into the petrol tank itself) by the sharp edged CF baffles rigidly attached to the tank base. The problem is that the through pipe (6mm ID) and the joins at either end to the aluminium pipes must be petrol /water proof and the pipe must be resistant to constant immersion in petrol. I thought about using electrical grommets to protect the pipe where it passes through the baffles but rejected this on the grounds that the grommets might slowly chemically break down and the detritus would end up in the float bowls. So the 6mm drain pipe passes through a short length of 10mm bore nitrile rubber pipe bonded to the baffle.
350TSS is offline   Reply With Quote
Reply


Posting Rules
You may not post new threads
You may not post replies
You may not post attachments
You may not edit your posts

BB code is On
Smilies are On
[IMG] code is On
HTML code is Off

Forum Jump


All times are GMT. The time now is 02:59 PM.

vBulletin Skins by vBmode.com. Powered by vBulletin® Version 3.8.3
Copyright ©2000 - 2024, Jelsoft Enterprises Ltd.