UK Monster Owners Club Forum » .: Technical :. » Mods & How To's » Slow Monster rebuild

Reply
 
Thread Tools Display Modes
Old 23-06-2020, 03:09 AM   #1276
350TSS
Too much time on my hands member
 
350TSS's Avatar
 
Join Date: Jan 2013
Location: Shipbourne
Bike: M900
Posts: 1,419
I have been putting off today because I hate working with brake fluid especially when you have finished parts either painted or awaiting painting. The plan was to spend about 3 hours bleeding the clutch, the front brakes and the rear brake.
I started with the clutch, nipped up the banjos, filled the master cylinder and pumped the lever slackening and tightening the bleed nipple above the banjo on the slave cylinder. After 20 minutes no more air appearing so all seemed good.
I then tried the clutch action, permissable free play, then like hitting a brick wall, an absolutely solid lever, no disengagement of the pressure plate. nothing. WTF.
My first thought was that the problem had to do with the alternator case which I previously cracked and had to have welded and the hole for the clutch push rod had to be re-drilled and one of the clutch slave cylinder attachment threads had to be re-tapped. Perhaps it was all misaligned and causing the issue. The slave was removed and the pushrod was free to move. Maybe I had misassembled the clutch itself, so the pressure plate came off and the plates and the hub were taken off and re-assembed. All was fine at that end of the pushrod.
Suspicion then fell on the Chinese slave cylinder so I swapped it for one off the S4 parts bike I bought which I knew worked. But that meant cleaning it up and re-bleeding with the new slave.
The result was the same. A completely solid lever. WTF.
The clutch master cylindeer is definitely pumping fluid, the clutch pipe is definitely delivering fluid, the slave banjo is passing fluid to the bleed nipple above. The banjo /bleed nipple came off the aforementioned S4 mongrel and worked there but, for some reason, in both a brand new Chinese slave and a previously perfectly functioning S4 slave the pistons are not transmitting hydraulic drive to the push rod. My only thought was that the pistons in both cylinders were too far withdrawn and that somehow the piston skirt was blocking the entry port for the brake fluid to get into the cylinder and behind the piston.
Stumped, I left a bungee cord applying pressure to the lever to see if magicallly, overnight the problem would disappear.

Last edited by 350TSS; 23-06-2020 at 04:08 AM..
350TSS is offline   Reply With Quote
Old 23-06-2020, 04:05 AM   #1277
350TSS
Too much time on my hands member
 
350TSS's Avatar
 
Join Date: Jan 2013
Location: Shipbourne
Bike: M900
Posts: 1,419
Next I turned my attention to the front brakes. I spent a solid hour cracking the bleed nipple on the furthest caliper, pulling the brake lever to the bars, closing the bleed nipple, releasing the brake lever and waiting 10 or fifteen seconds for the bubbles to rise through the master cylinder. I knew it was going to be painfull as the sytem was completely dry to start with. At the end of an hour I had not needed to refill the master cylinder despite seeing a stream of bubbles every time.
A long time ago I used to work on cars quite a bit and have bought over the years 3 "easy" bleed tools.
1. Gunsons - working off tyre pressure forcing fluid through a reservoir into the master cylinder via a sealed cap - this is no good as none of the available caps fit a motorcycle master cylinder.
2. A hand pumped system that creates a vacuum and draws the fluid through from the manually topped up master cylinder (between the bleed nipple and the vaccum pump there is a reservoir to capture the fluid before being drawn into the vacuum pump), and
3. A system that works off an air line and works rather like a spray gun, blowing the compressed air across a venturi that creates a vacuum that draws the fluid from the manually topped up master cylinder into a "paint kettle" below the venturi.
If you are a designer working for a manufacturer of easy bleed systems you only have one job, which has two parts a) to make sure the system has an adequate seal to all the various types of bleed nipple available on any vehicle (including motorcycles) and b) to make sure that the reservoir for brake fluid has sufficient stability to overcome the tendency for the necessary pipework to overturn said reservoir.
The designers of both the the systems I have purchased need to go back to school or at least try their product out on a motorcycle.
I tried item 2 above first. It would hold a vacuum provided you did not move the pipe attached to the bleed nipple which is virtually impossible whilst you are vigorously generating the vacuum with the hand pump. When the flimsy reservoir tipped up and emptied its contents into the hand vacuum pump end of the equipment and started spraying me and everything in the vicinity with brake fluid out of the back end of the pump I switched to number 3.
This was marginally more successful and would probably work very well with 15cfm air supply, unfortunately I only have about 10cfm. The system is very air hungry and draws a lot of fluid.
After running it for about an hour I had used 3 litres of brake fluid and still had no brake lever.
The problem really I think is that drawing the air downwards through the fluid is not the way to go. Air naturally wants to rise in brake fluid and if the bleed nipple was at the master cylinder end (top) of the system I think it would have worked.
So 5 hours in the garage, no clutch system, no front brake and I haven't even started to work on the rear brake. Not a great day

Last edited by 350TSS; 23-06-2020 at 04:11 AM..
350TSS is offline   Reply With Quote
Old 23-06-2020, 09:54 AM   #1278
Luddite
Registered User
 
Luddite's Avatar
 
Join Date: Aug 2011
Location: Southampton
Bike: M1100evo
Posts: 2,465
I share your frustration regarding bleeding brakes, Richard!

I recently switched to a Mityvac, (which I presume is the type described at point 2 in your list). Although the hose adapter created a perfect seal over the nipple, (confirmed by creating a vacuum on the closed nipple that didn't reduce at all despite jiggling the adapter), I found that, as soon as the nipple was opened, air was drawn in past the threads. However, a small amount of PTFE tape seals the threads nicely and the pump worked perfectly after that.


As for keeping the reservoir from tipping, I supported the pump upright in an old vice, which had the added benefit of allowing you to continually top up the master cylinder without having to stop.


More details here:
http://www.ukmonster.co.uk/monster/s...ad.php?t=58090
Luddite is offline   Reply With Quote
Old 23-06-2020, 12:52 PM   #1279
350TSS
Too much time on my hands member
 
350TSS's Avatar
 
Join Date: Jan 2013
Location: Shipbourne
Bike: M900
Posts: 1,419
Two hours in and I have working brakes at both ends and a working clutch. Thanks Luddite.
Tried the PTFE tape and it worked a treat, front brakes all bled within 20 minutes. The rear took a little longer as the system was completely dry and a miniscule master cylinder in an awkward to reach spot.
Clutch problem also sorted. The issue was of course the missing 10mm spacer required on later slave cylinders. What I thought was some form of hydraulic lock was in fact the piston completely at the end of its travel within the slave cylinder.
I may yet have a problem with the clutch as the stack height was more than the recommended 38mm and I appear to have a dragging clutch with the pressure plate fully disengaged (turning by hand only). I will have to hunt through all my second hand plates to see if I can find a couple of 1.5mm steel ones to put in insted of the 2mm steel ones
350TSS is offline   Reply With Quote
Old 23-06-2020, 07:22 PM   #1280
Pedro
Ciao, come stai?
 
Pedro's Avatar
 
Join Date: Apr 2003
Location: Somewhere
Bike: Multiple Monsters
Posts: 4,157
Only thing I have to say about bleeding brakes is get Stalhbus bleed nipples, not cheap granted but makes an empty system to fully bled a five minute job

http://www.stahlbus.com/products/en/...stem/index.php
__________________
M900 - 1993!
Monster 1200R!
Pedro is offline   Reply With Quote
Old 23-06-2020, 08:02 PM   #1281
Davy
Registered User
 
Davy's Avatar
 
Join Date: Aug 2007
Location: Derry
Bike: M900
Posts: 358
Quote:
Originally Posted by Pedro View Post
Only thing I have to say about bleeding brakes is get Stalhbus bleed nipples, not cheap granted but makes an empty system to fully bled a five minute job

http://www.stahlbus.com/products/en/...stem/index.php
They look the dogs dangleys
__________________
1994 M900 Black
Davy is offline   Reply With Quote
Old 23-06-2020, 08:13 PM   #1282
Pedro
Ciao, come stai?
 
Pedro's Avatar
 
Join Date: Apr 2003
Location: Somewhere
Bike: Multiple Monsters
Posts: 4,157
Quote:
Originally Posted by Davy View Post
They look the dogs dangleys
They are, makes life sooooo much easier
__________________
M900 - 1993!
Monster 1200R!
Pedro is offline   Reply With Quote
Old 28-06-2020, 06:25 PM   #1283
350TSS
Too much time on my hands member
 
350TSS's Avatar
 
Join Date: Jan 2013
Location: Shipbourne
Bike: M900
Posts: 1,419
After last week's minor success with hydraulics, this week was a week of setbacks. No one to blame but myself but that is sometimes how it goes.
Ten days ago I was advised that my LED headlamp was in the country - it is still not with me and a suspect I shall get a card through the door asking for customs' duties. My glass is always half empty.

In the headlamp's absence i decided to try to re-re-make the instrument glass - 2 more Fails (both cracked when I tried to put the 22 degree bend in them) convinced me the acrylic material (Wickes replacement window "glass") was the wrong stuff. I bought some face shields but they were COVID grade face protectors and far too flimsy (and only just transparent). They might come in handy for the second wave. I did win some browny points as my wife thought I was thinking of the family instead of that "bloody bike". Fail #4.
I have now ordered Lexan polycarbonate 2mm which I should have used in the first place.

I then turned my attention to the escutcheons (moulded from the cam bearing end cap logo) tp be used to secure the over seat strap that hides the gap between the hump and the glove box enclosure in the seat hump.
After 6 attempts I had two that were presentable and had cured to a satisfactory hardness. A number never cured properly, I think there is somethng in plasticine that reacts with laminating resin (and Araldite Rapid) that stops the curing taking place. I cut up some clips from an old drawer runner but when I presented it to the seat it just looked completely NAF so that idea was scrapped.


With nothing better to do I thought I should connect the battery and test all my wiring.
Initially hardly anything worked except the LH indicator.
After a bit of twiddling most circuits are now OK but the MU unit threw me for some time as it has a latching logic (presumably designed to work with their expensive push button controls (which I do not want as they require fairly large holes (8mm) being drilled in the handlebars as I am not comfortable with Swiss cheese clip-ons).
I still have no discernable life in the TV monitor or the starter solenoid and worryingly the low beam wire to ther headlamp is permanently live independent of the light switch or the ignition switch. Puzzling . Fail # 5 to ??????? who knows with electrics?
350TSS is offline   Reply With Quote
Old 02-07-2020, 07:22 PM   #1284
350TSS
Too much time on my hands member
 
350TSS's Avatar
 
Join Date: Jan 2013
Location: Shipbourne
Bike: M900
Posts: 1,419
Got the card from Fedex asking for an advancement fee of £12 and duties of £32.59 so £44.59 so that they can send me my Chinese LED headlamp.
When I looked into it more closely they had assessed the goods value as $161.03 - and charged 20% VAT on the assessed value.
They also stated that the package weight was 7.9 kg. The box must have been built to keep out Kryptonite.
A terse e mail was sent asking for a realistic assessment of price and weight with firm expectation of a significant reduction.
I still do not have my headlamp though and being over charged £20 to £30 would almost be worth it to have it here so I can finish the bike.
I have spent the last couple of weeks (rather half-heartedly) testing the electrics and the results have been decidedly depressing. I was getting inconsistent results, test one circuit - OK - test another N0 OK - test the first circuit again - no OK - but the second circuit when tested again - OK. Also the M Unit seems to have a latching logic within it so to turn something off (LH indicators for example) you had to go through every possible combination of switch position and turning it on again actually turns it off. I think this is re-settable as the unit is delivered to work with latching pushbuttons but can work with a normal switch. I was always hoping to get all the circuits working before attempting the re-set but with contradictory and somewhat random results from my testing I was getting nowhere.
Today I took a big decision to start again from scratch on the wiring and spent about 4 hours removing the harness, all the tape and all the bits I spent ages designing and making to fit it all together. All scrapped now

I was never happy with the original arrangement - too congested, looked bloody awful, a nightmare to maintain and I suspect likely to be unreliable.
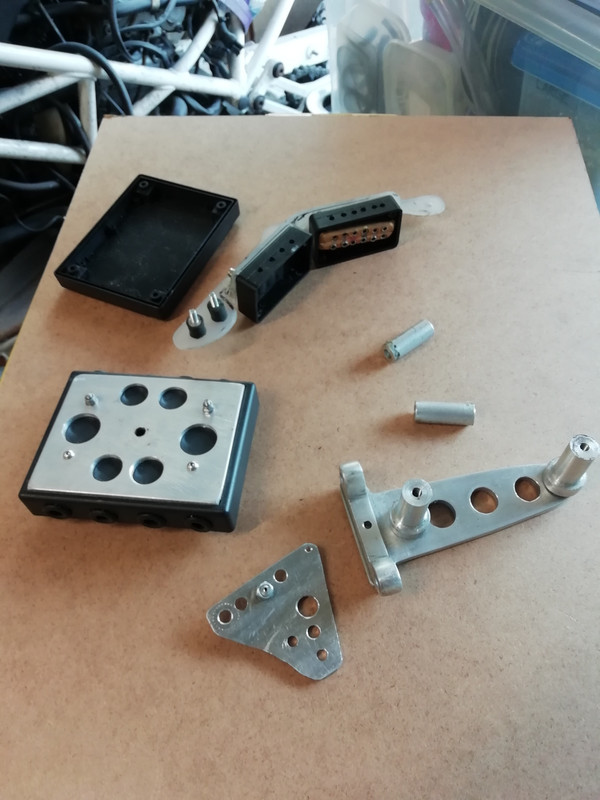
In my head I have designed it. Effectively I have moved the M Unit in front of the steering head in front of the instrument nacelle. I will save 2 connection boxes and by additionally by also rationalising the earth wiring about half the number of wires going around the steering head. The bundle of knitting near the battery will be eliminated. Just got to do it now.
As a footnote just as I was packing up I thought I would test the camera and monitor one more time, first, quite by accident, I discovered my test link wire (2 x crododile clips on about 500mm of wire) was defective (broken internally to the insulation). No wonder all my testing was producing odd results, second when I worked that out I found the link wiring between the camera and the monitor was open circuit.
Its a good job it is not good painting weather as I have about 30 hours of re-wiring to do now.
350TSS is offline   Reply With Quote
Old 15-07-2020, 09:37 AM   #1285
350TSS
Too much time on my hands member
 
350TSS's Avatar
 
Join Date: Jan 2013
Location: Shipbourne
Bike: M900
Posts: 1,419
The bike is now almost re-wired, it was not without its tribulations and I am sure there will be more to come.
I used 5 core cable to the tail light and 7 core cable around the headstock and if I say so myself aft of the headstock now looks quite tidy. The MU unit is now in front of the instruments and all the mess has simply migrated forward however there is more space there and the dash board should hide it all from view.

I do not have a neutral light nor a oil pressure light yet but the horn, brake lights, side lights, instrument lights all work as they should. The headlamp and dip and flasher seem a bit haphazard sometimes working and sometimes not. It maybe the latching of the switches within the MU as the LH switch is now definitely working as it should.
With some trepidation I took the LH switch apart expecting all manner of springs and tiny electrical bits to fall on the garage floor, but no, it came apart easily and is actually nicely engineered. I did find that the screw that provides the vertical pivot for the indicator button latch was slightly undone and could have been grounding on the handlebars.

I cannot yet test the full system as the LED headlamp is still with Fedex. They kindly advised me that they would charge me £53 + VAT if they discovered that the lading bill mistake was not their fault and they had to take the matter up with HM Customs. I emailed back that I thought that such a large charge could be construed as a penalty (being almost 100% of the value of the goods) and as such was not enforceable in English law. I also pointed out that withholding delivery of goods which were not their property pending payment of a penal sum could be considered as extortion which is a criminal offence. I still do not have the LED headlamp though so I cannot wire it or work out how it fits inside the headlamp shell or how it interfaces with the fly-screen.

I gave up in my original rear view camera and monitor as the coax cable was definitely kaput and I couldn't find a suitable alternative and I did not feel confident to repair it satisfactorily. I ordered a wireless one instead and await customs difficulties on that as well.

Today I shall be seeing what is wrong on the oil pressure and neutral circuits then clearing the garage to erect the paint booth. Unfortunately there is a very heavy ZX9R with two seized 6 pot Tokico calipers in the way.

Last edited by 350TSS; 15-07-2020 at 09:41 AM..
350TSS is offline   Reply With Quote
Old 16-07-2020, 07:33 PM   #1286
350TSS
Too much time on my hands member
 
350TSS's Avatar
 
Join Date: Jan 2013
Location: Shipbourne
Bike: M900
Posts: 1,419
Some good news and some bad news today.
The LED headlamp arrived, I didn't pay any extra charges or duty and it is intact and seems to work as advertised. Sometimes it pays to be objectionable.
The bad news was that before setting up the paint booth I thought I had better just test the tank with some of Esso's finest. It did a reasonable impression of a collander. One leak around the plate which the fuel tap seats on and another almost as bad further forward on the underside. I only got about 2 gallons in before I abandoned the test. I think the tank will hold about 5 gallons. Worryingly, there was evidence of further vapour seepage higher on the flanks and shoulders of the tank. So I drained about 1.5 gallons and I left it with a fan heater blowing cold air over the top of the filler cap hole. I have ordered another batch of Caswell's ethanol proof tank sealer.
I charged up my battery and pressed the starter. Nice clicking noise from the solenoid but no engine cranking. I ran a lightweight (11 amp) lead to the positive terminal on the case of the starter and earthed the casing of the starter and it cranked (albeit slowly) and the 2.5mm wire got hot quite quickly, I am a bit puzzled by this and tomorrow will try a HD battery lead. I think the solenoid must not be making a proper connection even though it is definitely reacting to the starter button.
350TSS is offline   Reply With Quote
Old 17-07-2020, 05:23 AM   #1287
Darren69
Transmaniacon MOC
 
Darren69's Avatar
 
Join Date: Sep 2013
Location: Sutton In Ashfield
Bike: Multiple Monsters
Posts: 6,022
Quote:
Originally Posted by 350TSS View Post
Some good news and some bad news today.
The LED headlamp arrived, I didn't pay any extra charges or duty and it is intact and seems to work as advertised. Sometimes it pays to be objectionable.
The bad news was that before setting up the paint booth I thought I had better just test the tank with some of Esso's finest. It did a reasonable impression of a collander. One leak around the plate which the fuel tap seats on and another almost as bad further forward on the underside. I only got about 2 gallons in before I abandoned the test. I think the tank will hold about 5 gallons. Worryingly, there was evidence of further vapour seepage higher on the flanks and shoulders of the tank. So I drained about 1.5 gallons and I left it with a fan heater blowing cold air over the top of the filler cap hole. I have ordered another batch of Caswell's ethanol proof tank sealer.
I charged up my battery and pressed the starter. Nice clicking noise from the solenoid but no engine cranking. I ran a lightweight (11 amp) lead to the positive terminal on the case of the starter and earthed the casing of the starter and it cranked (albeit slowly) and the 2.5mm wire got hot quite quickly, I am a bit puzzled by this and tomorrow will try a HD battery lead. I think the solenoid must not be making a proper connection even though it is definitely reacting to the starter button.
It should work ok with bigger wires. If they're getting hot then no current can flow or not enough.
__________________
Roast Beef Monster!

Termignoni and Bucci - Italian for pipe and slippers!

S4 Fogarty, S4R 07T, 748, Series 1 Mirage
Darren69 is offline   Reply With Quote
Old 17-07-2020, 05:55 AM   #1288
350TSS
Too much time on my hands member
 
350TSS's Avatar
 
Join Date: Jan 2013
Location: Shipbourne
Bike: M900
Posts: 1,419
Darren the big wires are all installed and the starter does not crank when the button is pressed. The solenoid clicks when the button is pushed but no starter cranking. I tested all the internal wiring to the starter before re-assembling it, pole to pole on the commutator and the windings inside the case. Also when I accidentally dropped a 10mm socket and it fell across the solenoid HD battery/starter connections the motor cranked over.
The test with the thin wire was just to confirm that the starter had not suffered any damage and still turned over.
So I definitely have power to solenoid (because it clicks), the HD lead from the solenoid to the starter is good (200 amp welding cable) and the starter motor turns over on 11 amp wire so I can only conclude that the solenoid whilst clicking is not making the actual connection between the input and output HD cables. It was a cheap Chinese one supposedly for a Kawasaki VX1800 cruiser chosen because a) it was the smallest size b) the solenoid was supposedly capable of taking enough current to fire up a big V twin c) it was cheap and d) it did not have the horrible low tension Ducati (semi) connector. Probably a lesson in there somewhere.
Today, I will refit the old Ducati one but it will need a new mounting bracket and the connections made up (probably solder directly to the OEM Hitachi/Ducati terminal pins then heat shrink sleeving between the pins and heat shrink sleeving over the two incoming wires to provide a mechanical support ot stop them coming out).
350TSS is offline   Reply With Quote
Old 17-07-2020, 11:15 AM   #1289
Darren69
Transmaniacon MOC
 
Darren69's Avatar
 
Join Date: Sep 2013
Location: Sutton In Ashfield
Bike: Multiple Monsters
Posts: 6,022
Ok, could be the solenoid then. You could (very carefully) put a screwdriver or something similar across the two poles of the solenoid and see if that cranks better. That way you could rule out anything inside the solenoid itself being duff.
__________________
Roast Beef Monster!

Termignoni and Bucci - Italian for pipe and slippers!

S4 Fogarty, S4R 07T, 748, Series 1 Mirage
Darren69 is offline   Reply With Quote
Old 17-07-2020, 11:41 AM   #1290
slob
.
 
slob's Avatar
 
Join Date: Jul 2003
Location: East London
Bike: Multiple Monsters
Posts: 9,707
have you connected the LT wires backwards?
that would give you a ‘click’ while the contactor plate moved away from the HT contacts...
slob is offline   Reply With Quote
Reply

Thread Tools
Display Modes

Posting Rules
You may not post new threads
You may not post replies
You may not post attachments
You may not edit your posts

BB code is On
Smilies are On
[IMG] code is On
HTML code is Off

Forum Jump


All times are GMT. The time now is 11:02 AM.

vBulletin Skins by vBmode.com. Powered by vBulletin® Version 3.8.3
Copyright ©2000 - 2024, Jelsoft Enterprises Ltd.